
Valentine's Day
Graham Brooks

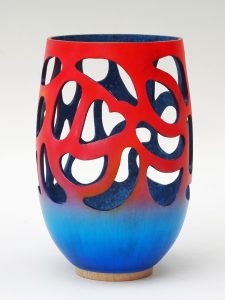
Most of the shaping to the outside was carried out first until I was satisfied with the profile. Then the inside was carefully hollowed out, working progressively downwards to leave a thickness of around 3mm. After sanding the inside, a few final cuts down the outside were made to reduce the thickness to 2mm.
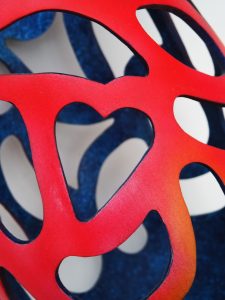
Rather than the very small voids most commonly produced by piercing, I chose much larger cut outs, which give a different effect and which were quicker and easier to smooth off, because a mini drum sander could be used to assist. In some of my pierced bowls I have included disguised names within the piercing pattern of pieces that were for anniversary gifts. For this piece I included a special void shape, that could easily be missed, unless carefully inspected.
The sycamore grain was very plain, so I decided to add colour. An airbrush was used for the outside, starting with blue, darker at the base and lighter further up, where it was blended with the red. Acrylic blue paint was applied by brush to the inside surface and to the inside perimeter of the voids. Darker blue was then applied with a sponge to provide a contrasting fleck appearance.
The rim had deliberately been left taller to add strength and minimise the risk of breakage. To finish, it was sanded down to a better level. The top edge of the rim, together with side and underside of the base were left uncoloured to show the bare wood. A finish of acrylic satin lacquer was applied.
Stuart Clarke
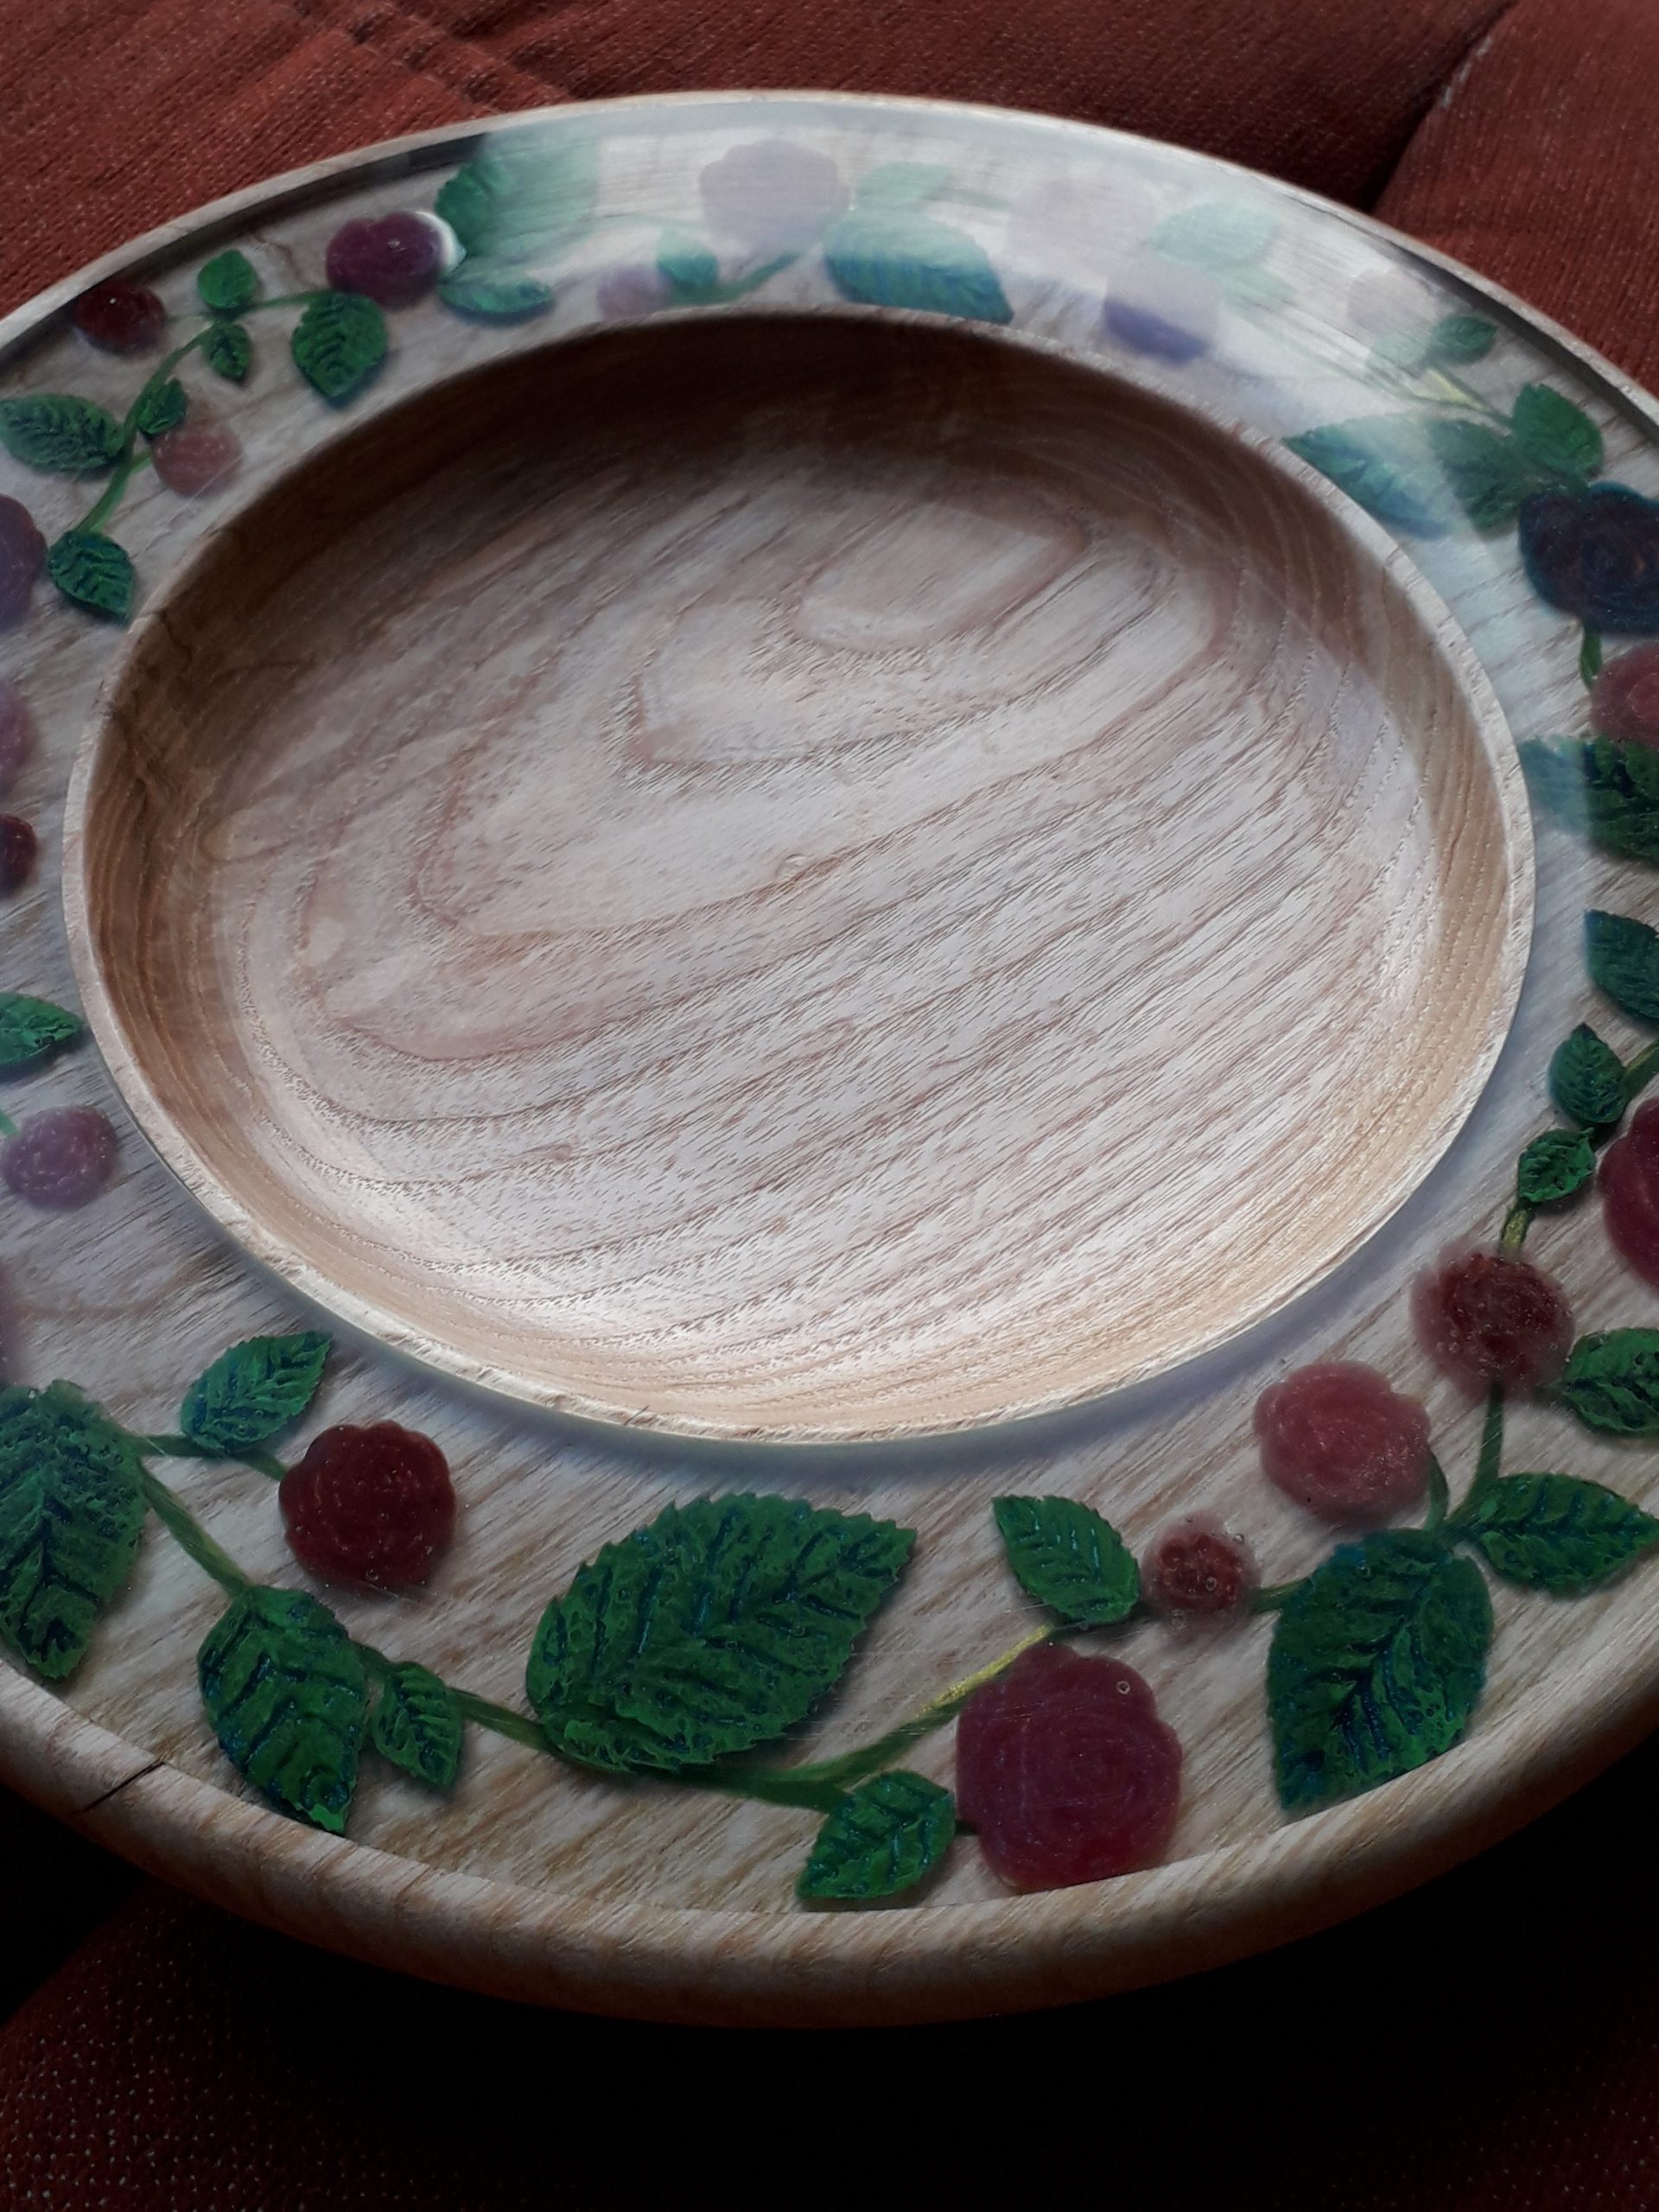
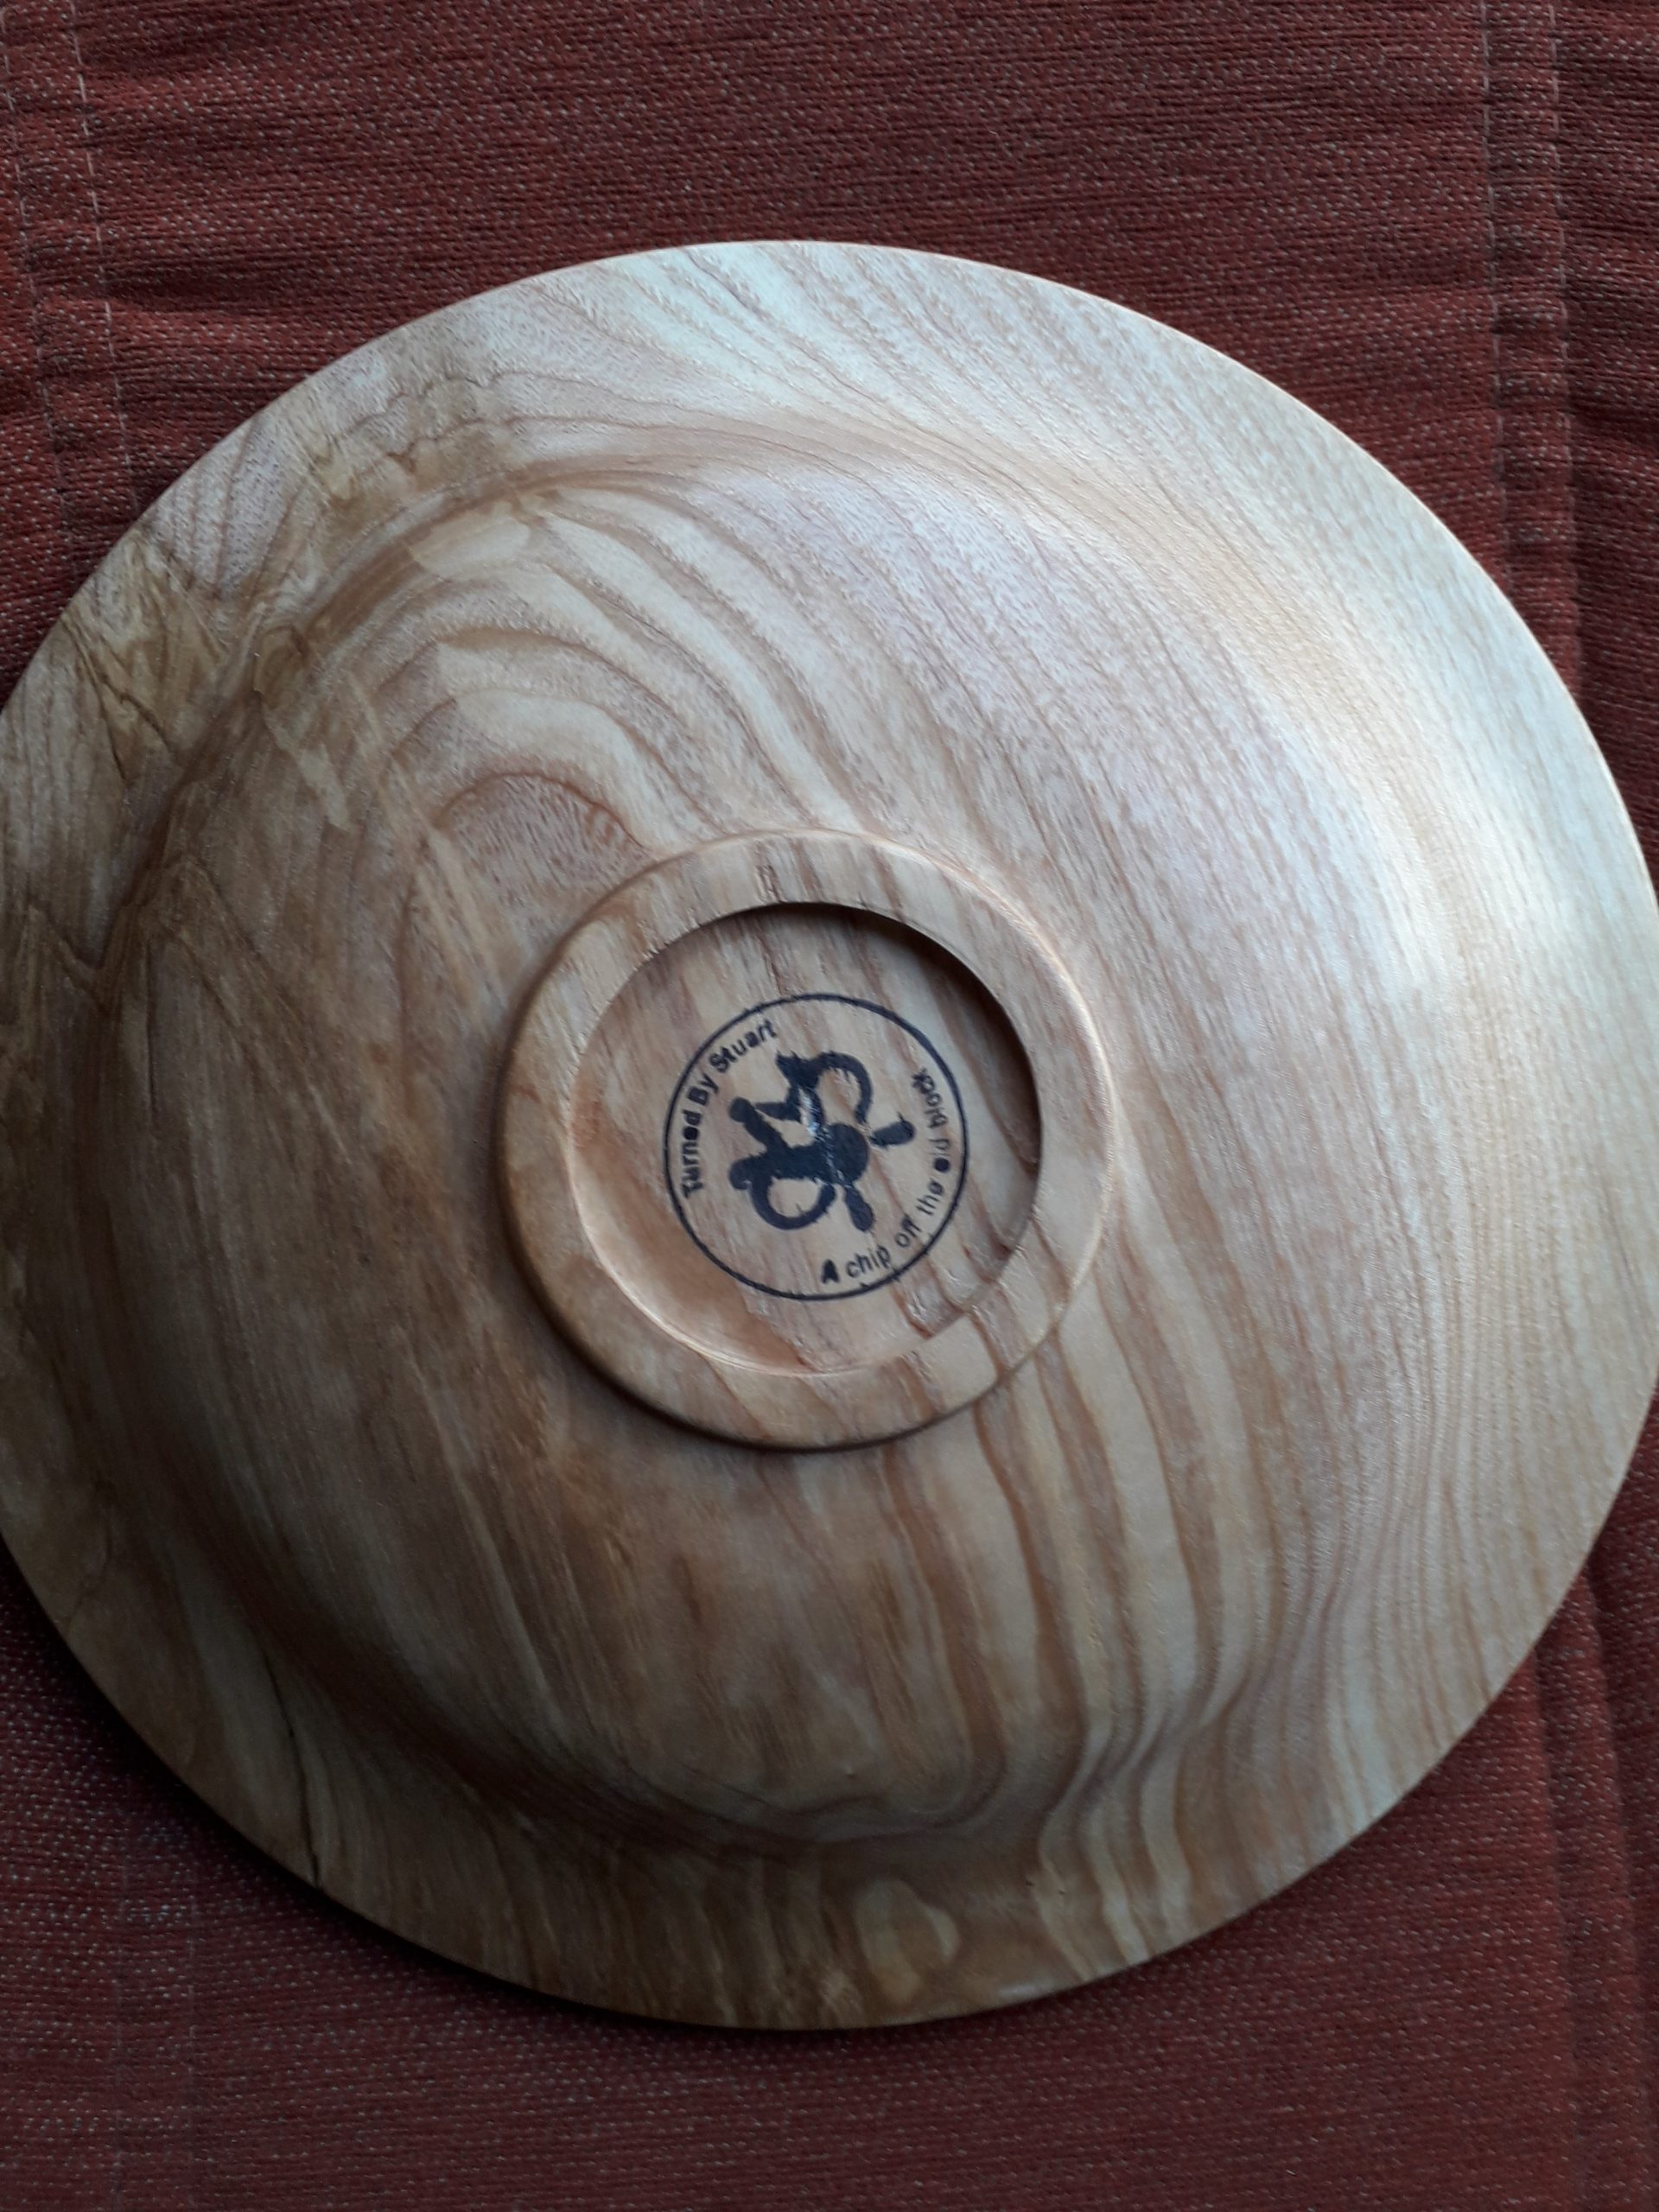
I particularly like the shape and form of a wide rimmed platter and turned my first one over a number of evening classes with Mary Ashton in December 2019, closely followed by this one created in my humble shed in January 2020 for my wife for Valentine’s Day.
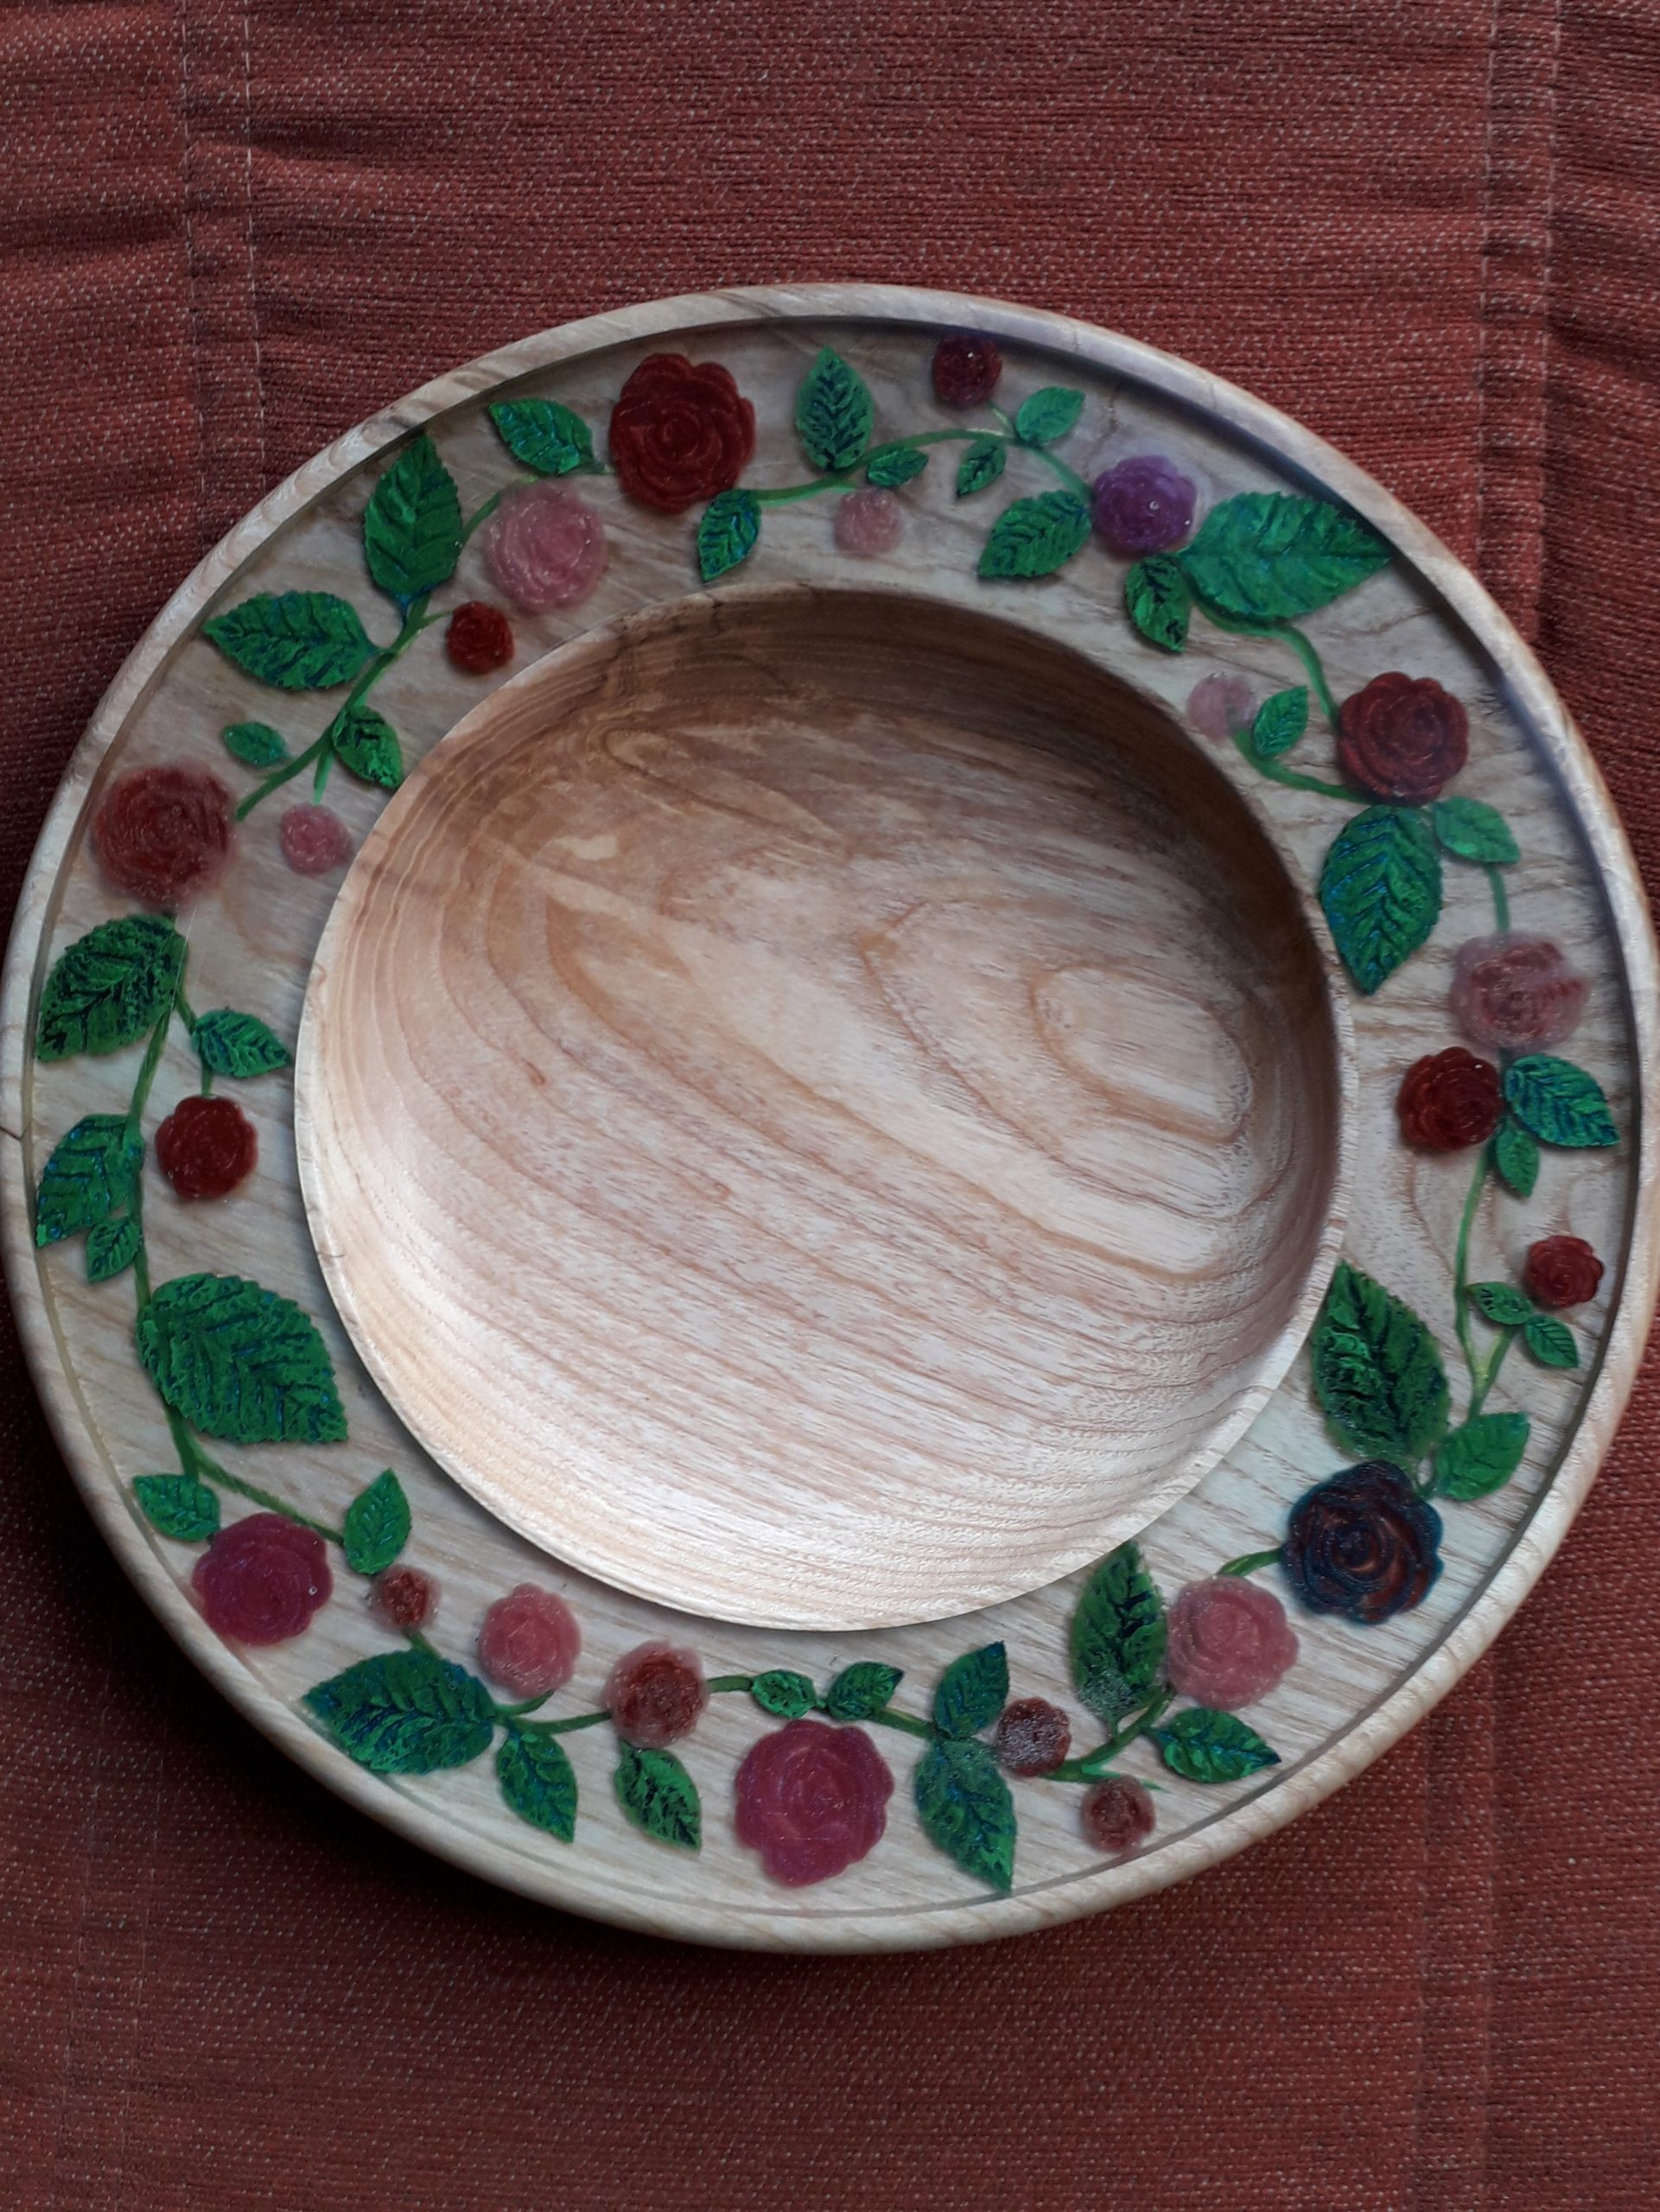
I love the look and feel of natural wood but also greatly appreciate the addition of colour by various mediums and the creative affects you can obtain using resin and therefore wanted to combine these elements using this gorgeous Ash blank, with the final piece measuring about 24cm diameter with 4cm depth.
With the skills learned at evening class and using mainly a half inch bowl gouge, a parting tool and a skew I was able to turn the underside giving it an ogee effect curve with an inset recess for chuck mounting. The personalised icon in the recess is a simple ink stamp. After sanding to 240 grit, applying sanding sealer and working a sanding paste it was finished off with a simple woodturner’s wax and buffed to a shine.
Reversing in the chuck I first cut the face to a smooth flat finish using the bowl gouge and a swept back spindle gouge to sheer scrape, rounding off the outer edge to meet the underside, and then cut the channel in the outer rim about 5m deep and 4cm wide with a parting tool and skew, which was then sanded to 240 but nothing else.
The flowers and leaves are individually made from a two-part epoxy resin with the addition of various coloured powders and using cheap silicon molds. The leaves seemed a little plain so I also dry brushed these with an acrylic paint to give some depth and variation and also painted on the winding stem/vine to the base of the trough.
I very thin layer of clear resin was applied to the trough and the leaves and flowers arranged along the vine and allowed to set for several hours to fix in place before topping up with more clear resin to the rim. I would have benefitted from a pressure pot at this point because, despite efforts to release any bubbles, several remained unobserved amongst the folds of the flowers and set in place forever!
Several days later, allowing the resin to thoroughly harden, I turned out the bowl and also had to make light cuts to the trough’s wood rim to level off with the resin where the meniscus effect was apparent. The whole face was then sanded, with additional sanding of the resin part to about 600 grit, followed by sanding sealer, a sanding paste and a woodturners wax applied over all then buffed to a shine.
Winner of January Competition
Graham Brooks – Instagram @grahambrooks64
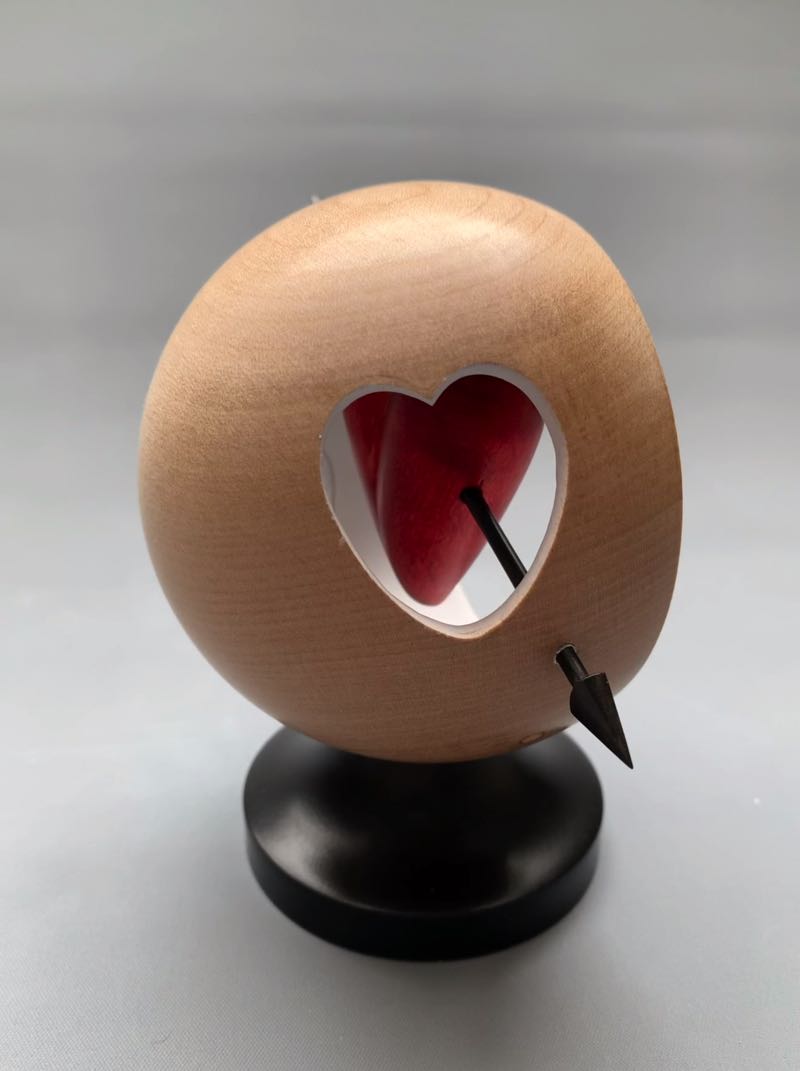
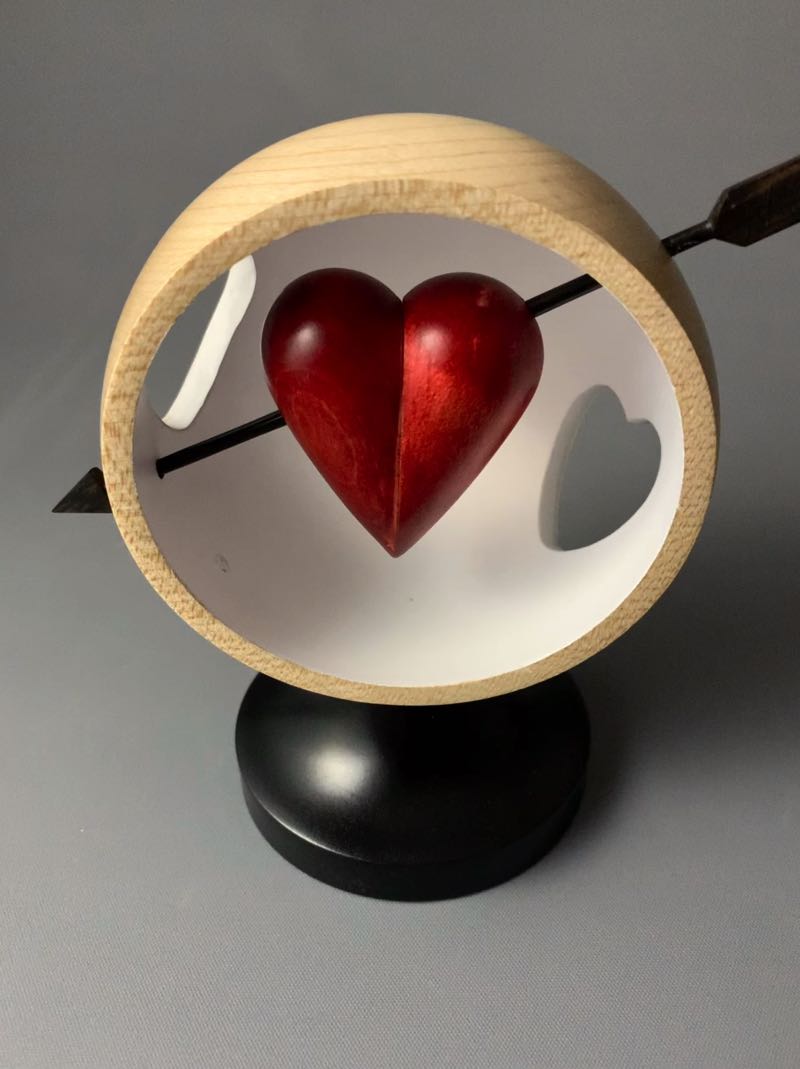
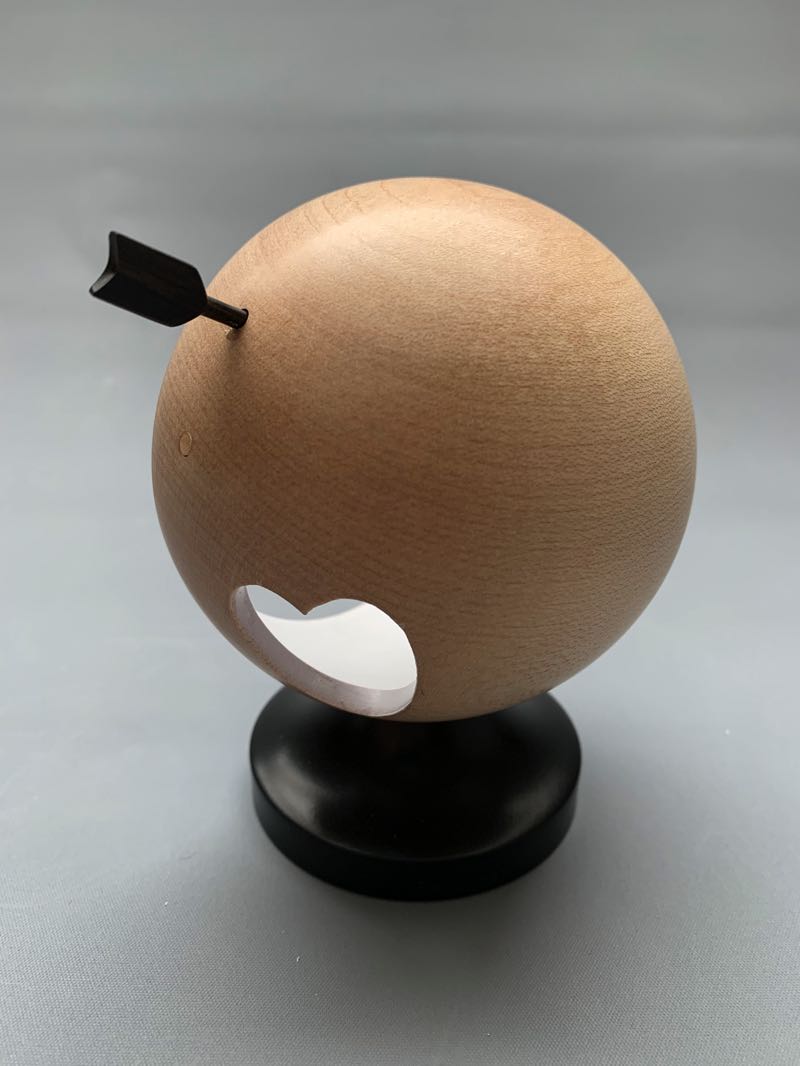
I wanted to show a hart representation suspended within a form and finally decided on a hollowed sphere with the hart being suspended via an arrow. The hart shaped piercings were introduced for added interest, provide visibility to the rear of feature hart and lighten the background. The sphere was hand turned with the aid of shop made cup chucks and was held for hollowing in a purpose made ‘donut’ chuck.
The arrow was turned from African Blackwood and the remainder of the piece is Sycamore.
The arrow was finished natural using the three stage buffing system. The hart was stained with Chestnut spirit stain and satin lacquer before being finished with the three stage buffing system. The interior of the sphere has multiple coats of white acrylic matt spray paint. The exterior of the sphere had a coat of acyclic sanding sealer and once again the three stage buffing system. The plinth was finished in Chestnuts ebonising lacquer.
I was concerned about the strength of the connections between the sphere and the arrow, wanting both the arrow and the sphere wall to be as thin as possible and settled on 3mm for the arrow and 4.5mm for the sphere. Fortunately these dimensions provided just enough glue area. The order of assembly/gluing / and support for the joints sphere/arrow/ hart also took some thought and planning.
Lillo Pisano – @lillopisano on Instagram
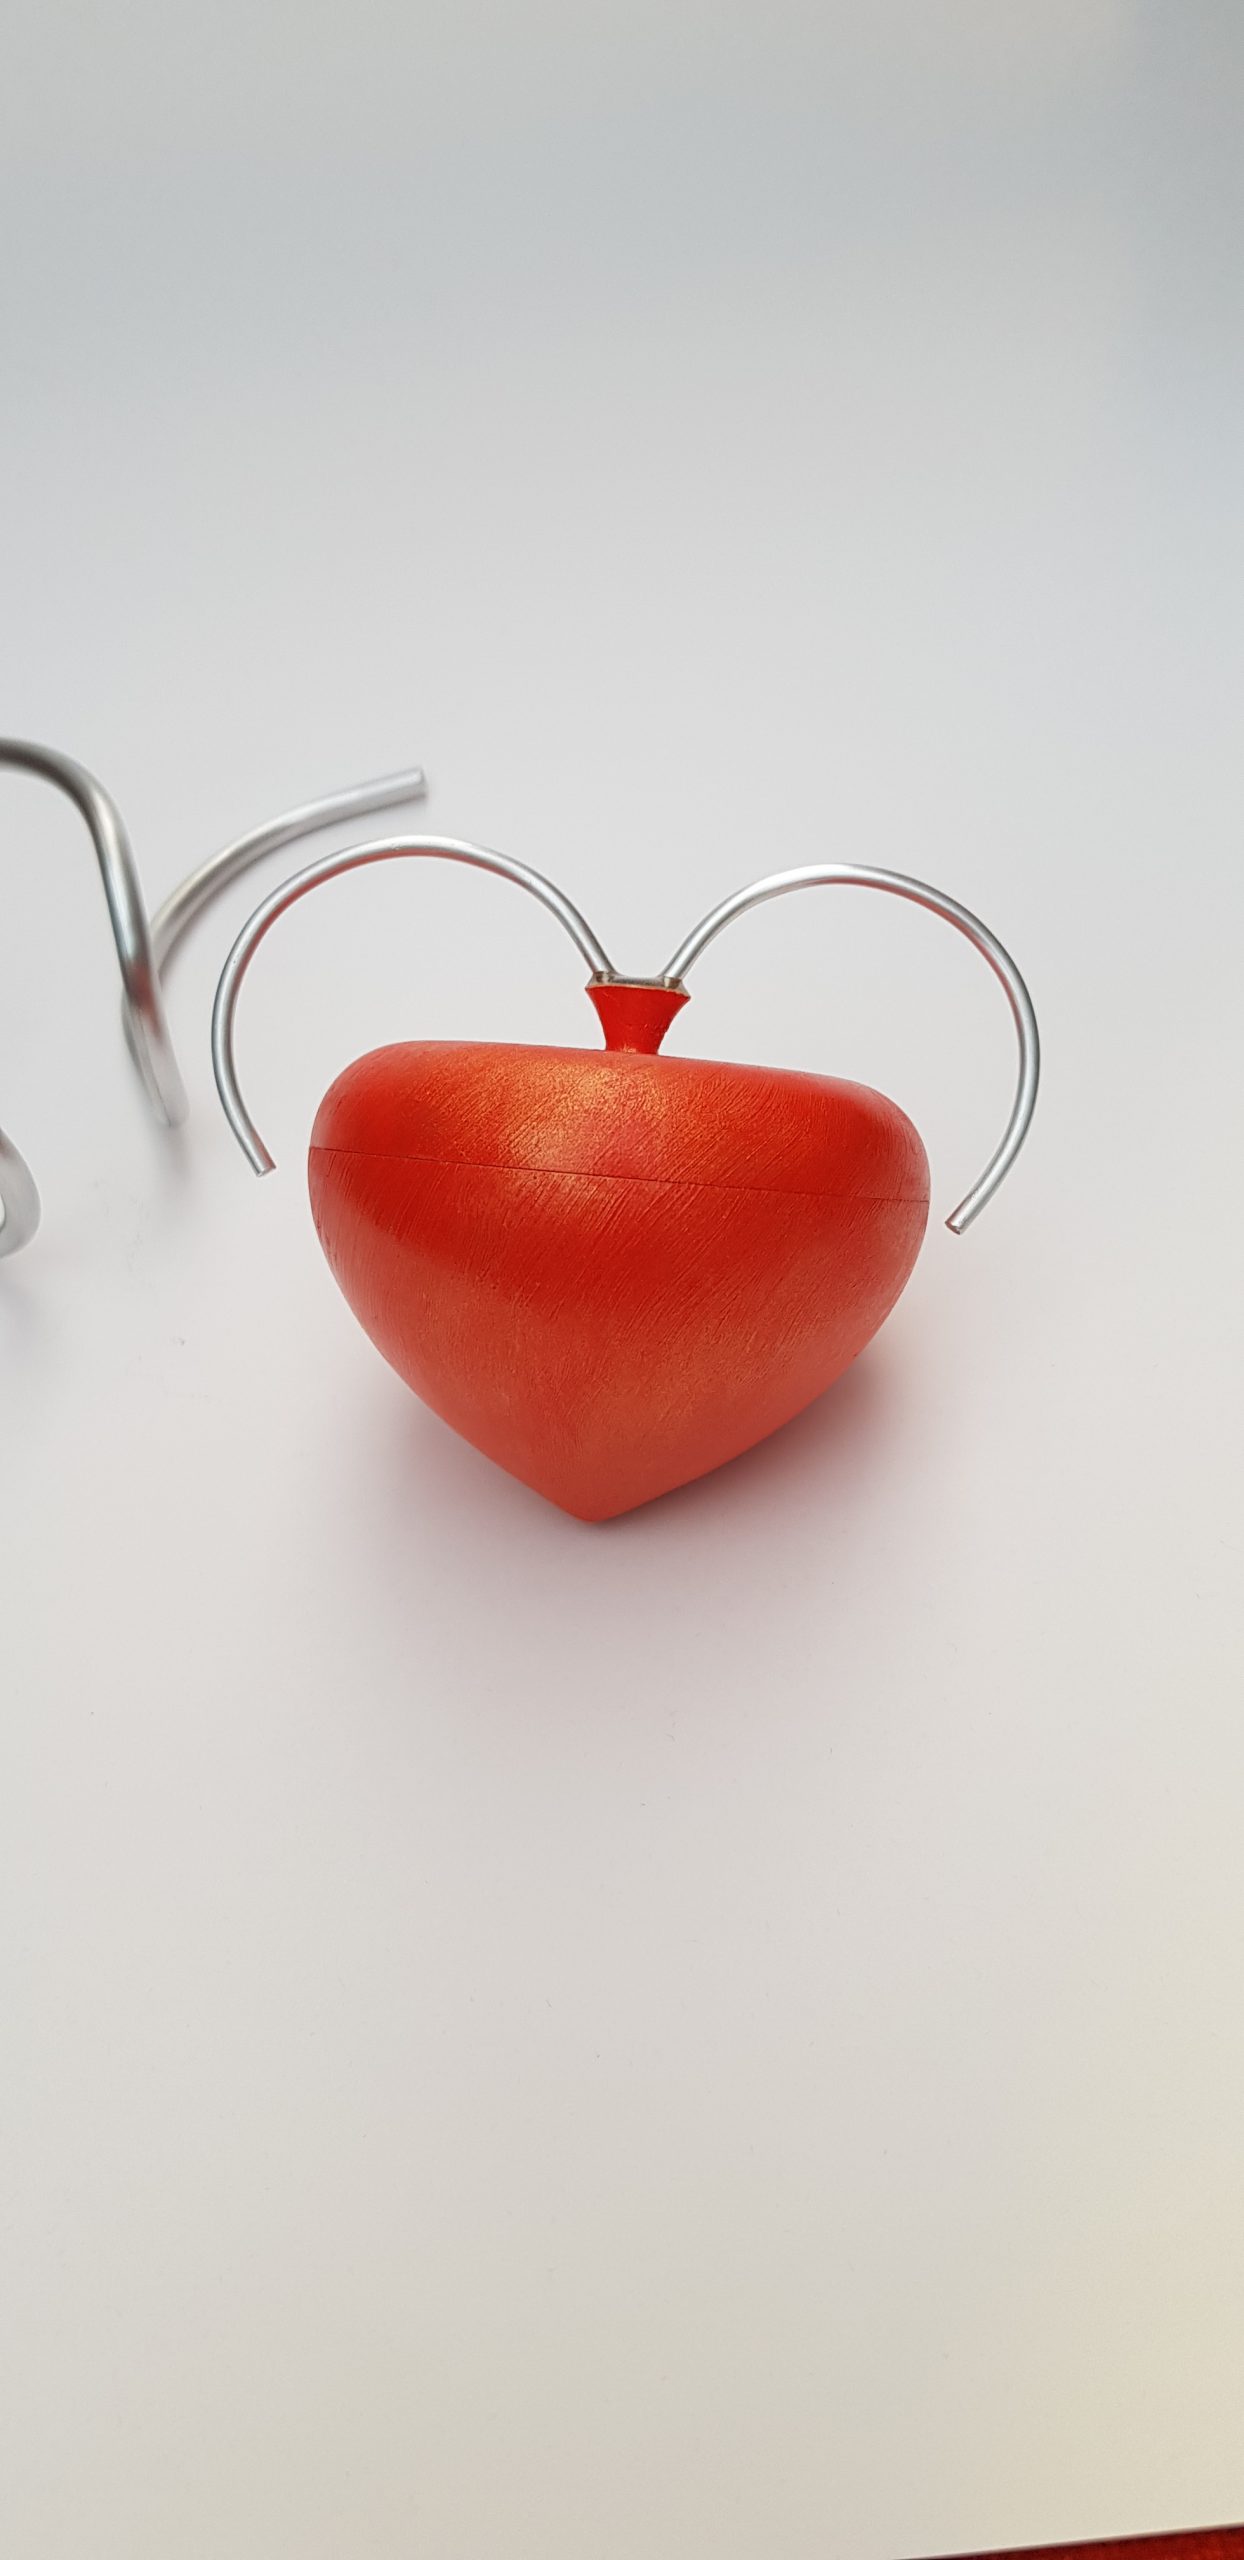
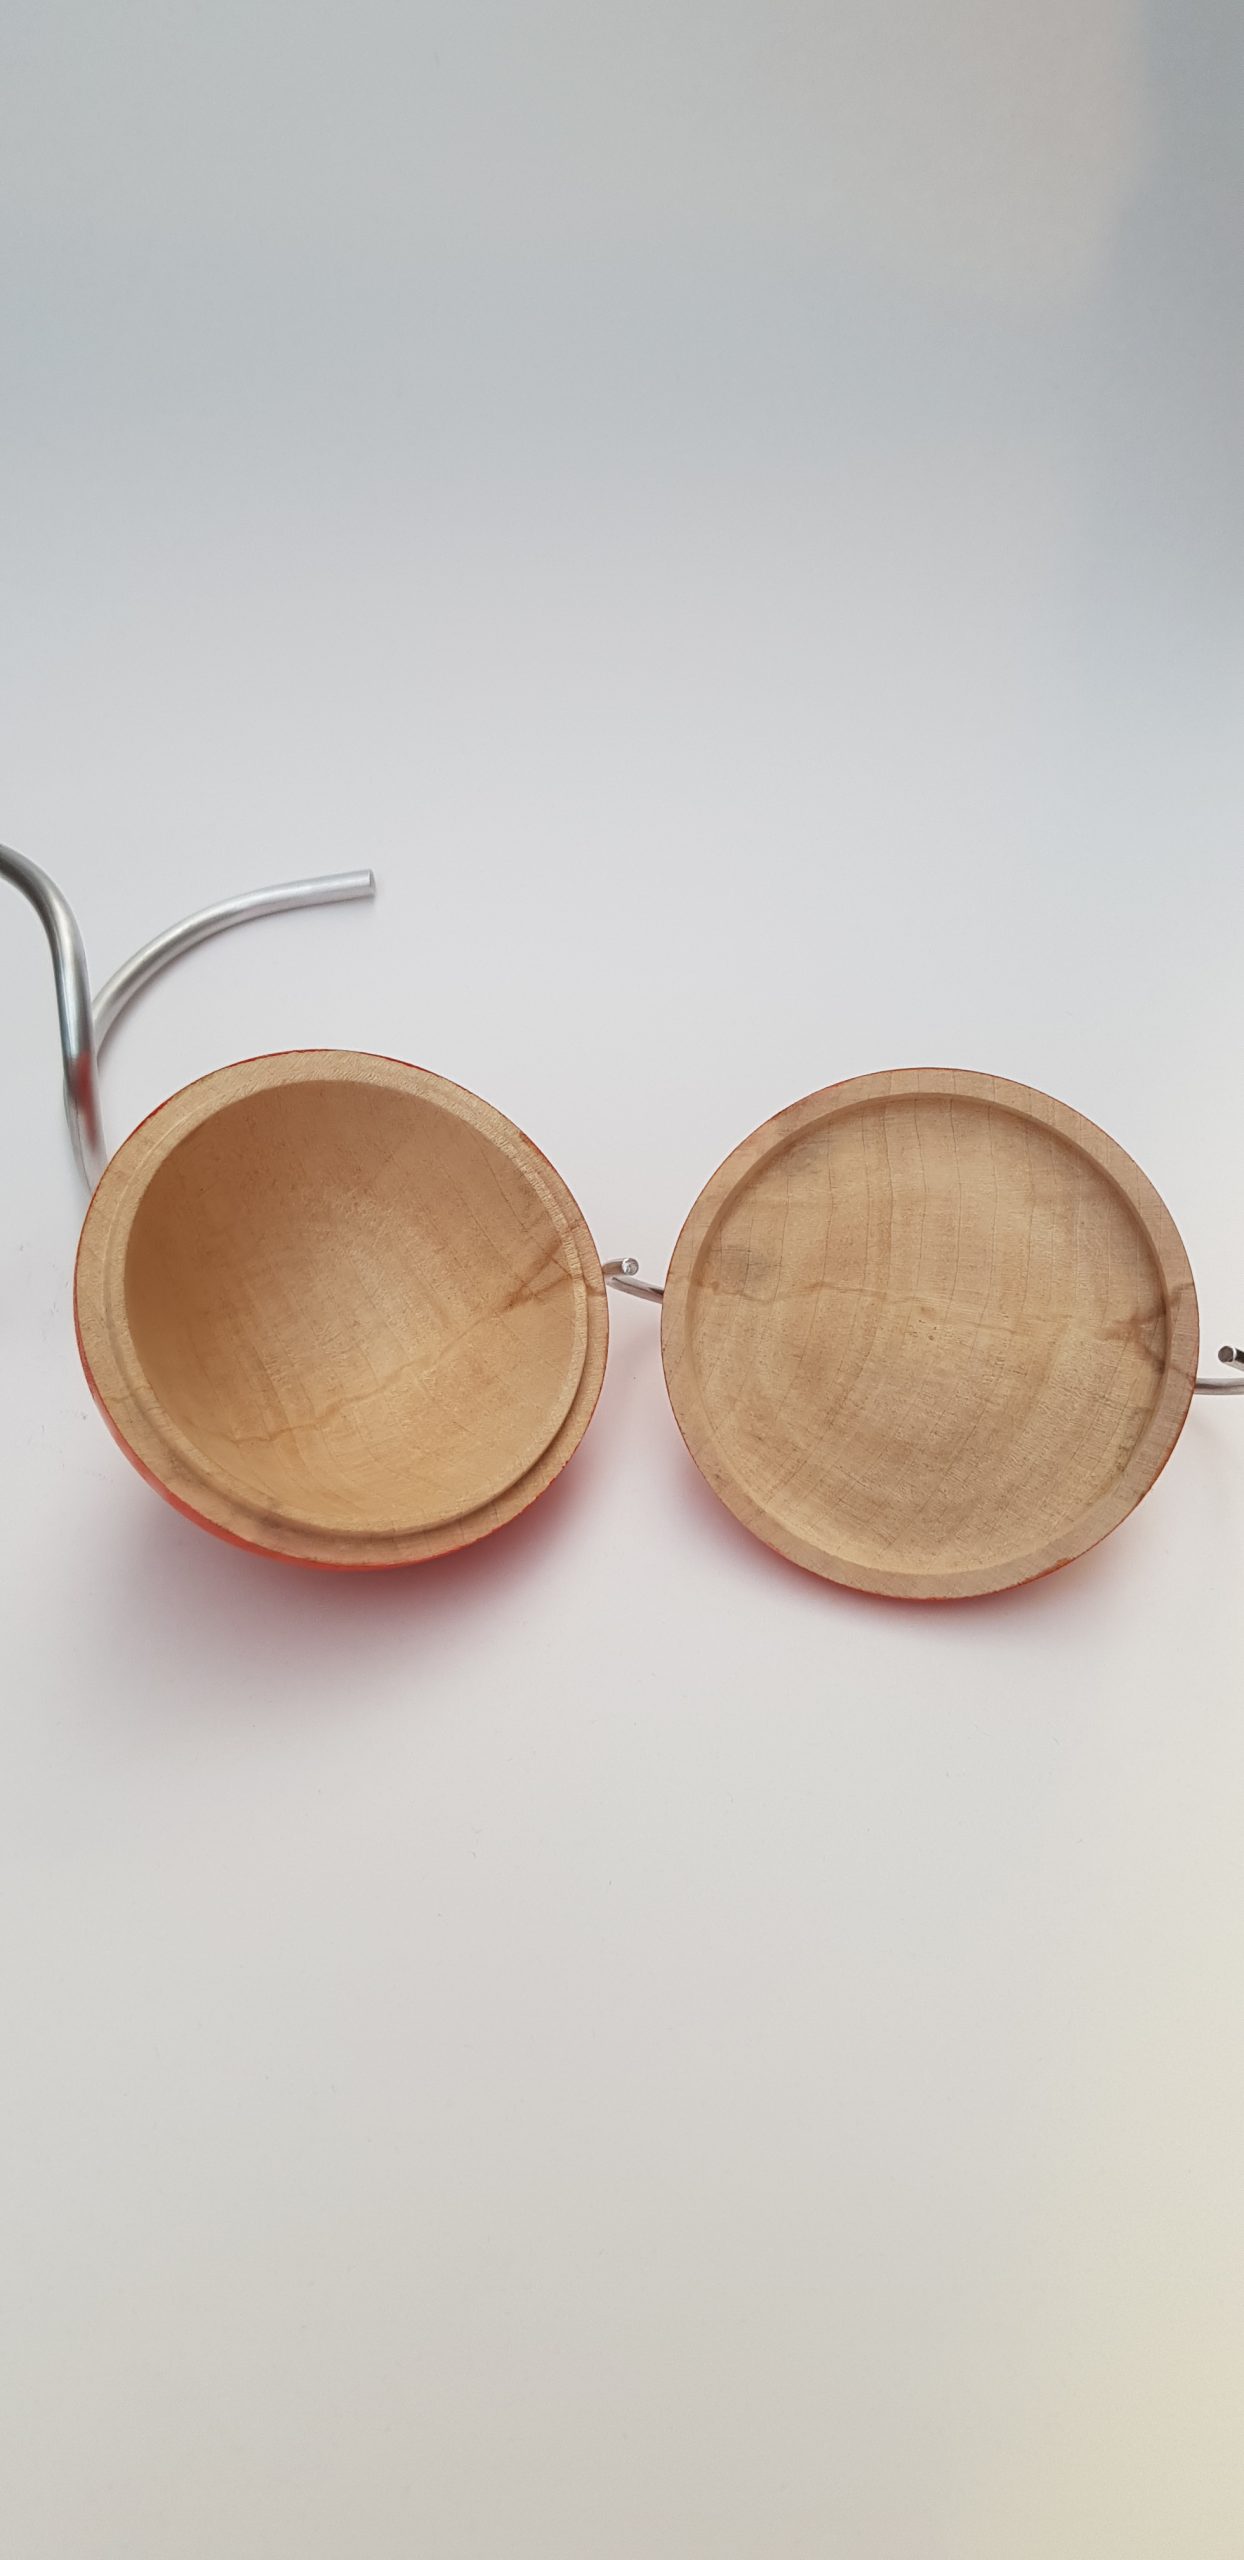
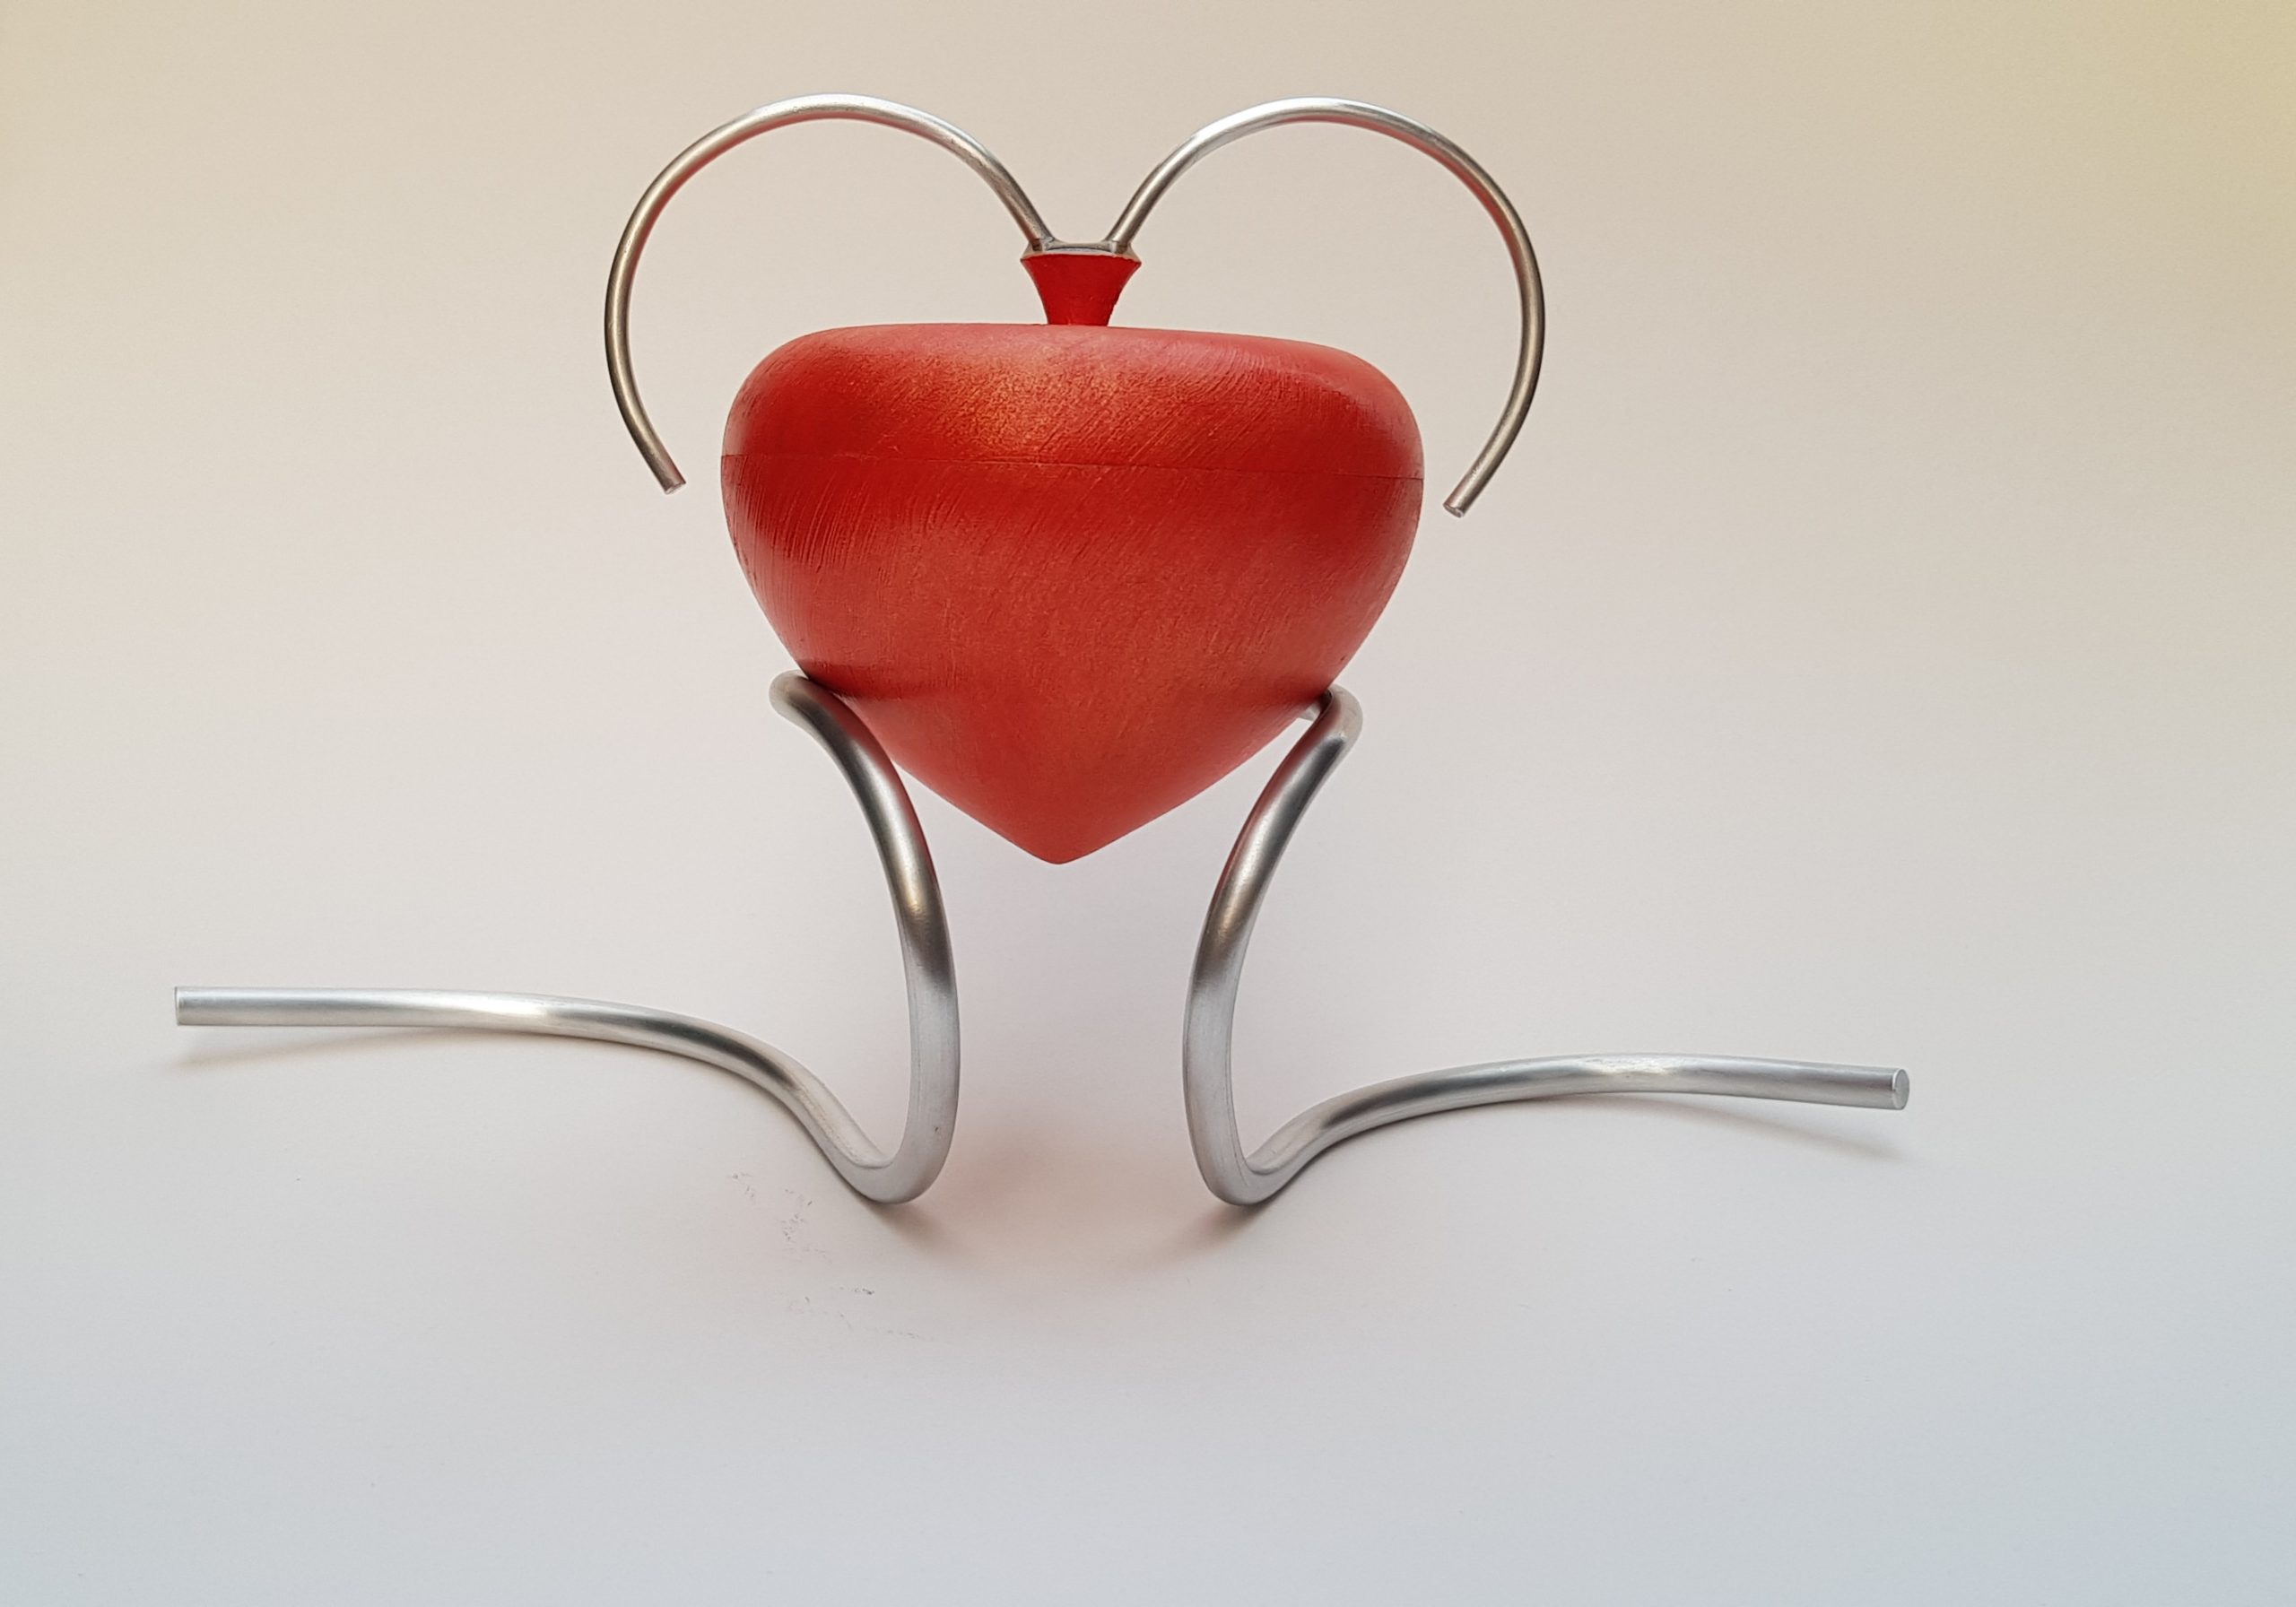
The box was born out of a thought for making something special as a gift for my wife and I decided to make a jewellery box. I decide to work on a new concept of box using different materials and using my taste and my contemporary design style to create the composition.
I had a few sycamore wood pieces and I decided to use one of them to create the body of the box and I’ve used aluminium for the stand and for the finial; the aluminium was upcycled from scrap electric cables.
I turned the box using a roughing gauge to make the cylinder then with a bowl gauge I shaped the box; I’ve hollow it using 13mm spindle gauge. Then I finished to shape the lid outside with a 13mm spindle gauge. I’ve sanded the box starting with 180 grit and sand it till 240 grit. Then I’ve painted it with acrylic colour using a brush and I finished it with a coat of finishing oil.
To fit the finial, after I’ve formed it by hand, I drilled it in the middle of the V shape that goes on top of the lid, then I’ve put a micro nail and glued it with epoxy glue.
The challenge for the whole composition was to create the illusion of a heart shape using both the wooden body and the finial. Then I decided to add a stand to keep the box in balance and for completing the composition.
Gordon McIver
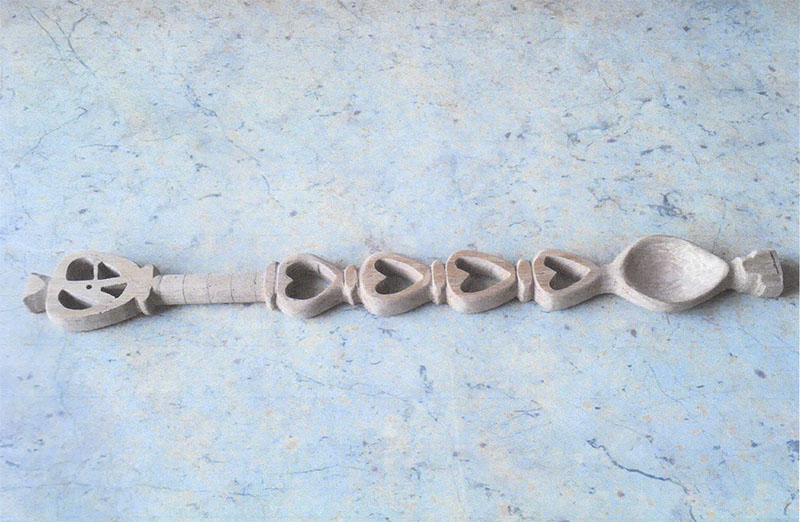
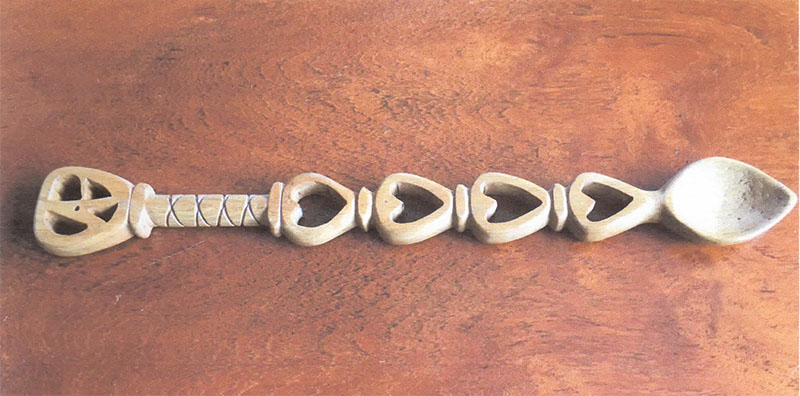
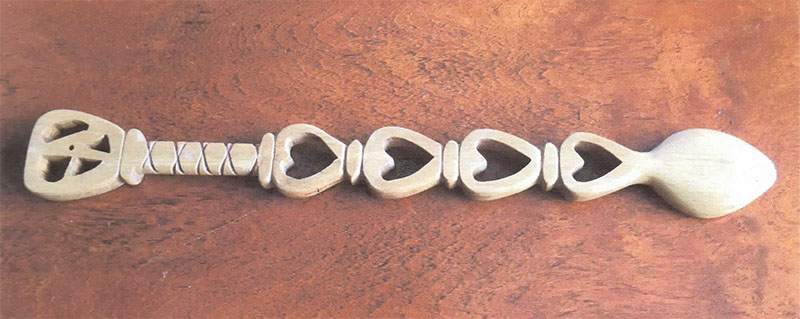
I am English (Yorkshire Born), My Wife is from Lancashire and we have a Scottish / Irish surname, so it’s really appropriate I have made a Welsh love spoon.
Material used – A piece of recycled rail from a 1930’s dining table – Size 600 x 20 x 60mm
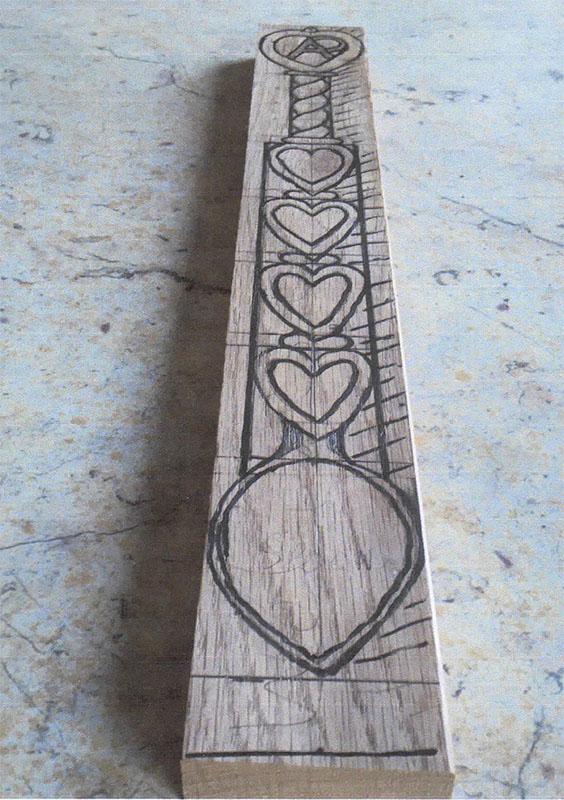
The photos show my original idea for the spoon, after I had researched the internet on the topic of welsh love spoons. Although most spoons are smaller than mine, I feel I have good reasons for this;
- The top heart shape shows the initials A+P which gives it a personal touch
- The twisted interlocking pattern represents a close relationship (if you use your imagination, this is the sexy bit)
- Four hearts represent the four seasons of continuous love for each other
- The spoon aspect
Steps taken:
- Research the internet for ideas
- Marking out the details and turning of all the major details
- The basic carving of the spoon – inside. This was done now to prevent damage to the heart shapes when the stem would be clamped to the bench. I used a half inch shallow fluted carving chisel
- Drilling many holes prior to using my scroll saw to remove the centres of the heart shapes
- Refining of all the shapes using small files & sanding cloth
- Sealing the whole surface with sanding sealer
- Finishing using wax
Considerations
If I were to make another piece, lime or ash would be used. I would also start from a square piece rather than a rectangular one. I found cutting a clean cut on the oak difficult but managed a tolerable finish using a bowl gouge. Equally difficult to form were the beads between the heart shapes. It took a long time to cut out the internal shapes as the oak was really hard and 20mm thick. This took more time than I expected and the cleaning up was quite tedious! The only bonus was that is call be done sitting down.
I have enclosed some research information with some early sketched out. There are also photographs, one showing before any finish was applied and the other as a completed project.
Foot note of interest
Metal spoons have deeper cup shapes than wooden spoons – twice as deep or more. Wooden spoons, as used by cooks, the cup end is only the same thickness as the handle. Therefore an easy woodturning project.