Technique focus – Pyrography
A wonderful facet of woodturning decoration coming from pyro- meaning fire and -graphy which means related to writing. Will you use the Beltane Fire Festival as inspiration? How about Volcanoes? There are some fantastically creative things you can do, so what will you do to stand out from the competition?
Deadline for entries is the 30th April.
Prizes – £100 total voucher for Chestnut products. Chestnut will add a £50 pound voucher in addition to the £50 voucher supplied by the AWGB.
See how to enter and the rules here – www.awgb.co.uk/show-tell/show-tell-rules/
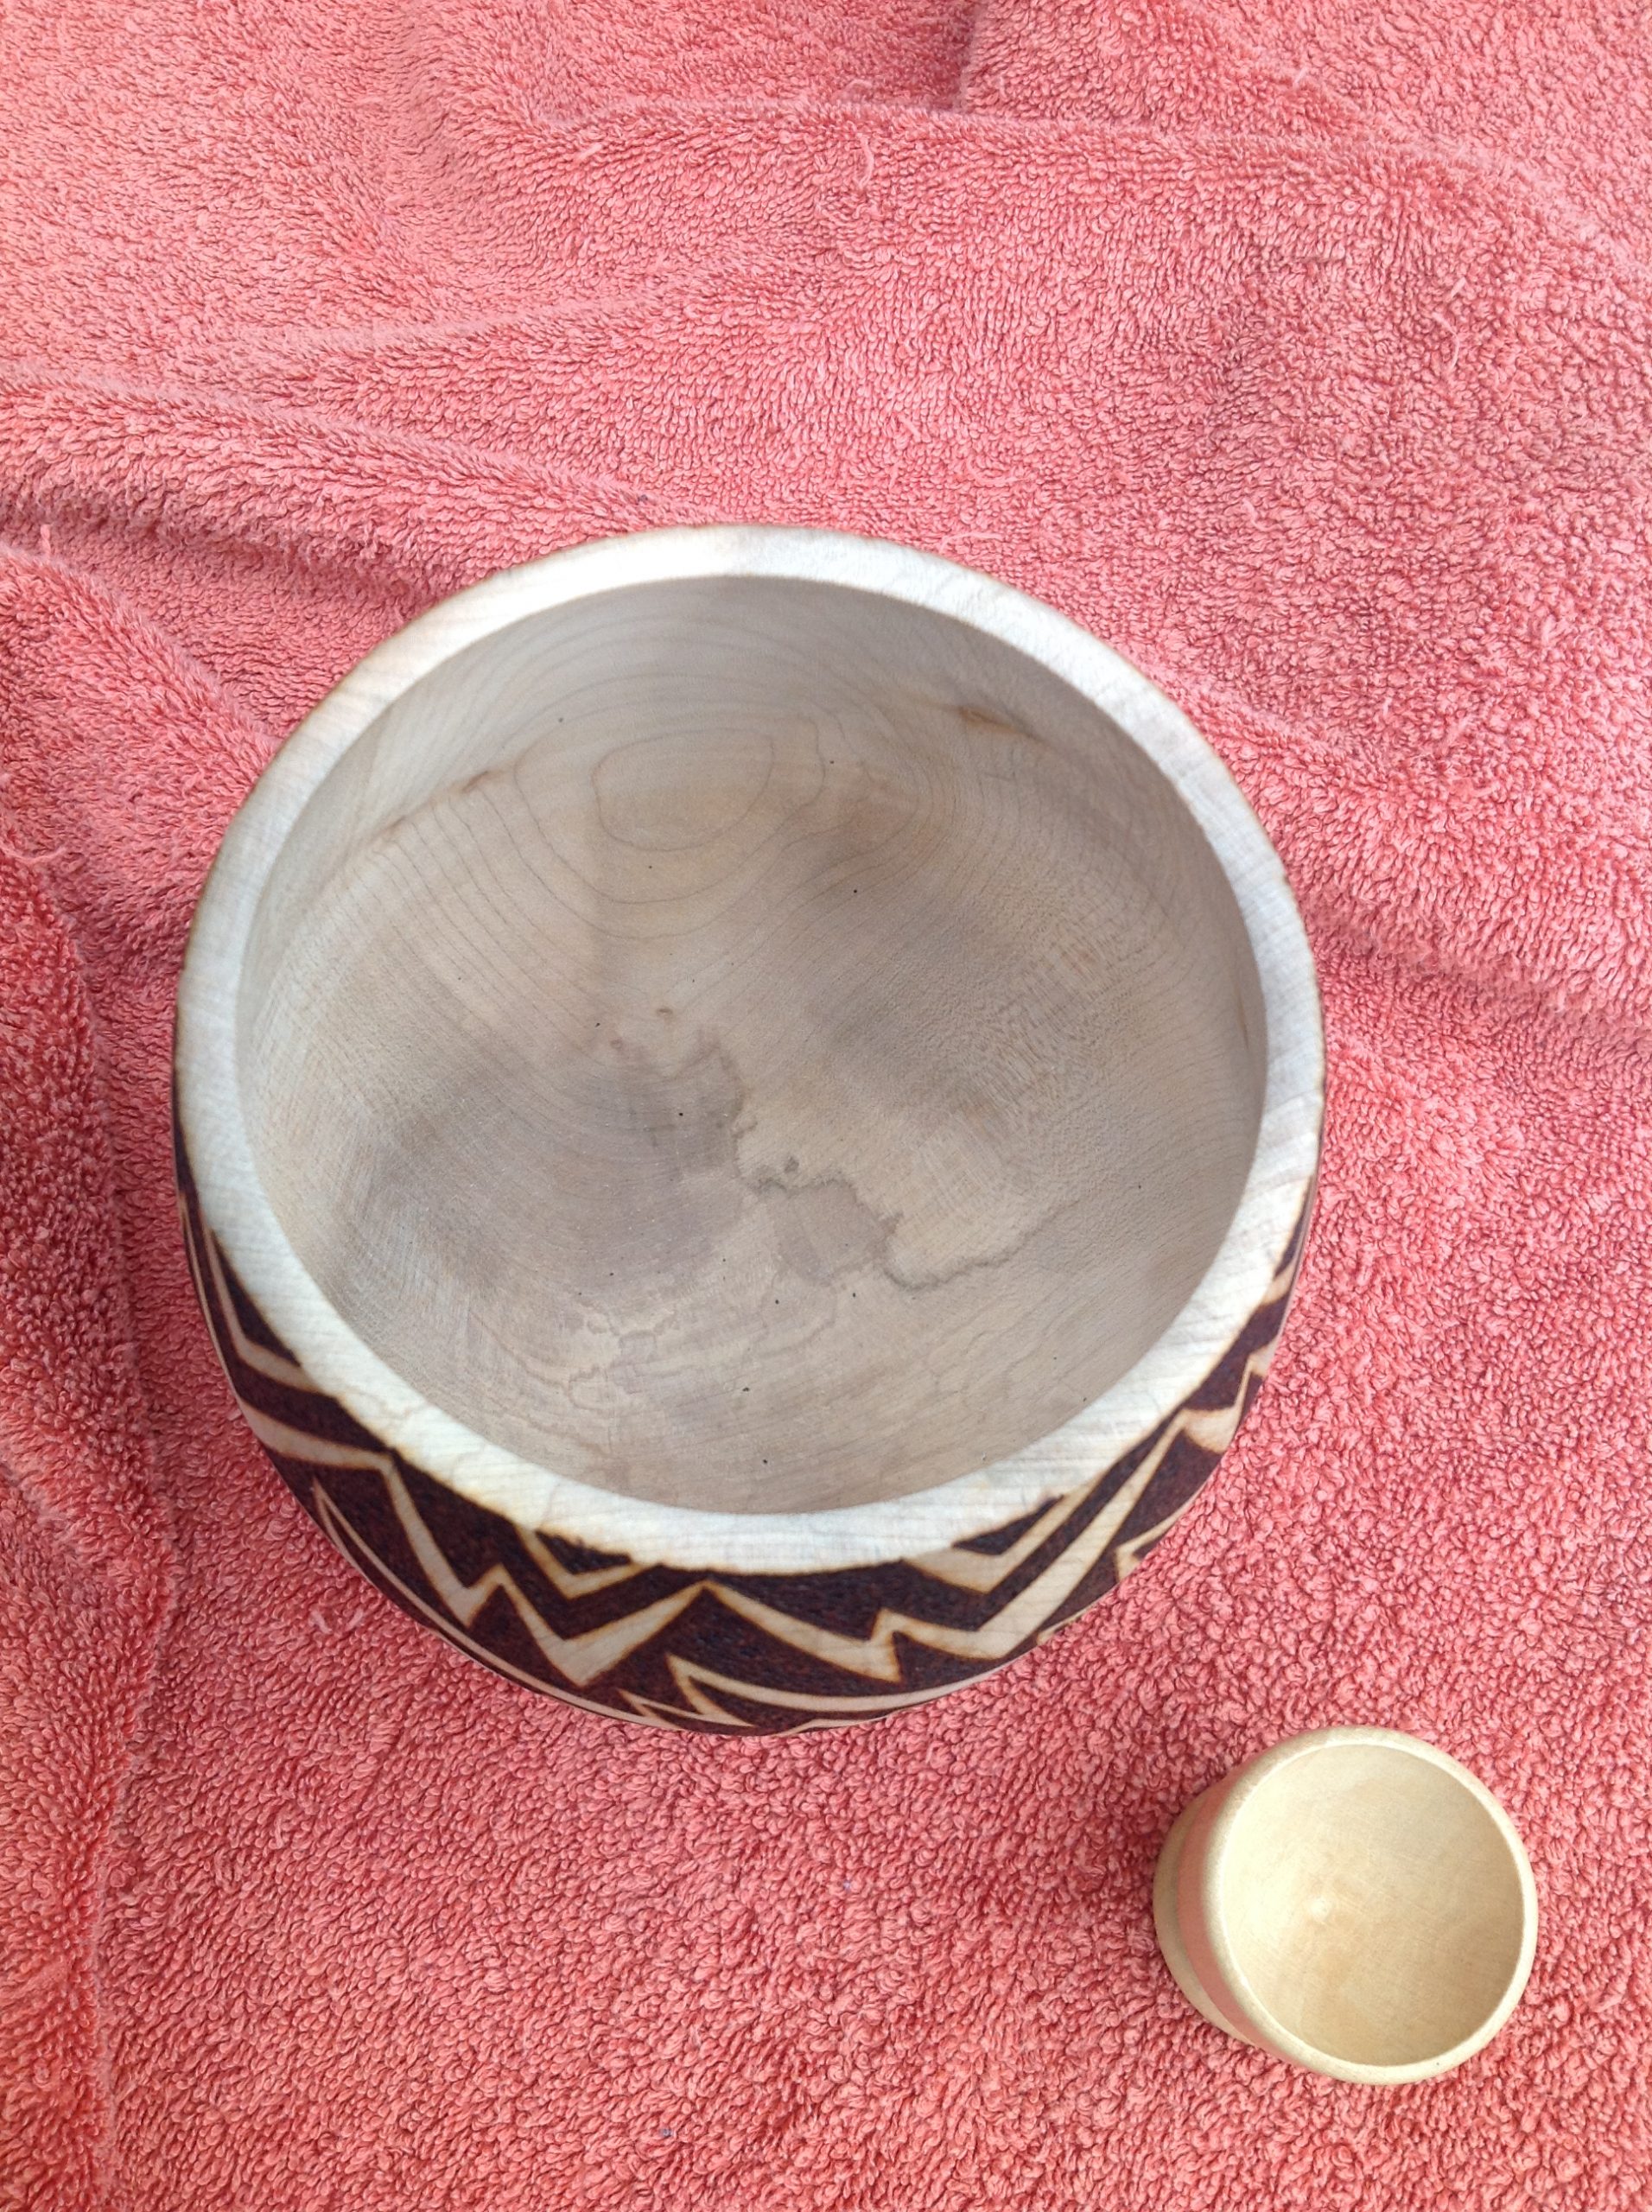
Winner – Steve Fearnley
Bob Neill
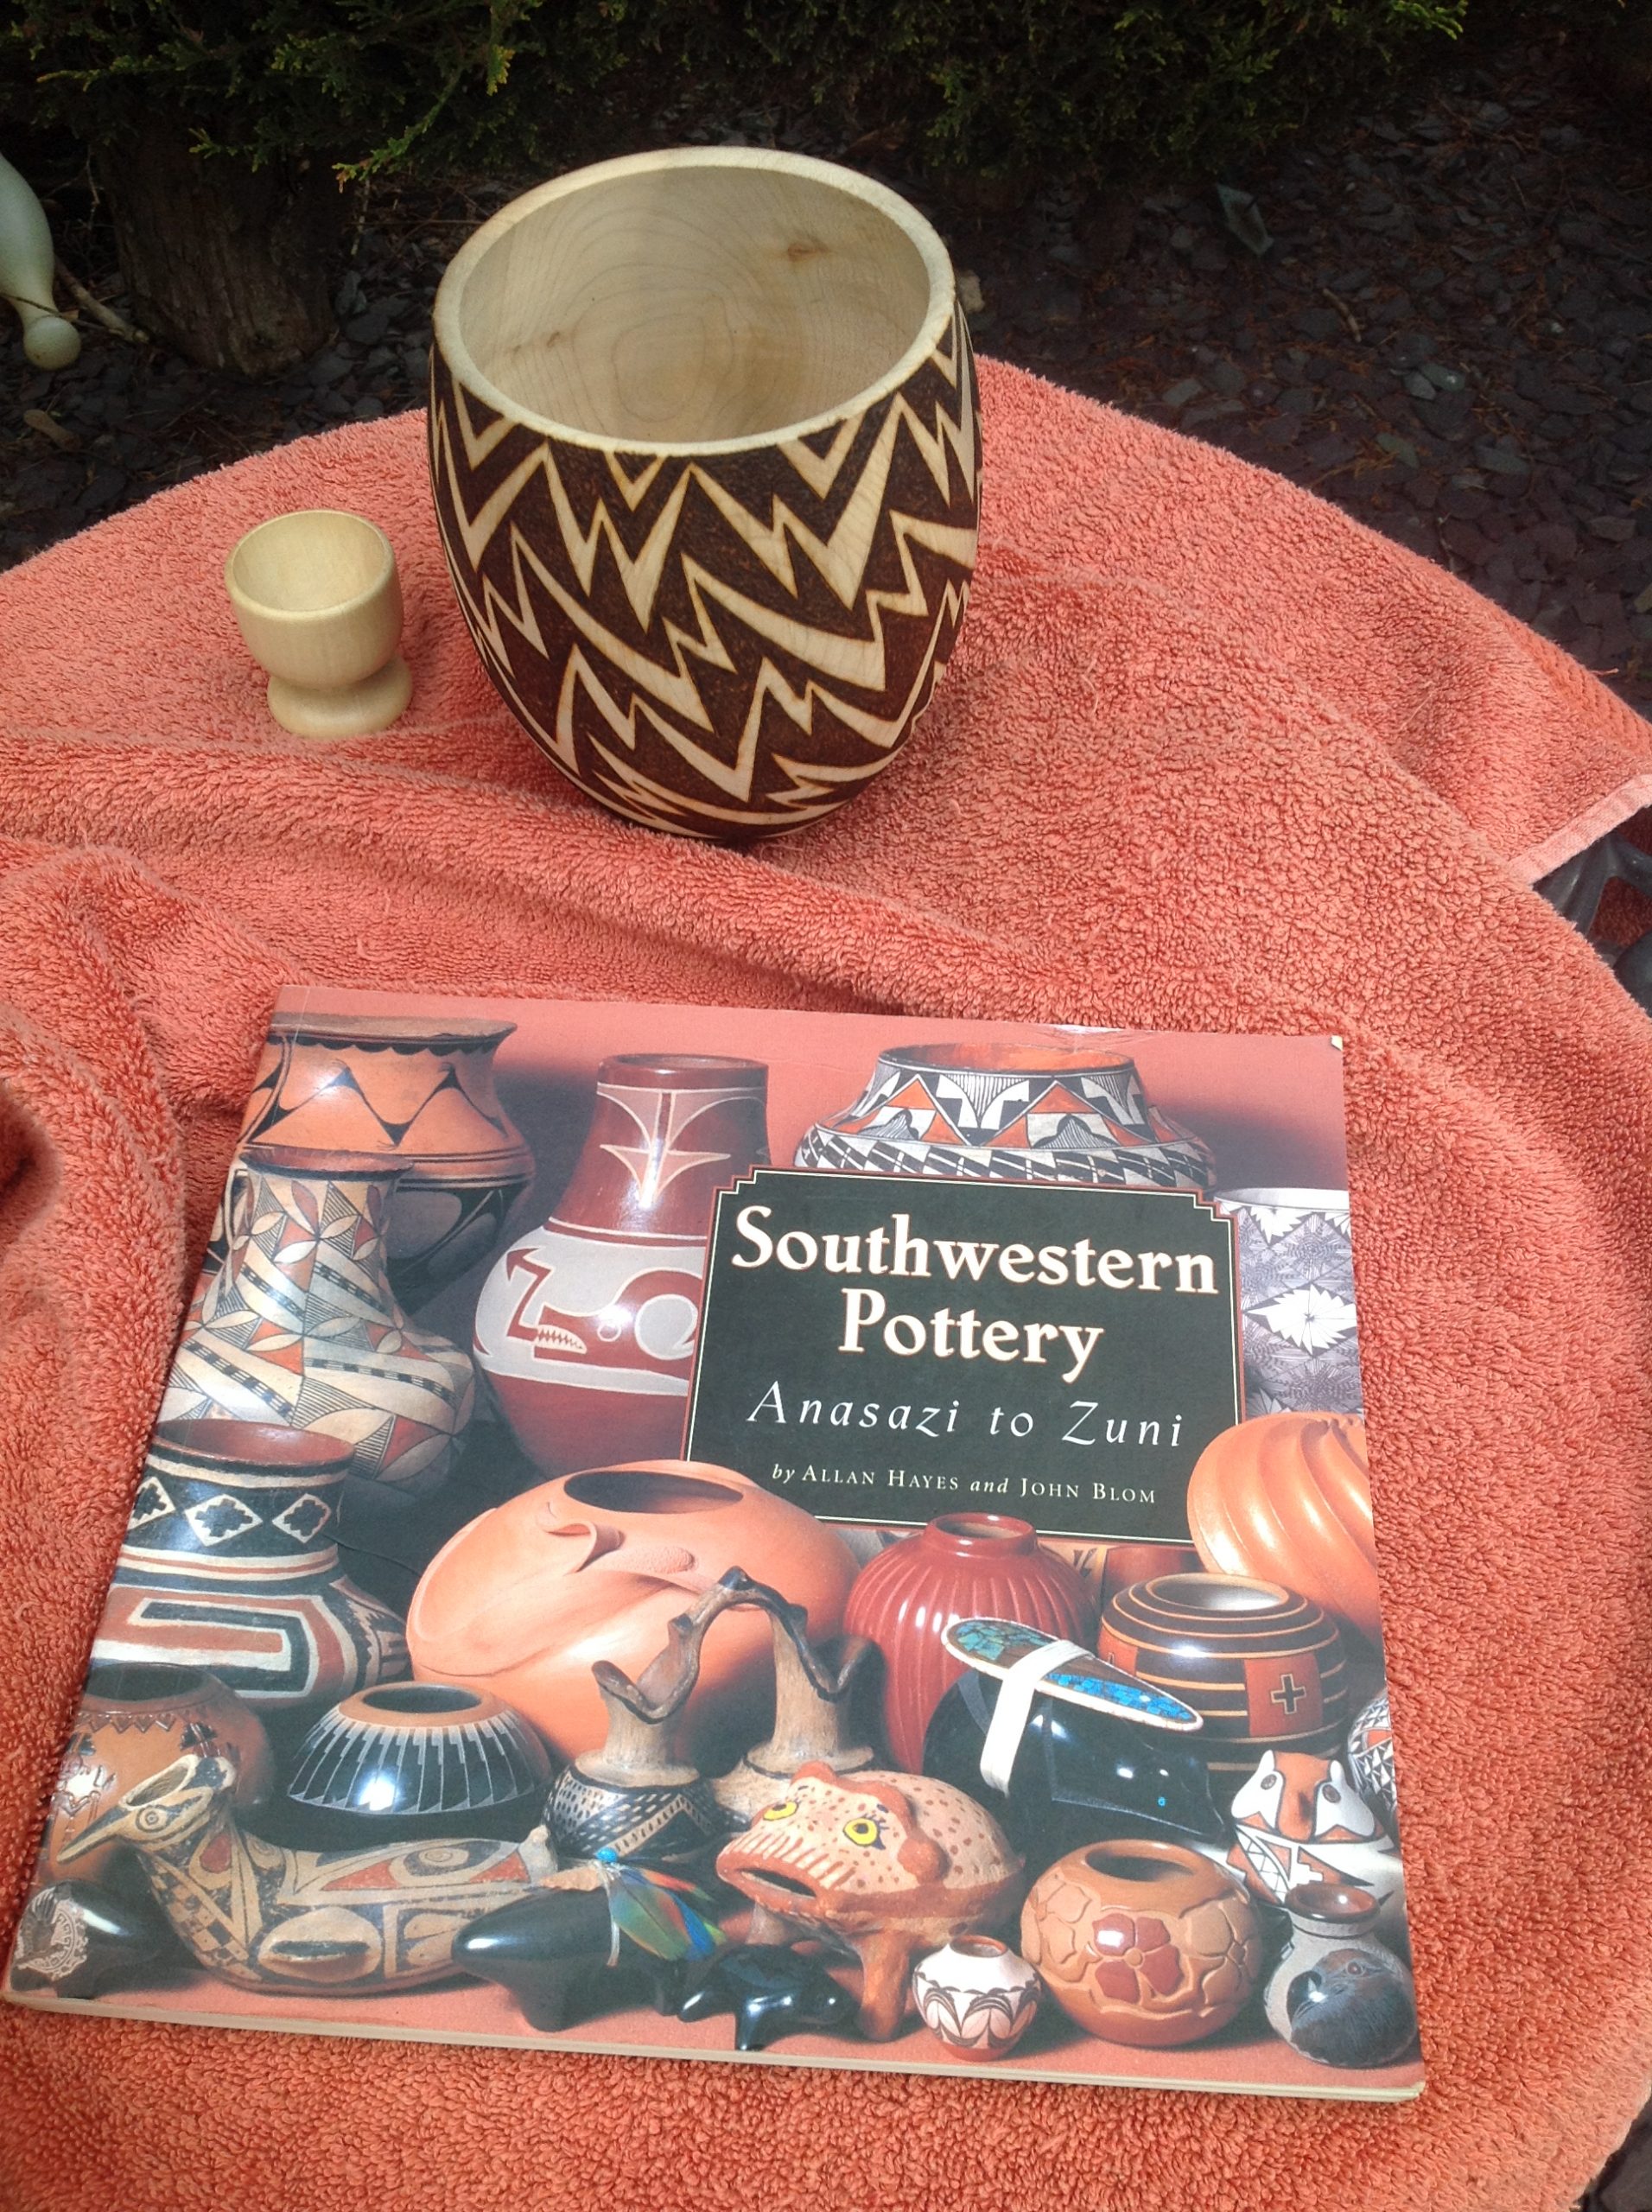
The story begins back in 2004 when I was invited to demonstrate at the 25th Anniversary of the Utah Woodturning Symposium. During my stay I demonstrated at the Open Day at Craft Supplies USA where I bought a book about the pottery of the Southwestern Indian tribes from Arizona, New Mexico and Utah. The book contains a large number of excellent photographs of the pottery created by the various tribes of these regions, including those from the Hopi Reservation.
Seventeen years later, I was following the excellent tv series ‘The Great Pottery Throw Down’ shown on Channel 4 on Sunday evenings. One of the challenges for the potters was to use designs used by the Native American Acoma Tribes to decorate their pots. This was the spark to get my book out and get my designs on to my entry for the April Competition.
The first challenge was to draw the design with a pencil; there was a lot of rubbing out until I was satisfied with the finished layout. I burnt the outline with my Peter Child Pyrography Pen which took most of the morning, followed by filling in the design with my spoon tip, creating my signature textured surface. The bowl is turned from Sycamore which I think is the best timber for pyrography. The entry is finished with three coats of Chestnut Products acrylic lacquer. There were a number of challenges; drawing out a suitable design; burning the design on a curved surface; and finding a comfortable position for my hand and pen when burning the surface.
My advice to beginners would be to practice on a scrap piece first, especially if you are tackling a similar form. Another suggestion would be to look at designs used by potters, as they can be an inspiration for your Woodturning pieces.
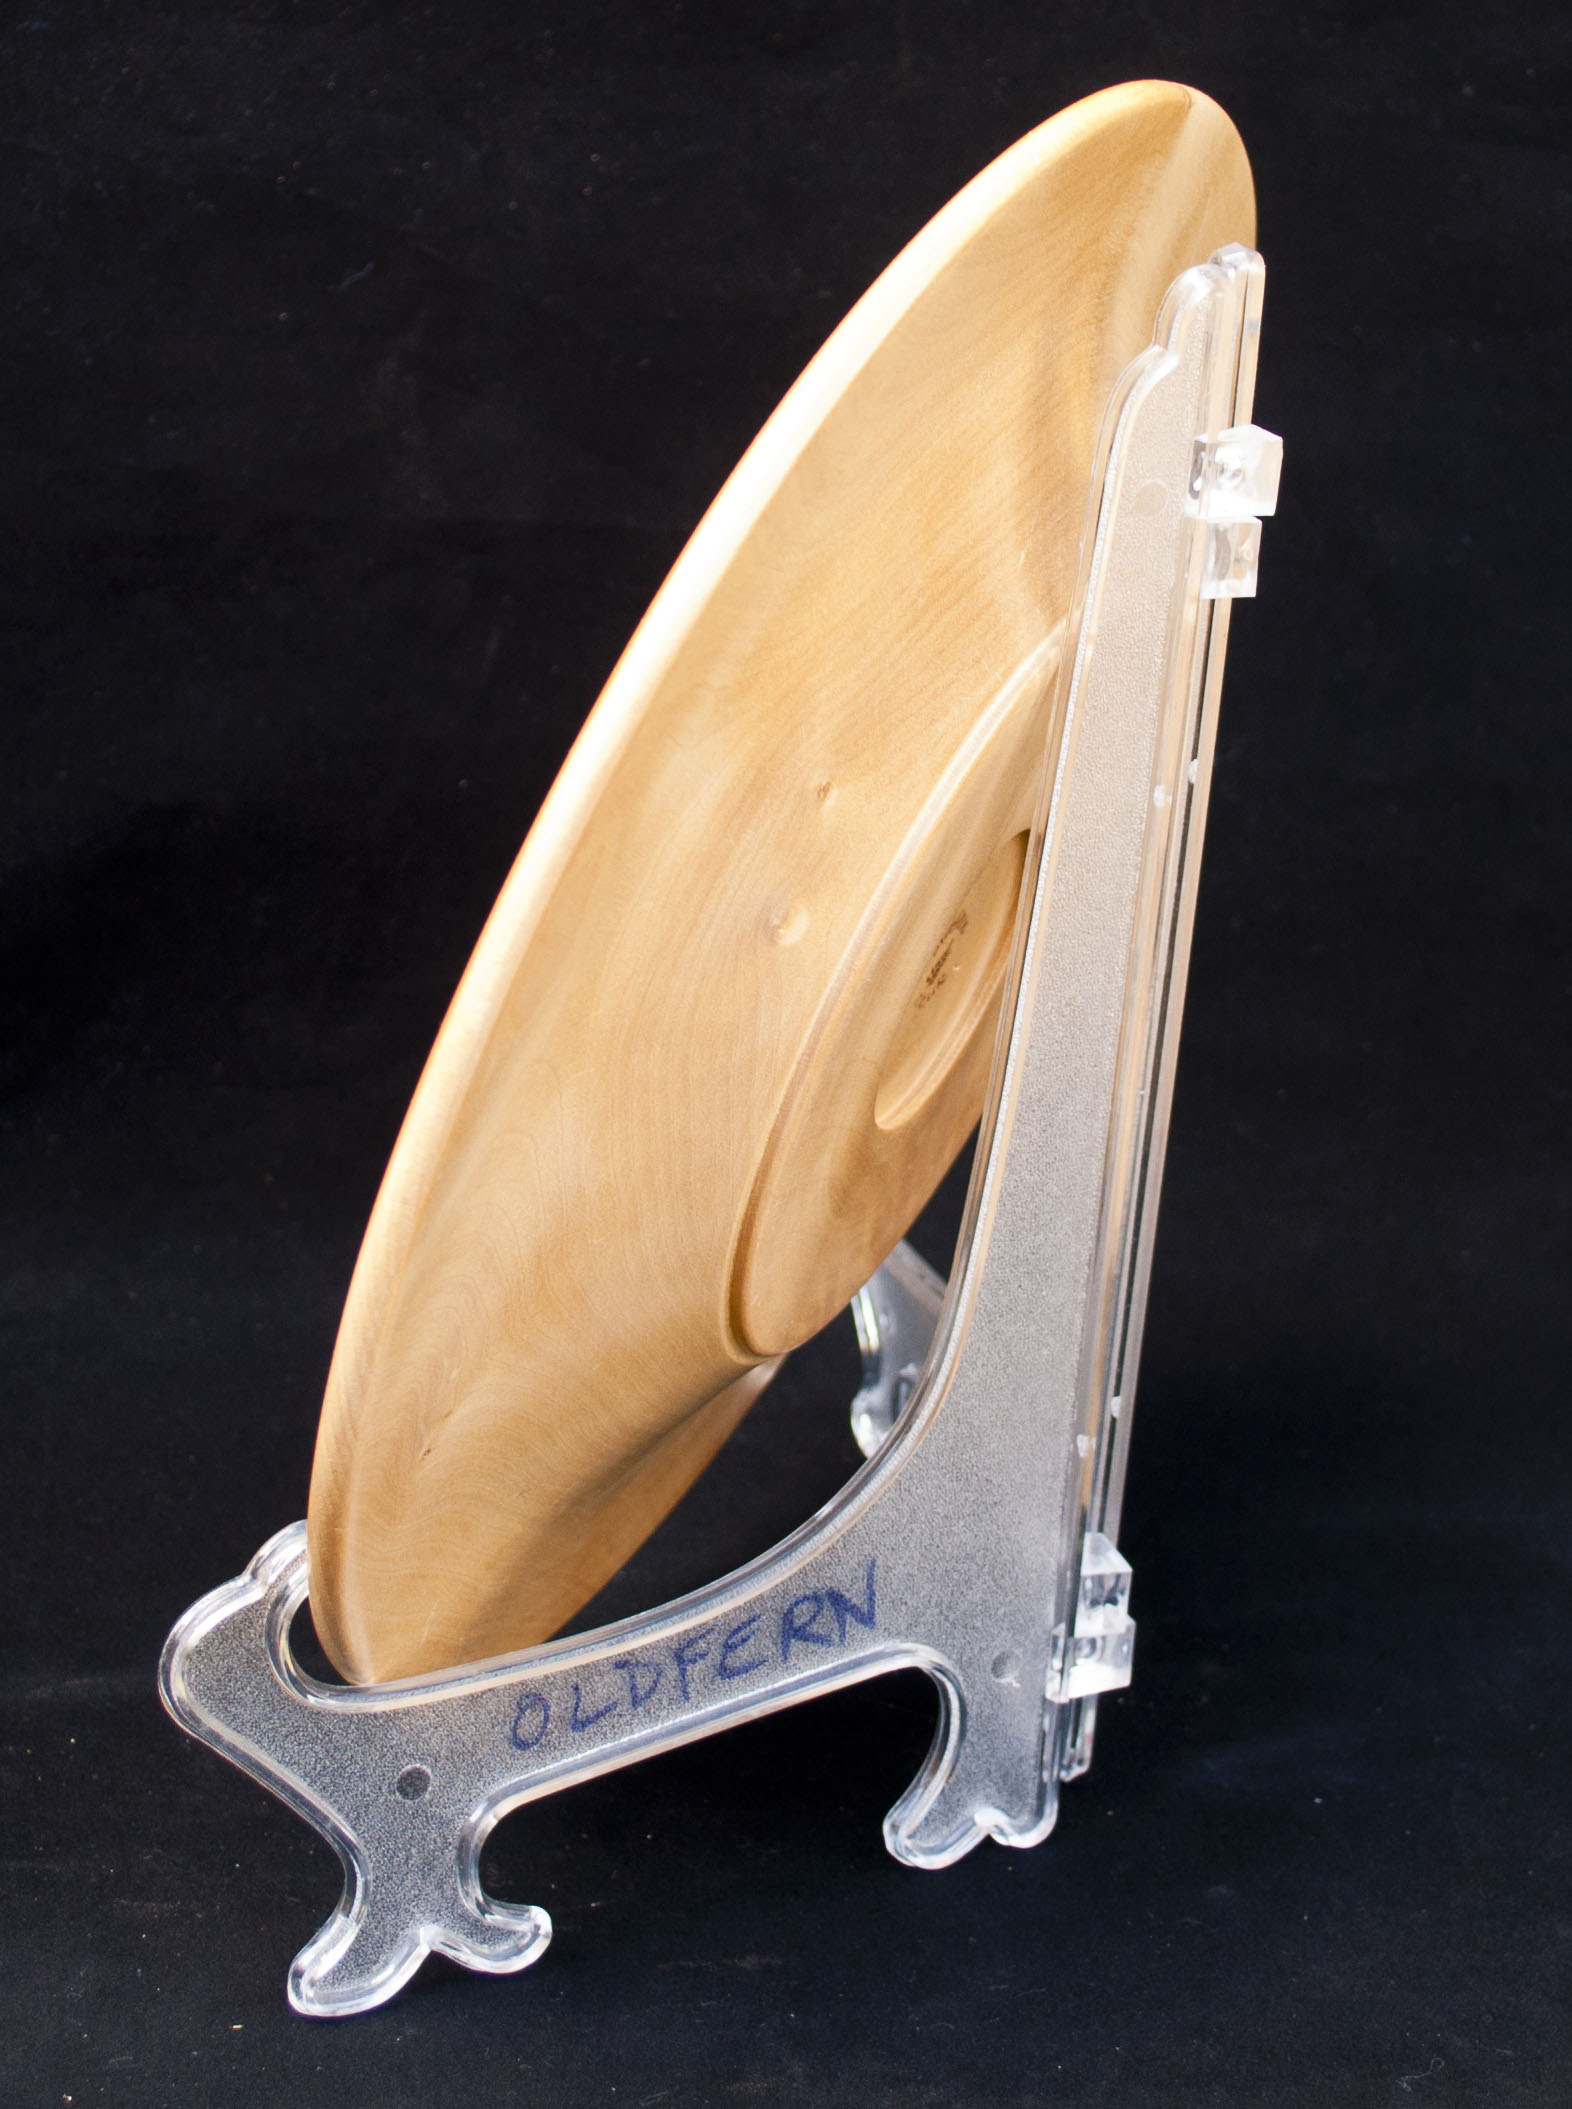
Steve Fearnley
For more of Steve’s work, visit http://oldfern.co.uk/
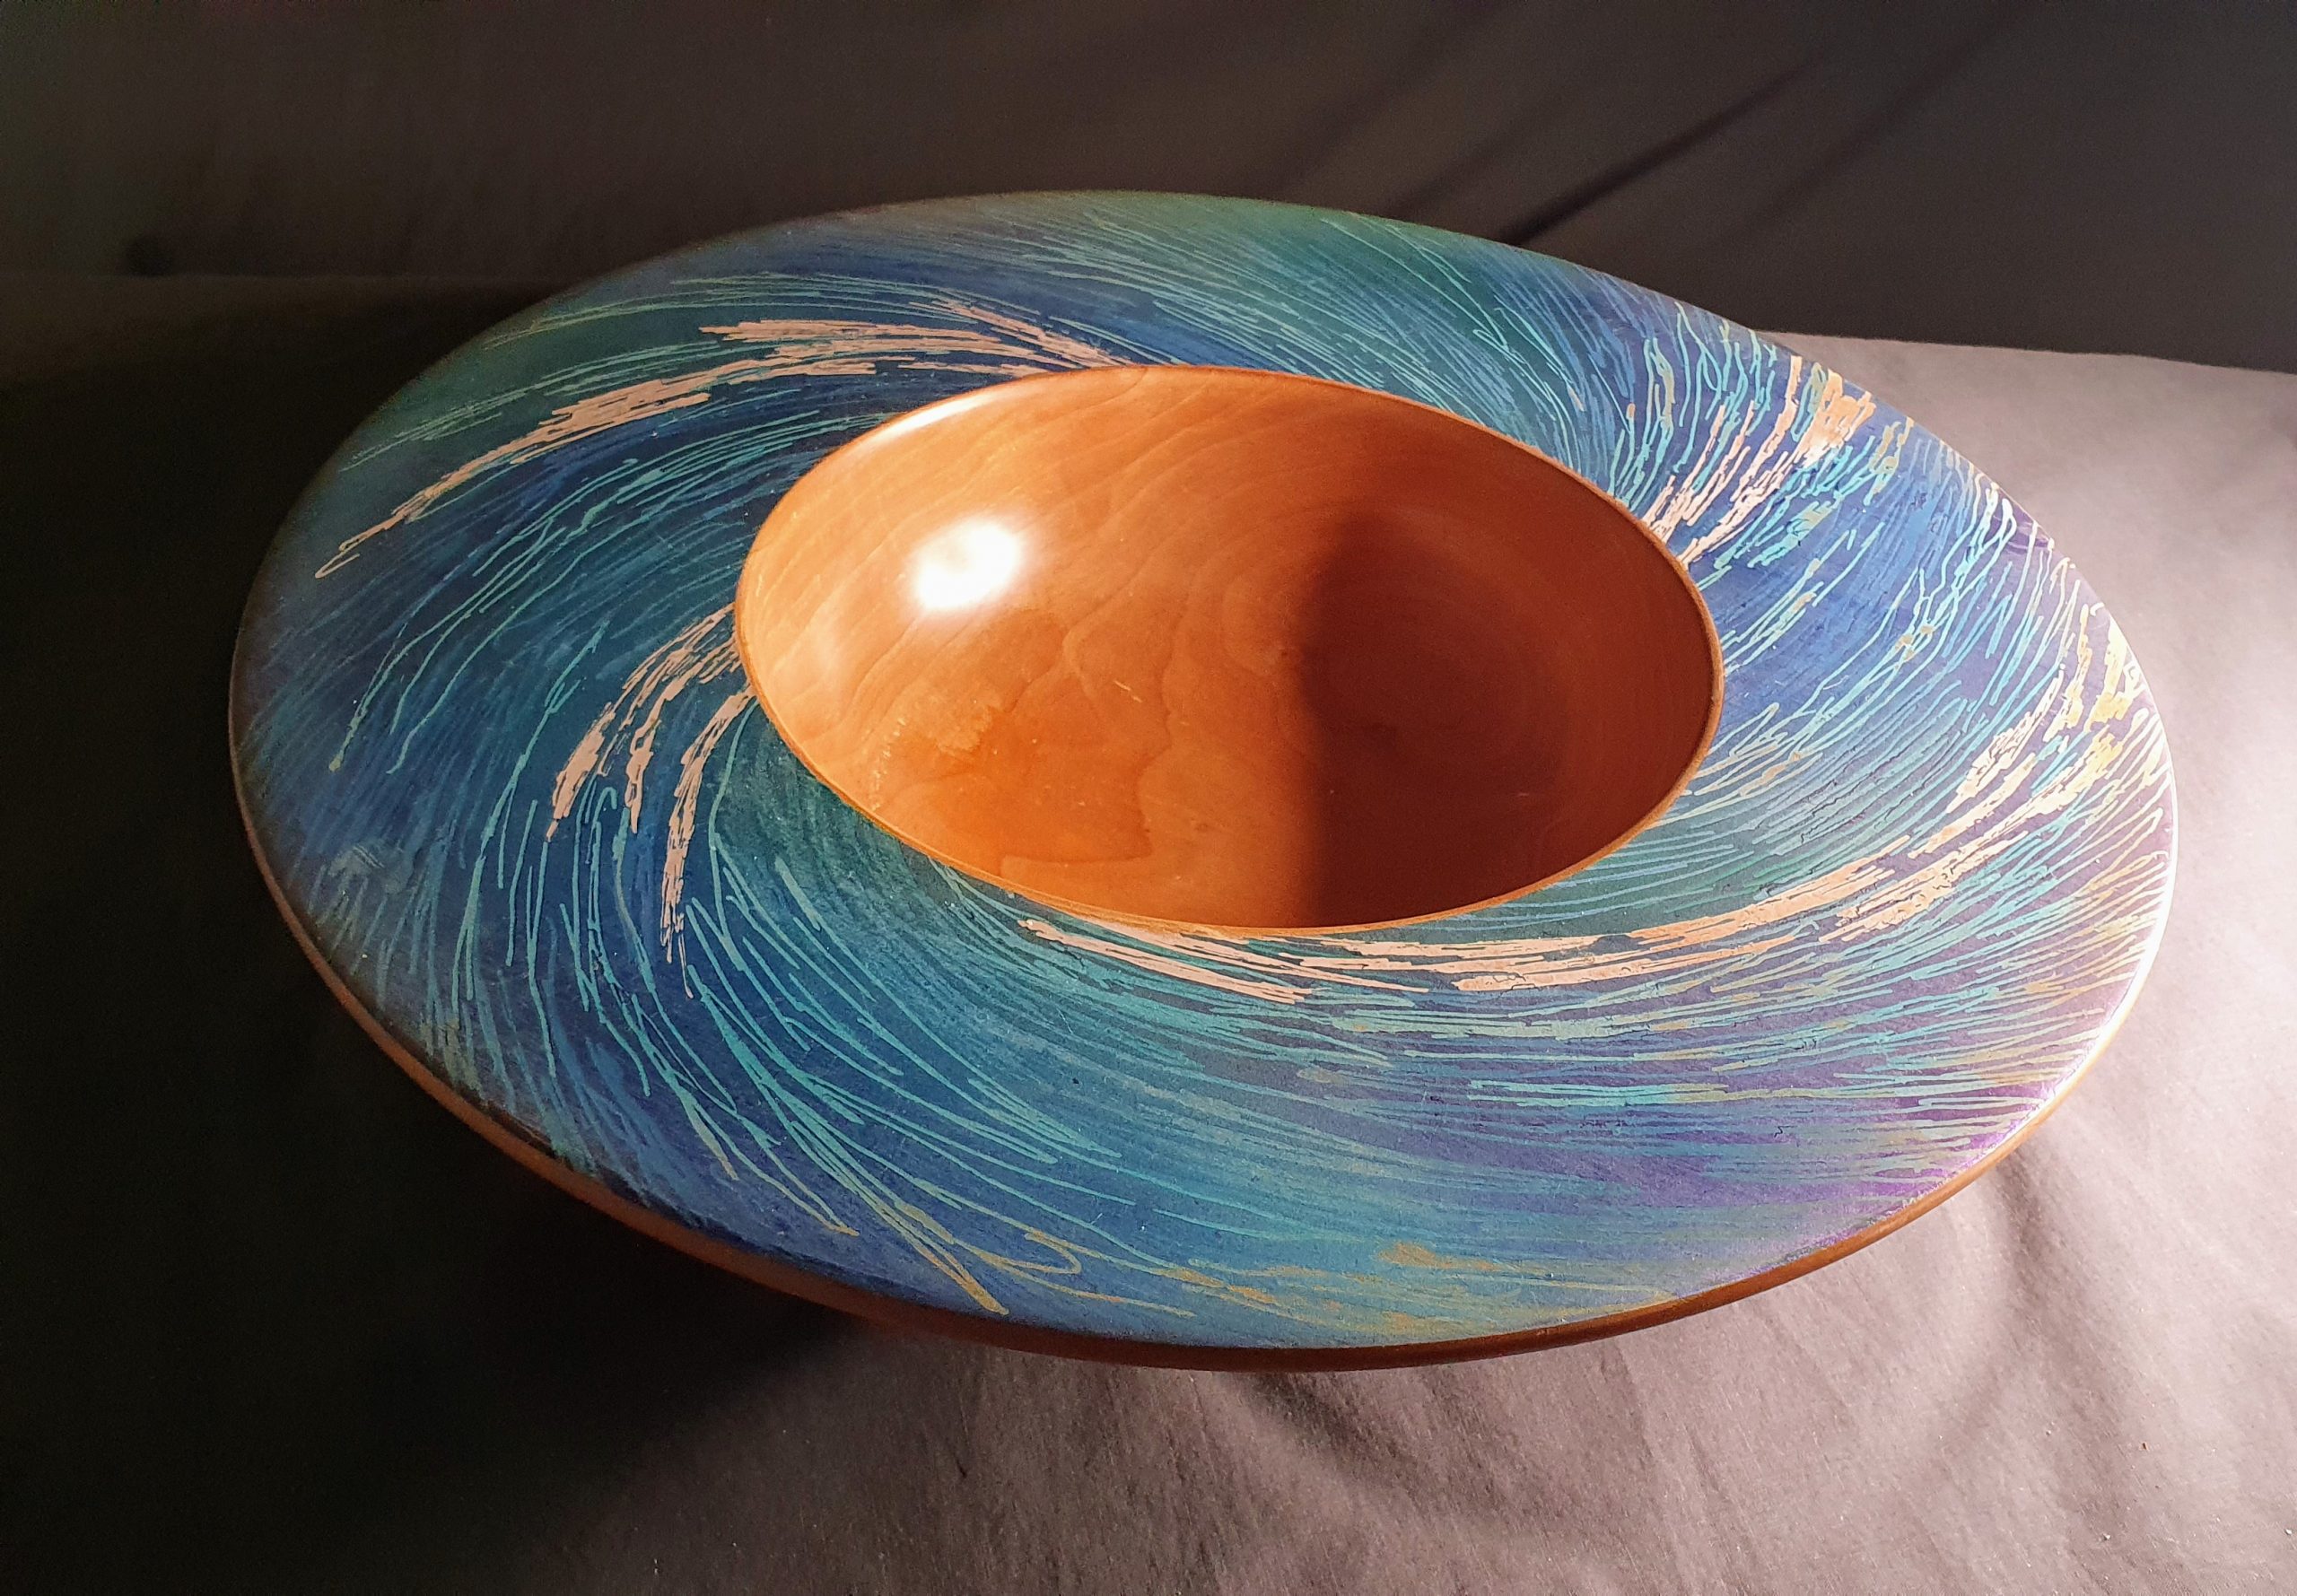
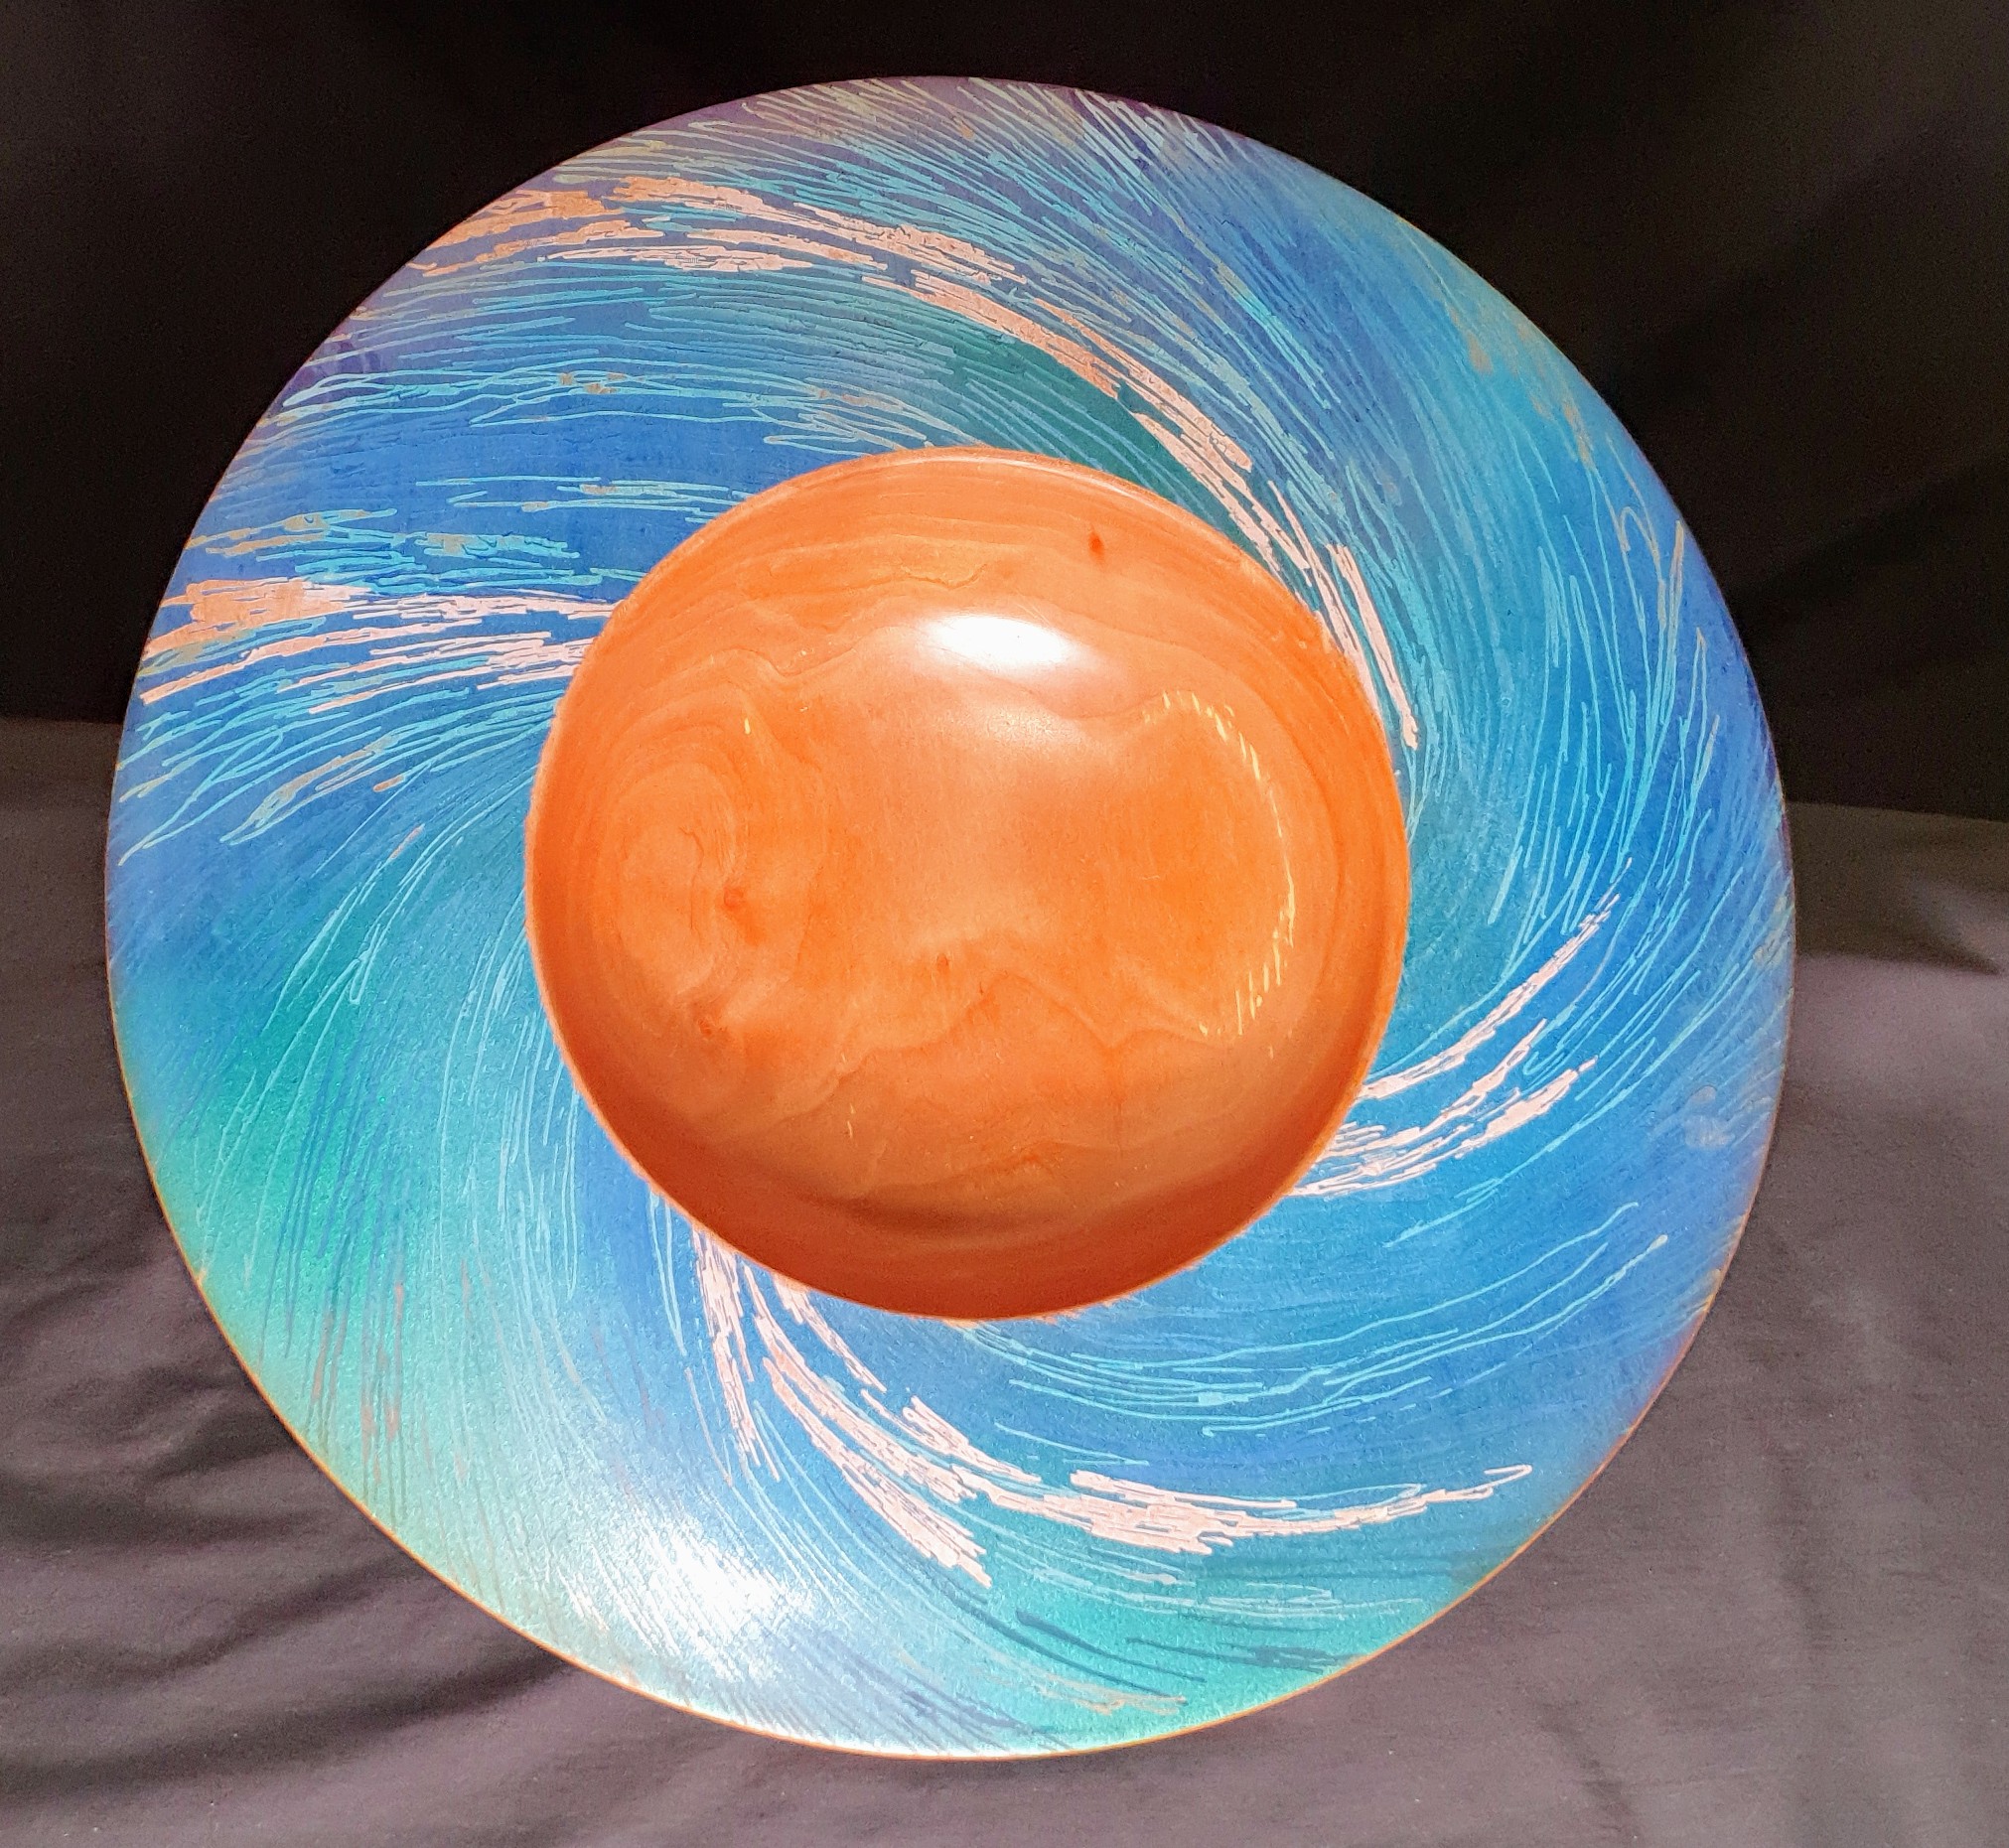
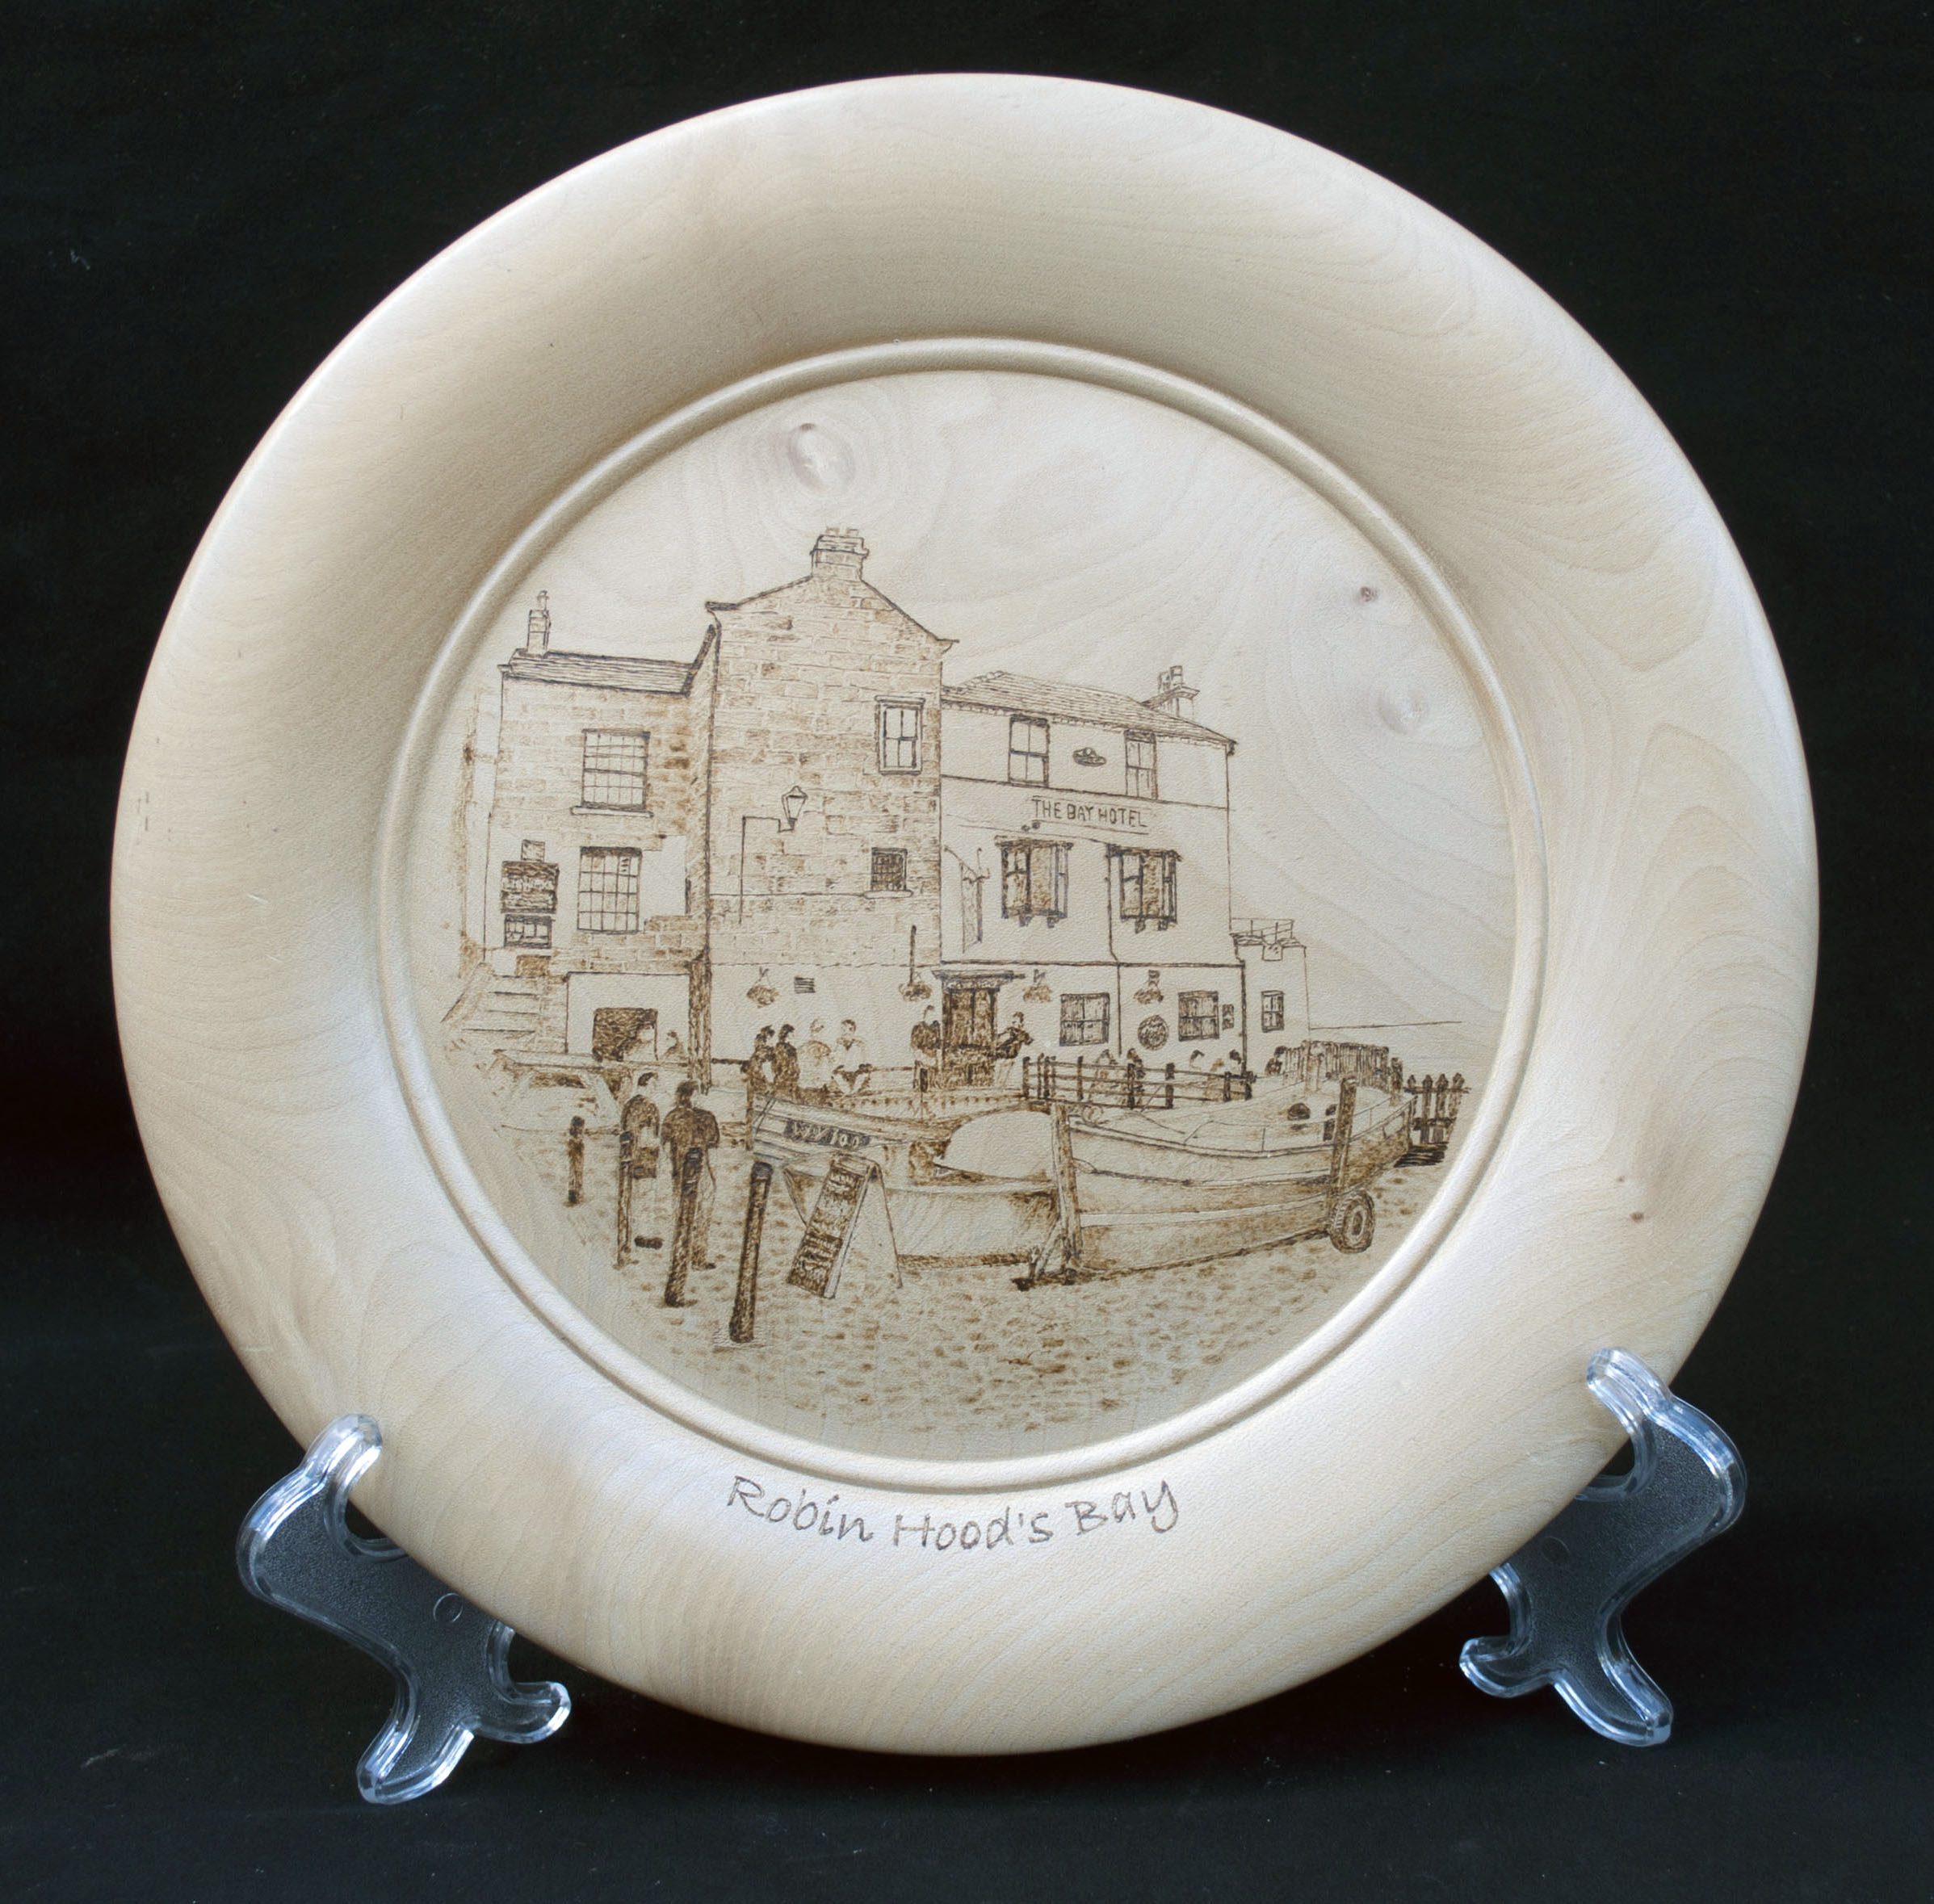
The platter is 12 inches in diameter, about an inch and a half thick, and is turned from a sycamore blank with a pleasant light grain patterning. Sycamore is always my first choice for pieces involving detailed pyrography. It has a very close grain, which provides an even surface for burning, and the creamy white colouring gives a good contrast to the pyrography.
The central circle is 8 inches in diameter, and is turned slightly convex. I generally try to avoid flat surfaces on turning, but here I also think the convex surface helps to give a three-dimensional effect to the picture. I haven’t made any attempt to hide the chucking point on the rear, though sometimes I remount platters using a vacuum chuck and turn away the chucking point to leave a slightly dished concave base.
I always turn the piece before preparing the picture. It is much easier to adjust picture sizes on paper or on a computer screen than it is to adjust the wood they are to adorn.
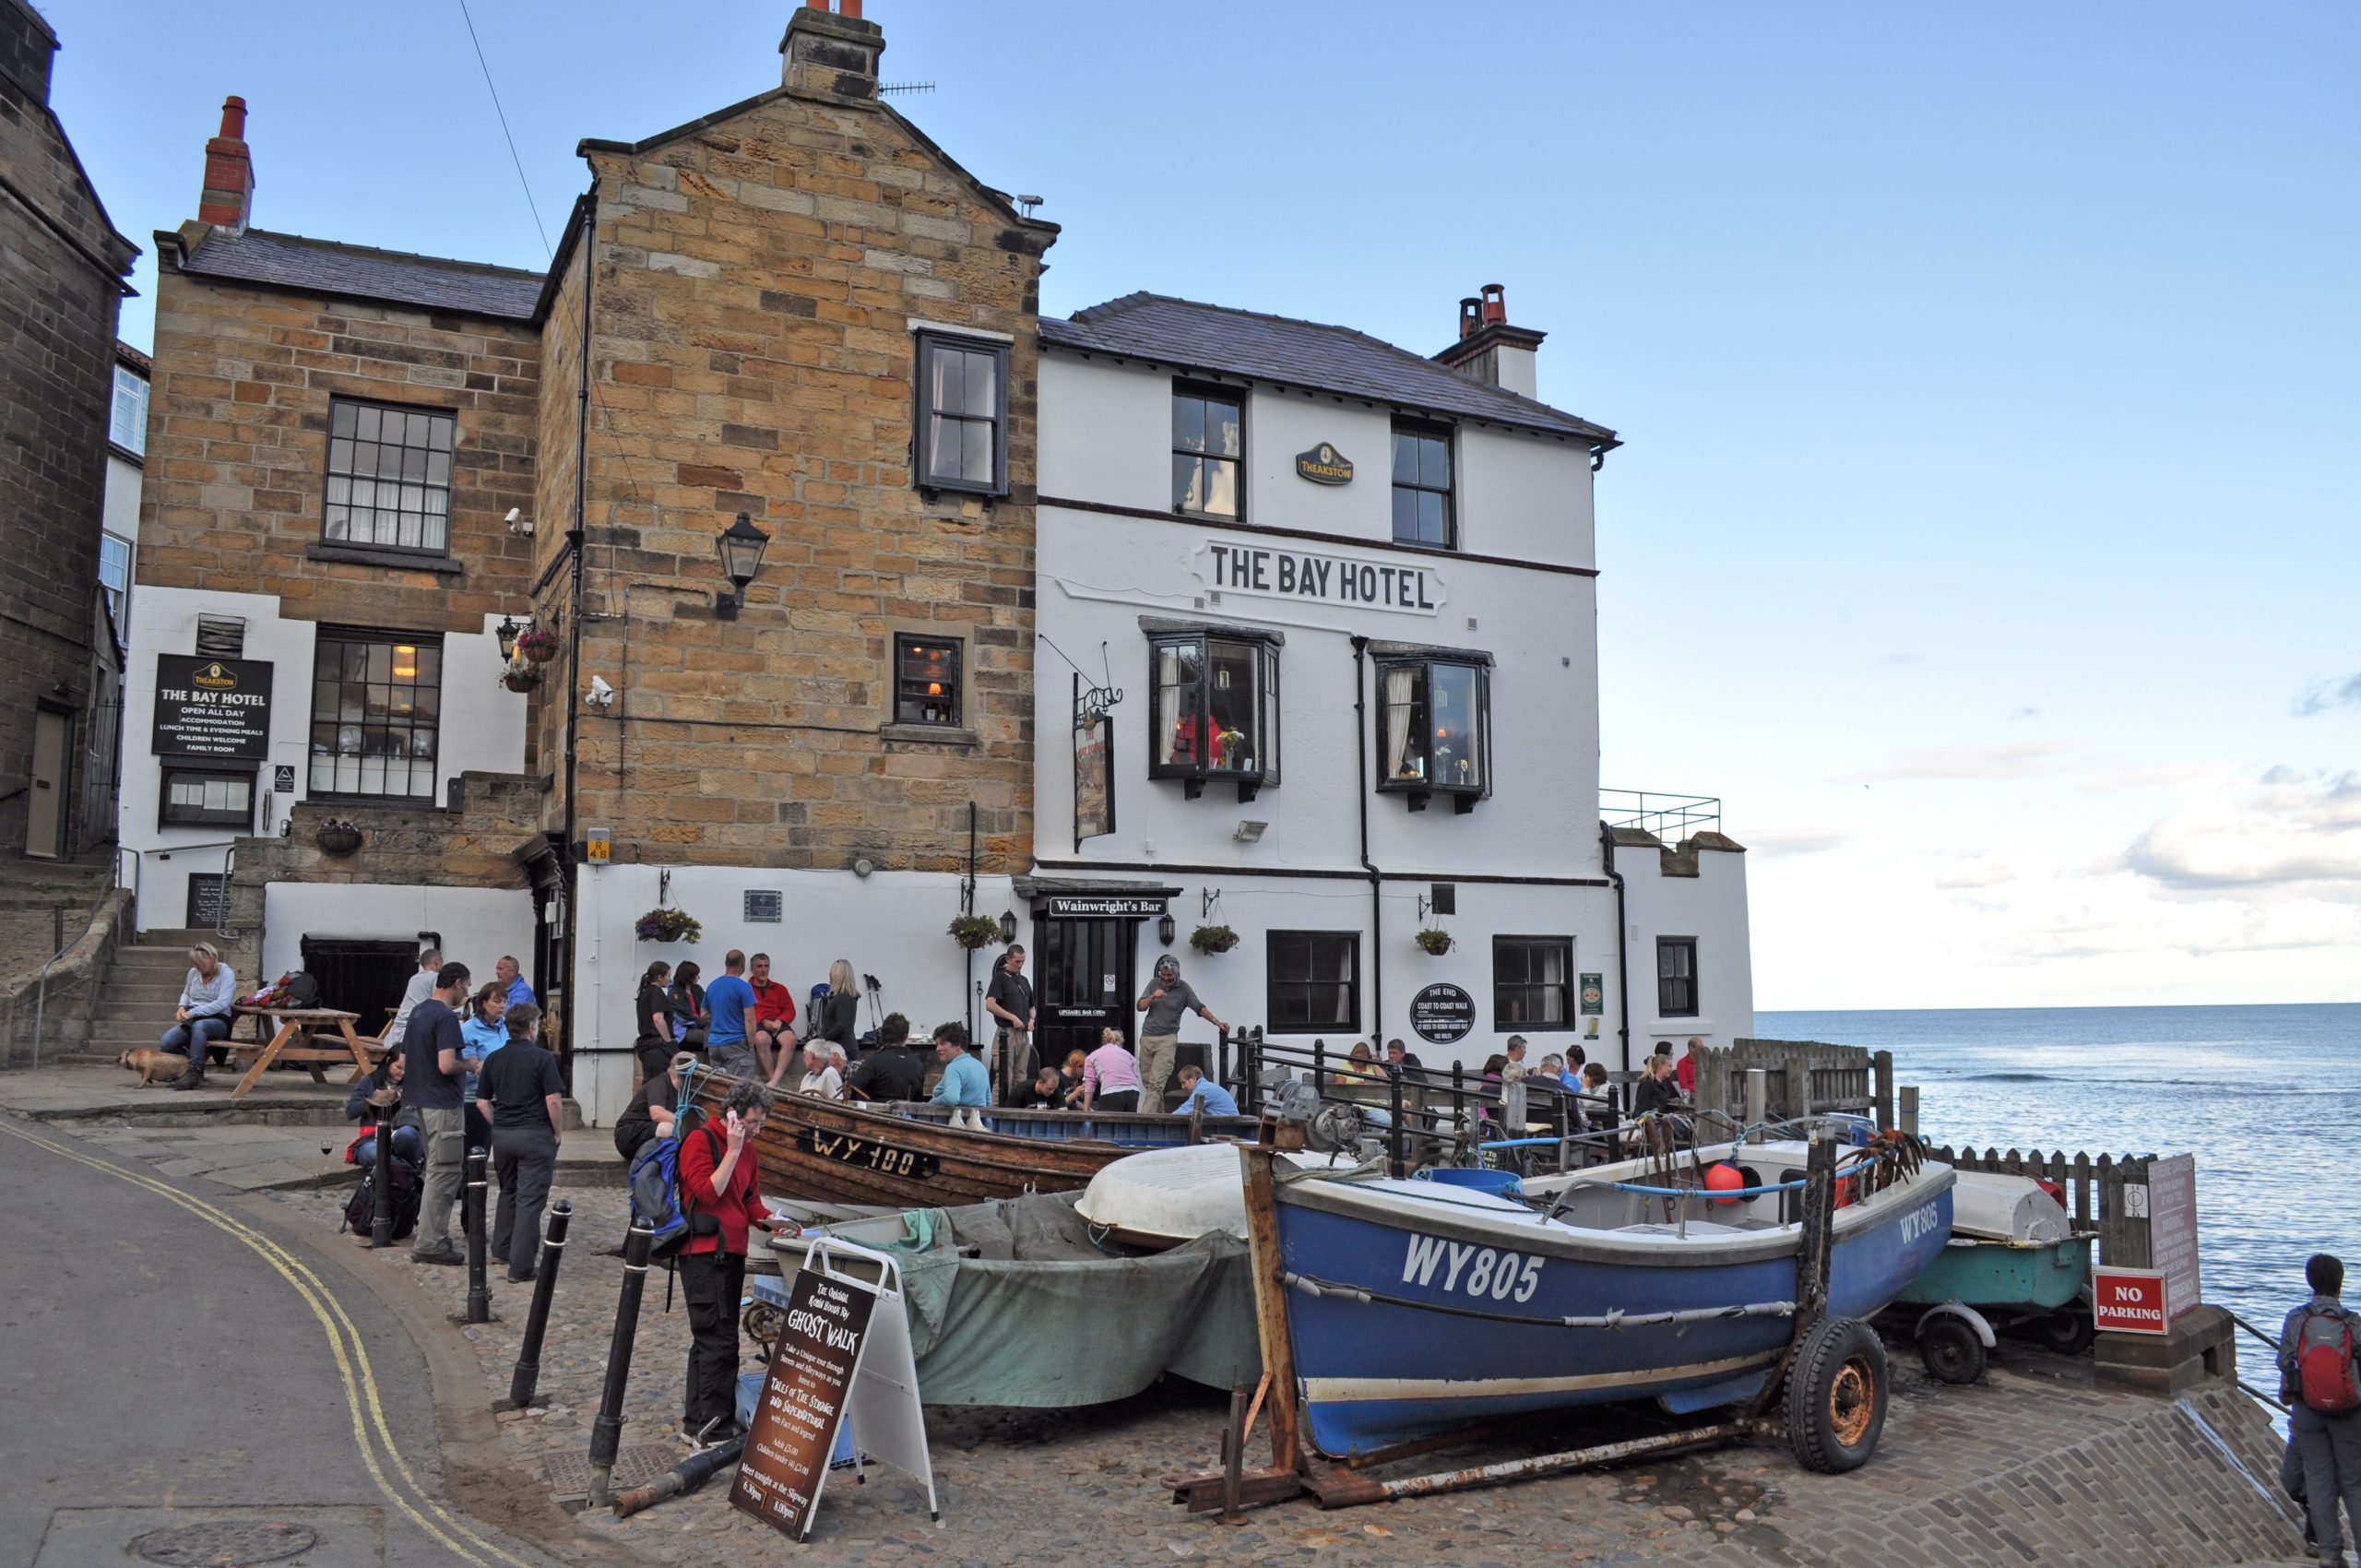
I had taken a photo of Robin Hood’s Bay on a sunny afternoon in July. A popular tourist attraction near Whitby, Robin Hood’s Bay is a small fishing village reached via a steep, winding, cobbled road. One of my favourite places to wander, and full of inspiration for photographs, drawings, paintings… and pyrography!
I converted the colour photo to a number of black and white versions, using various filters available in Adobe Photoshop. The one that proved most useful was the Sketch/Stamp filter. Corel PaintShopPro is another graphics package with similar filter options, though I think Photoshop has the edge on what it offers. I reversed the picture using Microsoft Publisher (select the image, then “Rotate” and “Flip Horizontal”), and printed it out on an ordinary deskjet printer. Publisher also allowed me to scale the picture to fit the platter, to crop it to a circle, and to add the “Robin Hood’s Bay” text.
Once printed, I used masking tape to fix the reversed picture to my platter. The ink face is in contact with the wood, then gently rubbed over the back of the paper with a soft pencil. I dampen the surface of the wood lightly with water, which helps transfer a good impression in ink of the picture onto the wood. I use original printer ink, not generic versions, as this gives a more intense impression when transferring.
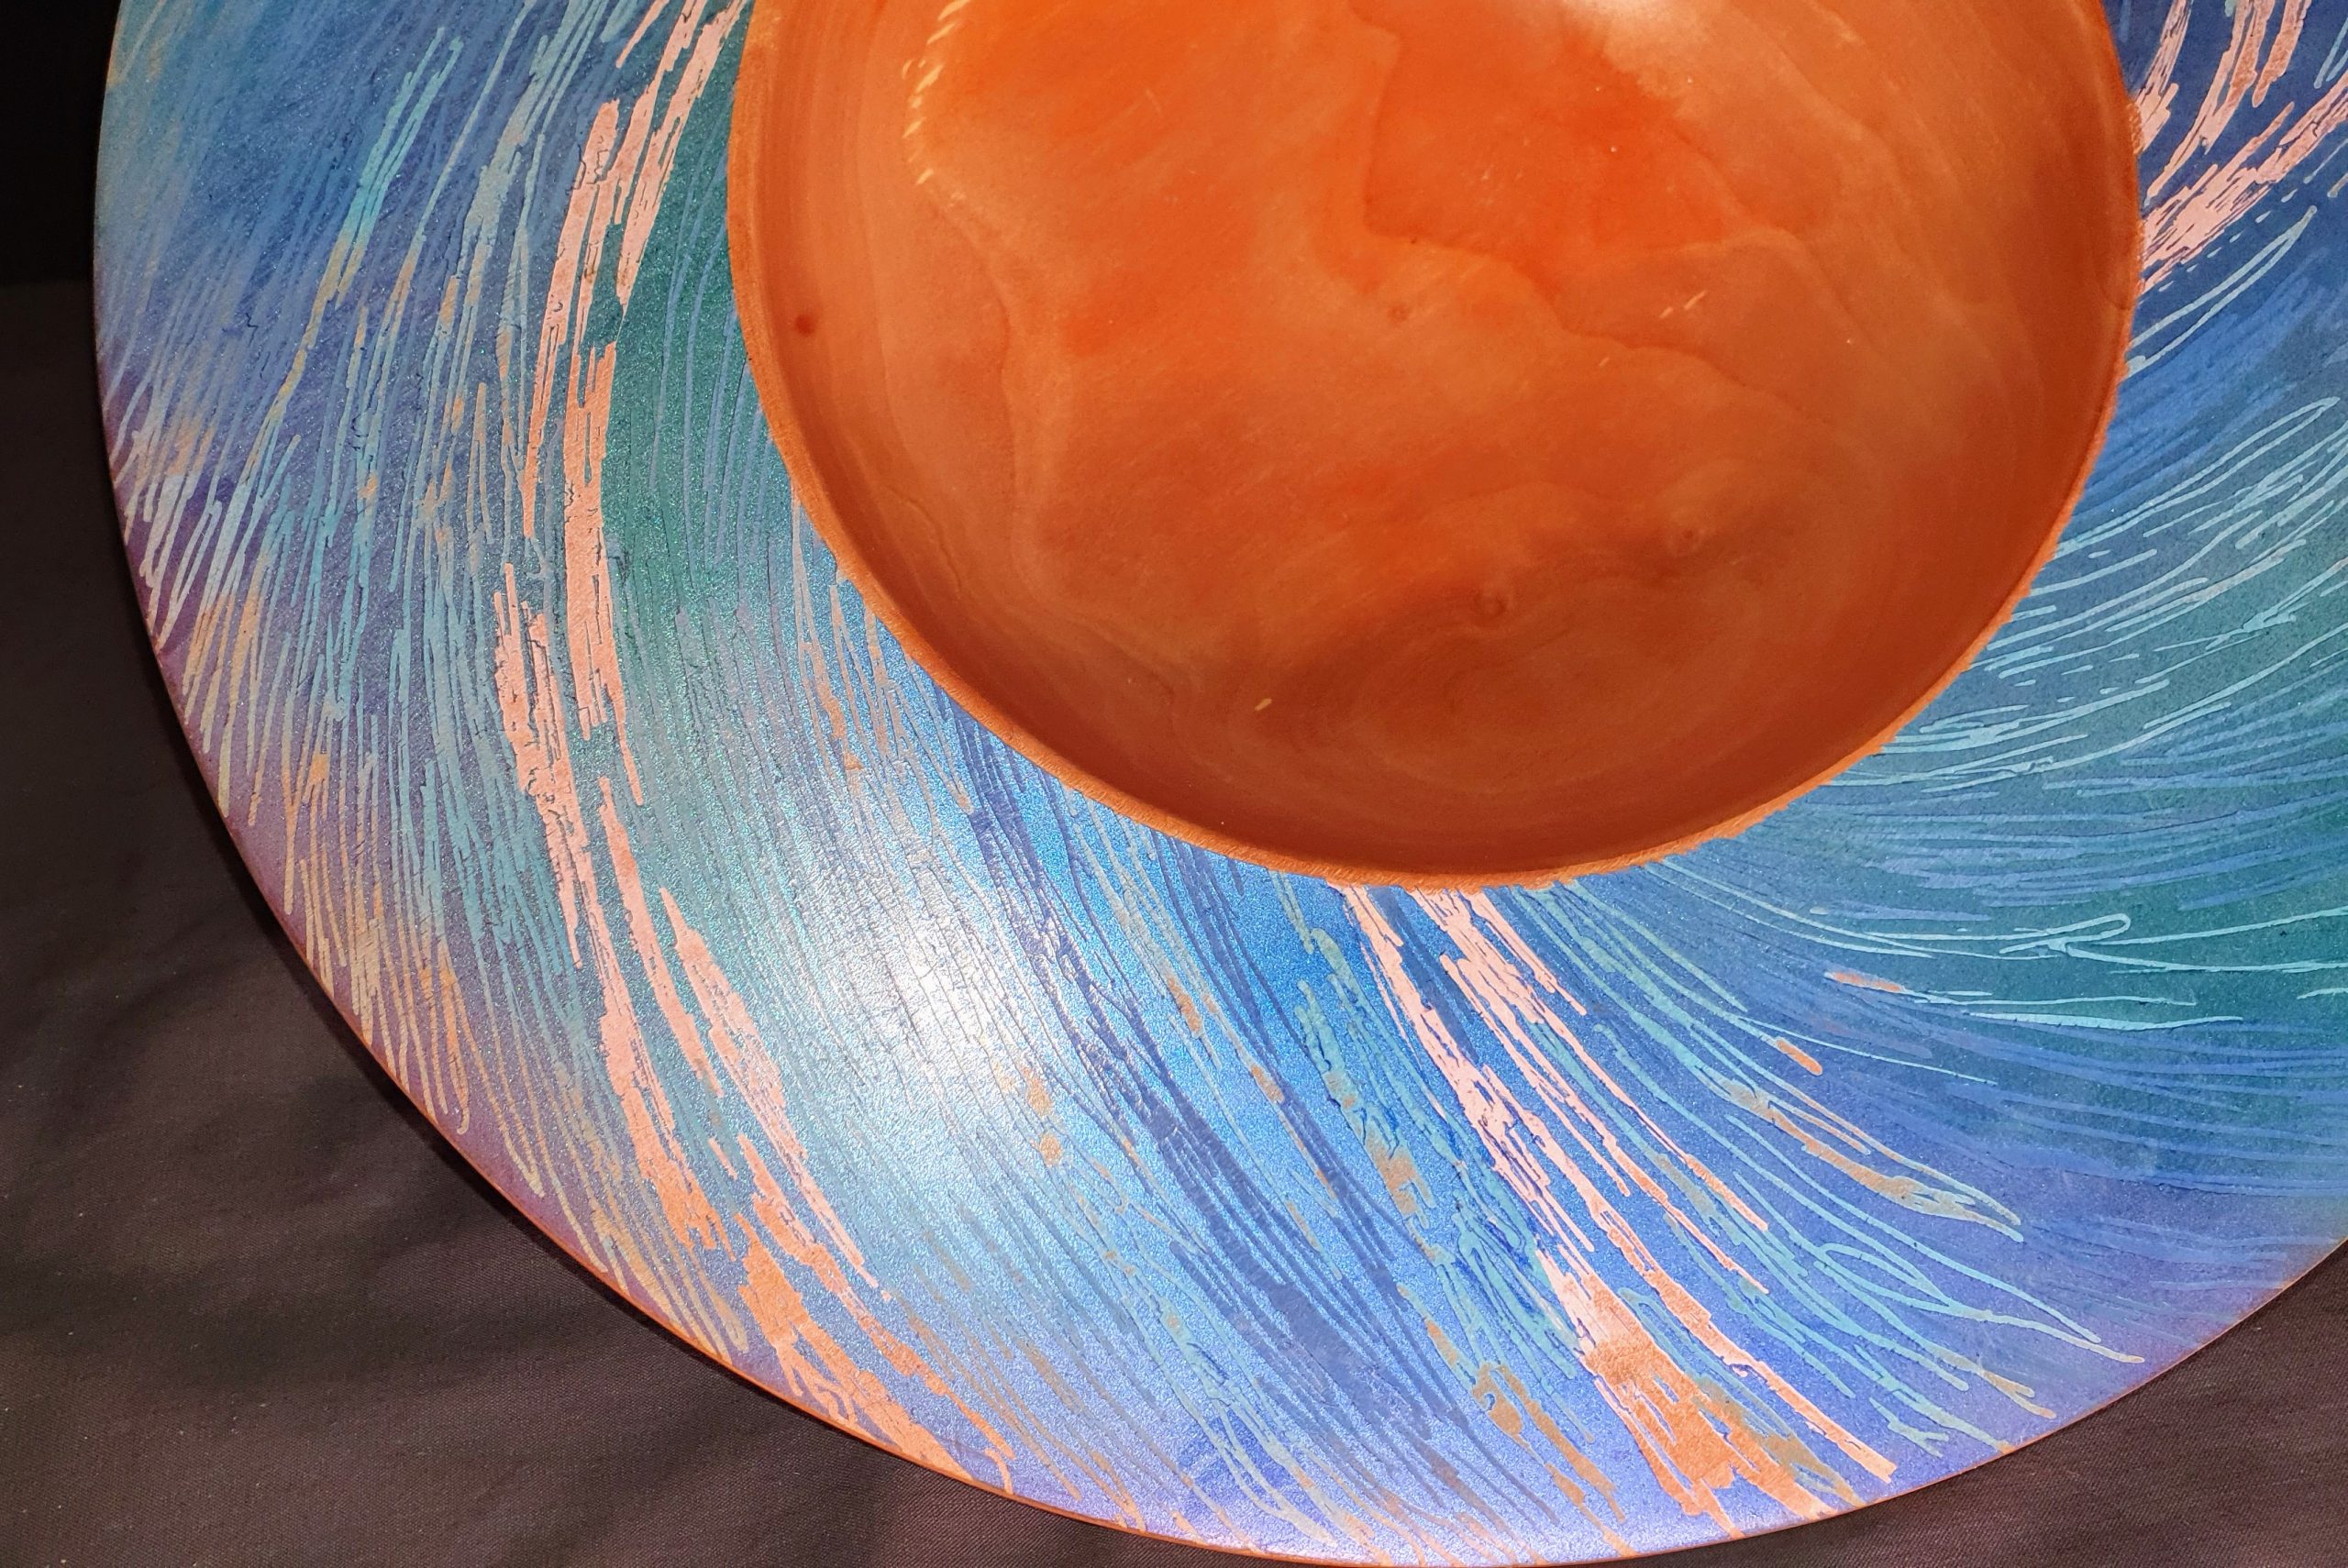
I use a Peter Child pyrography machine as well as a home-made wire stylus, made from 22 SWG wire, flattened out with a hammer, bent to shape, then filed to a skew point. This allows very fine lines to be burnt using the point of the skew, but also shading of areas using the flat side. Compare the fine lines of the window frames and the boat wires in the picture with the shading technique used for the stonework and the cobbles. This was the only tip used for the whole project. The trick is to file the point sharp enough to burn well, but not too fine as to result in it snapping after a very short period. An alternative is to buy a spoon-tip nib, which can be used in the same way for fine lines and for shading. Peter Child machines have a temperature control ranging from 0 to 10: for artistic work like this picture, I never go above 3. A light touch and repeat applications where necessary avoid burn blobs and burn shadows.
Once the pyrography was complete, the platter was sealed with cellulose sanding sealer and given three coats of wax using a 3-wheel Beall buffing system: Tripoli, white diamond, and finally carnauba. I find a wax finish preferable to oil: wax enhances the creamy white colouring of the sycamore, whereas oil darkens it, reducing the contrast for the pyrography.
Graham Brooks
Social media – Facebook Graham Brooks – Instagram grahambrooks64
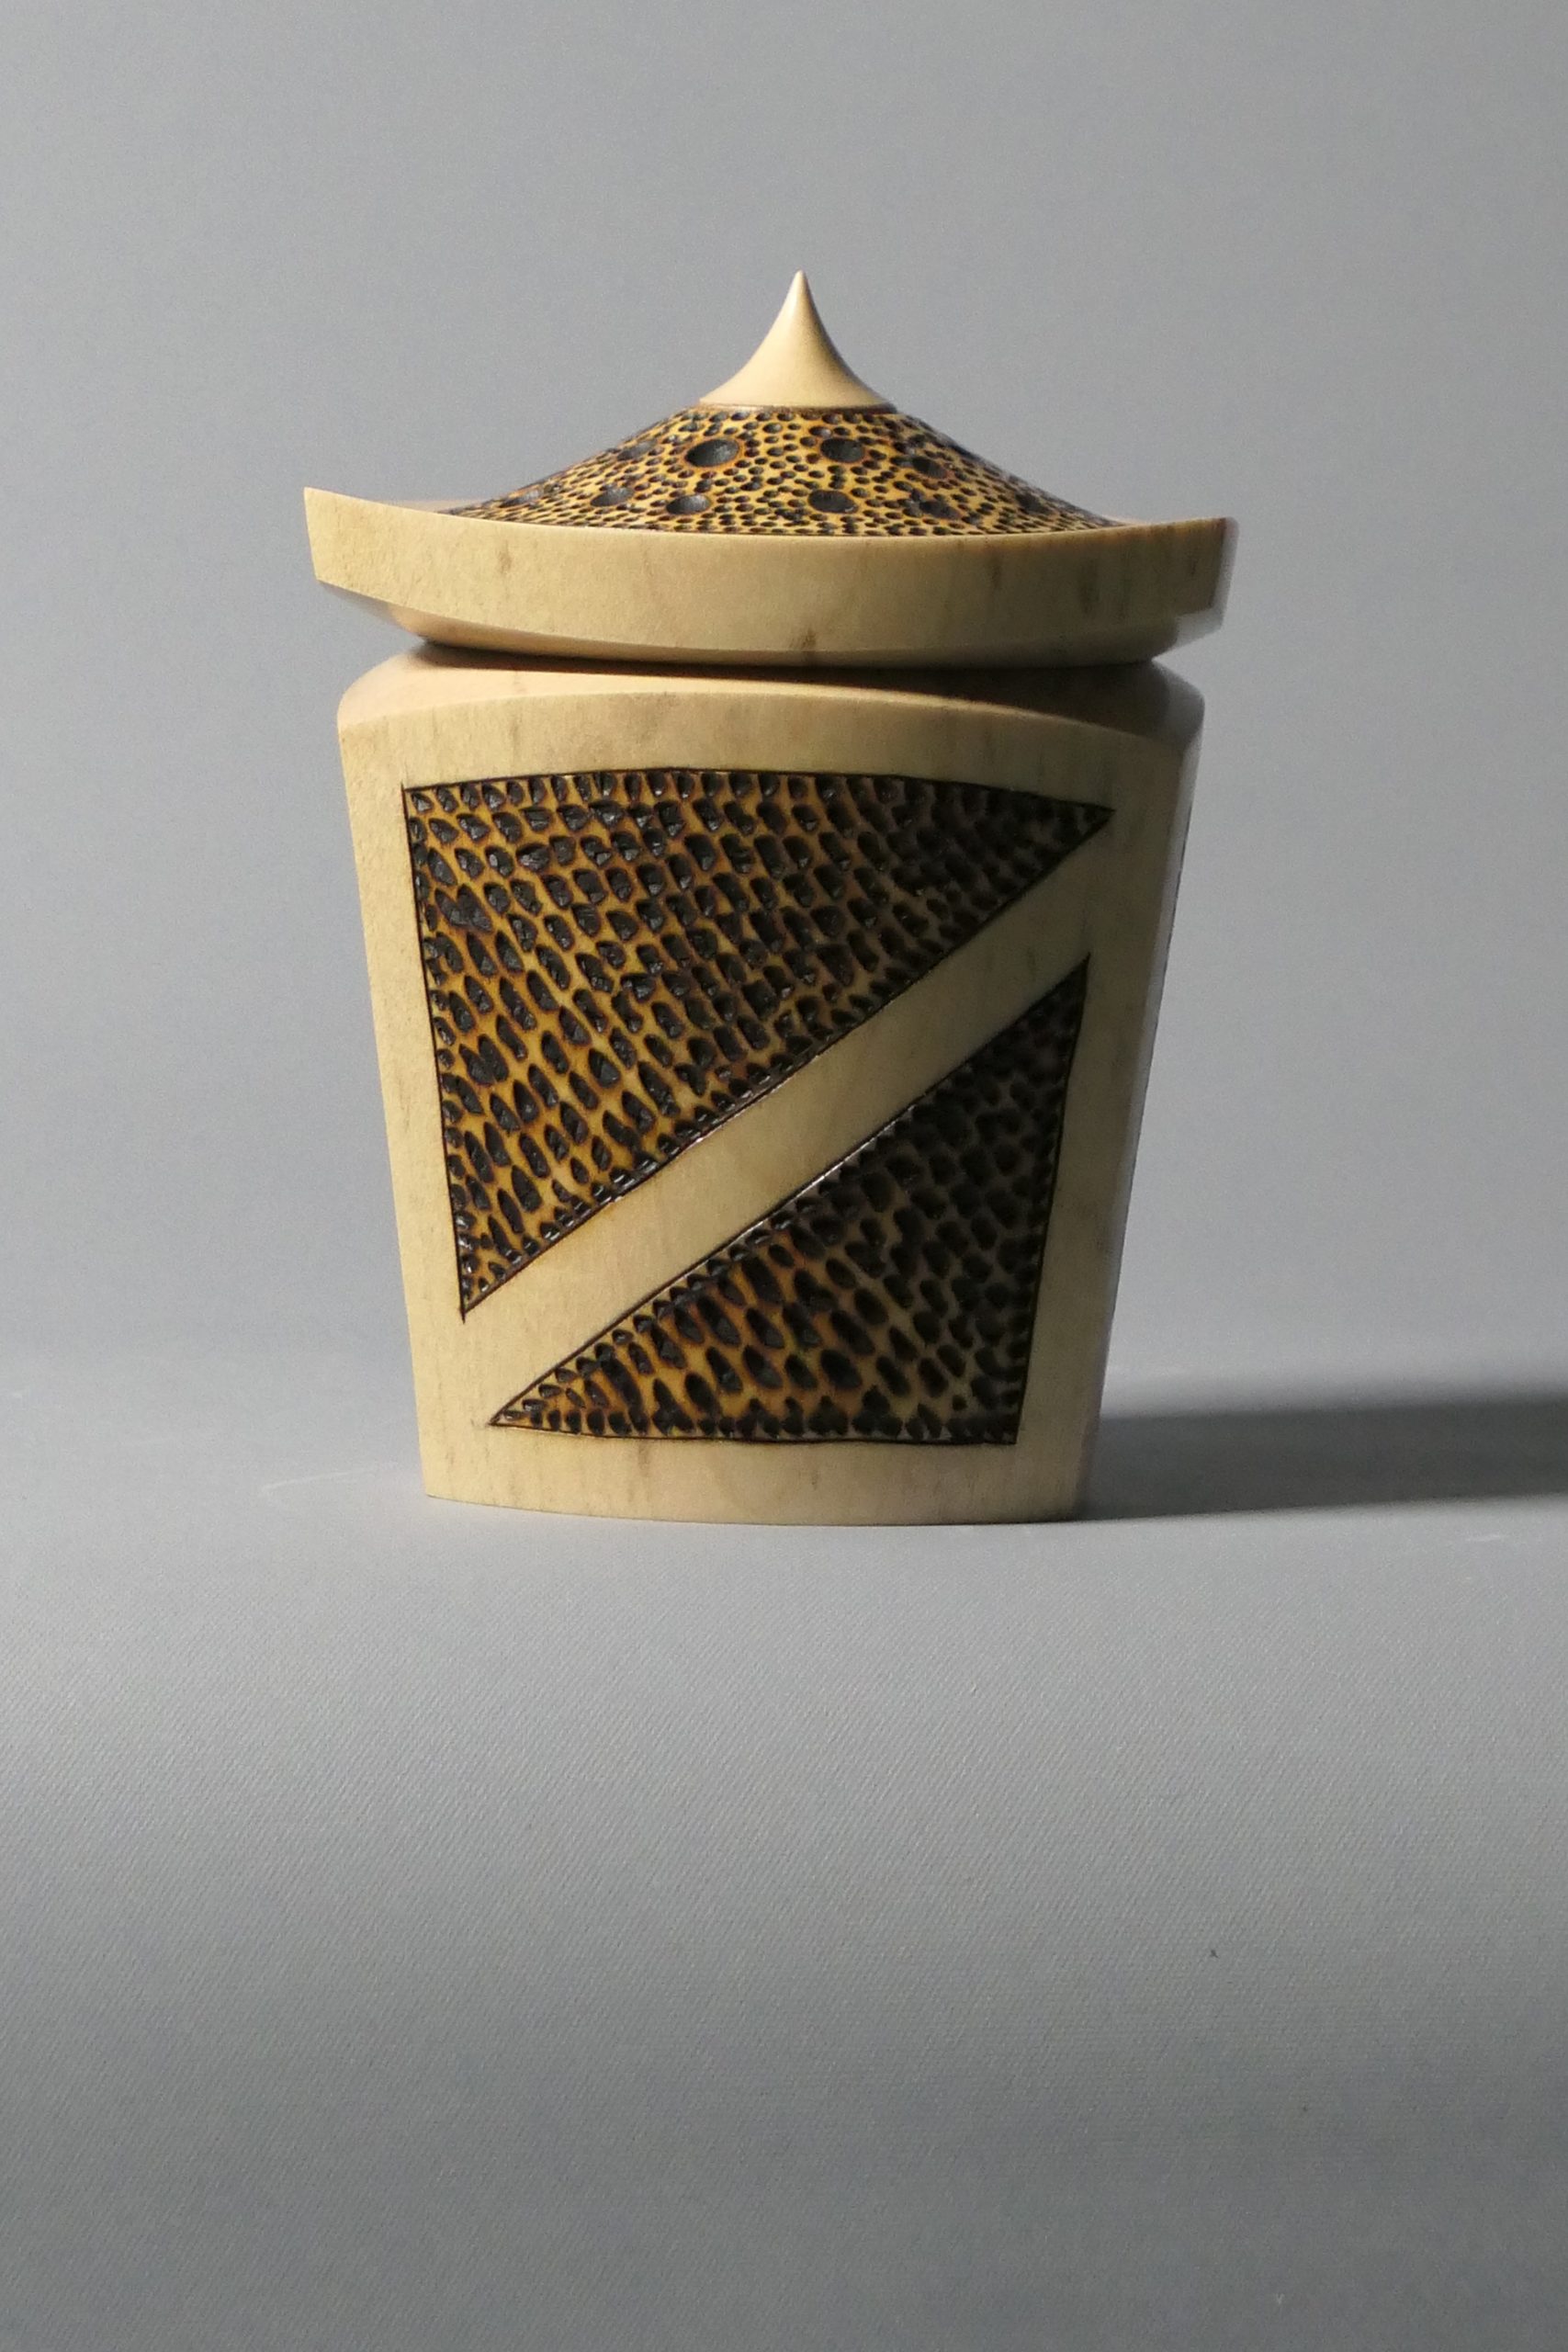
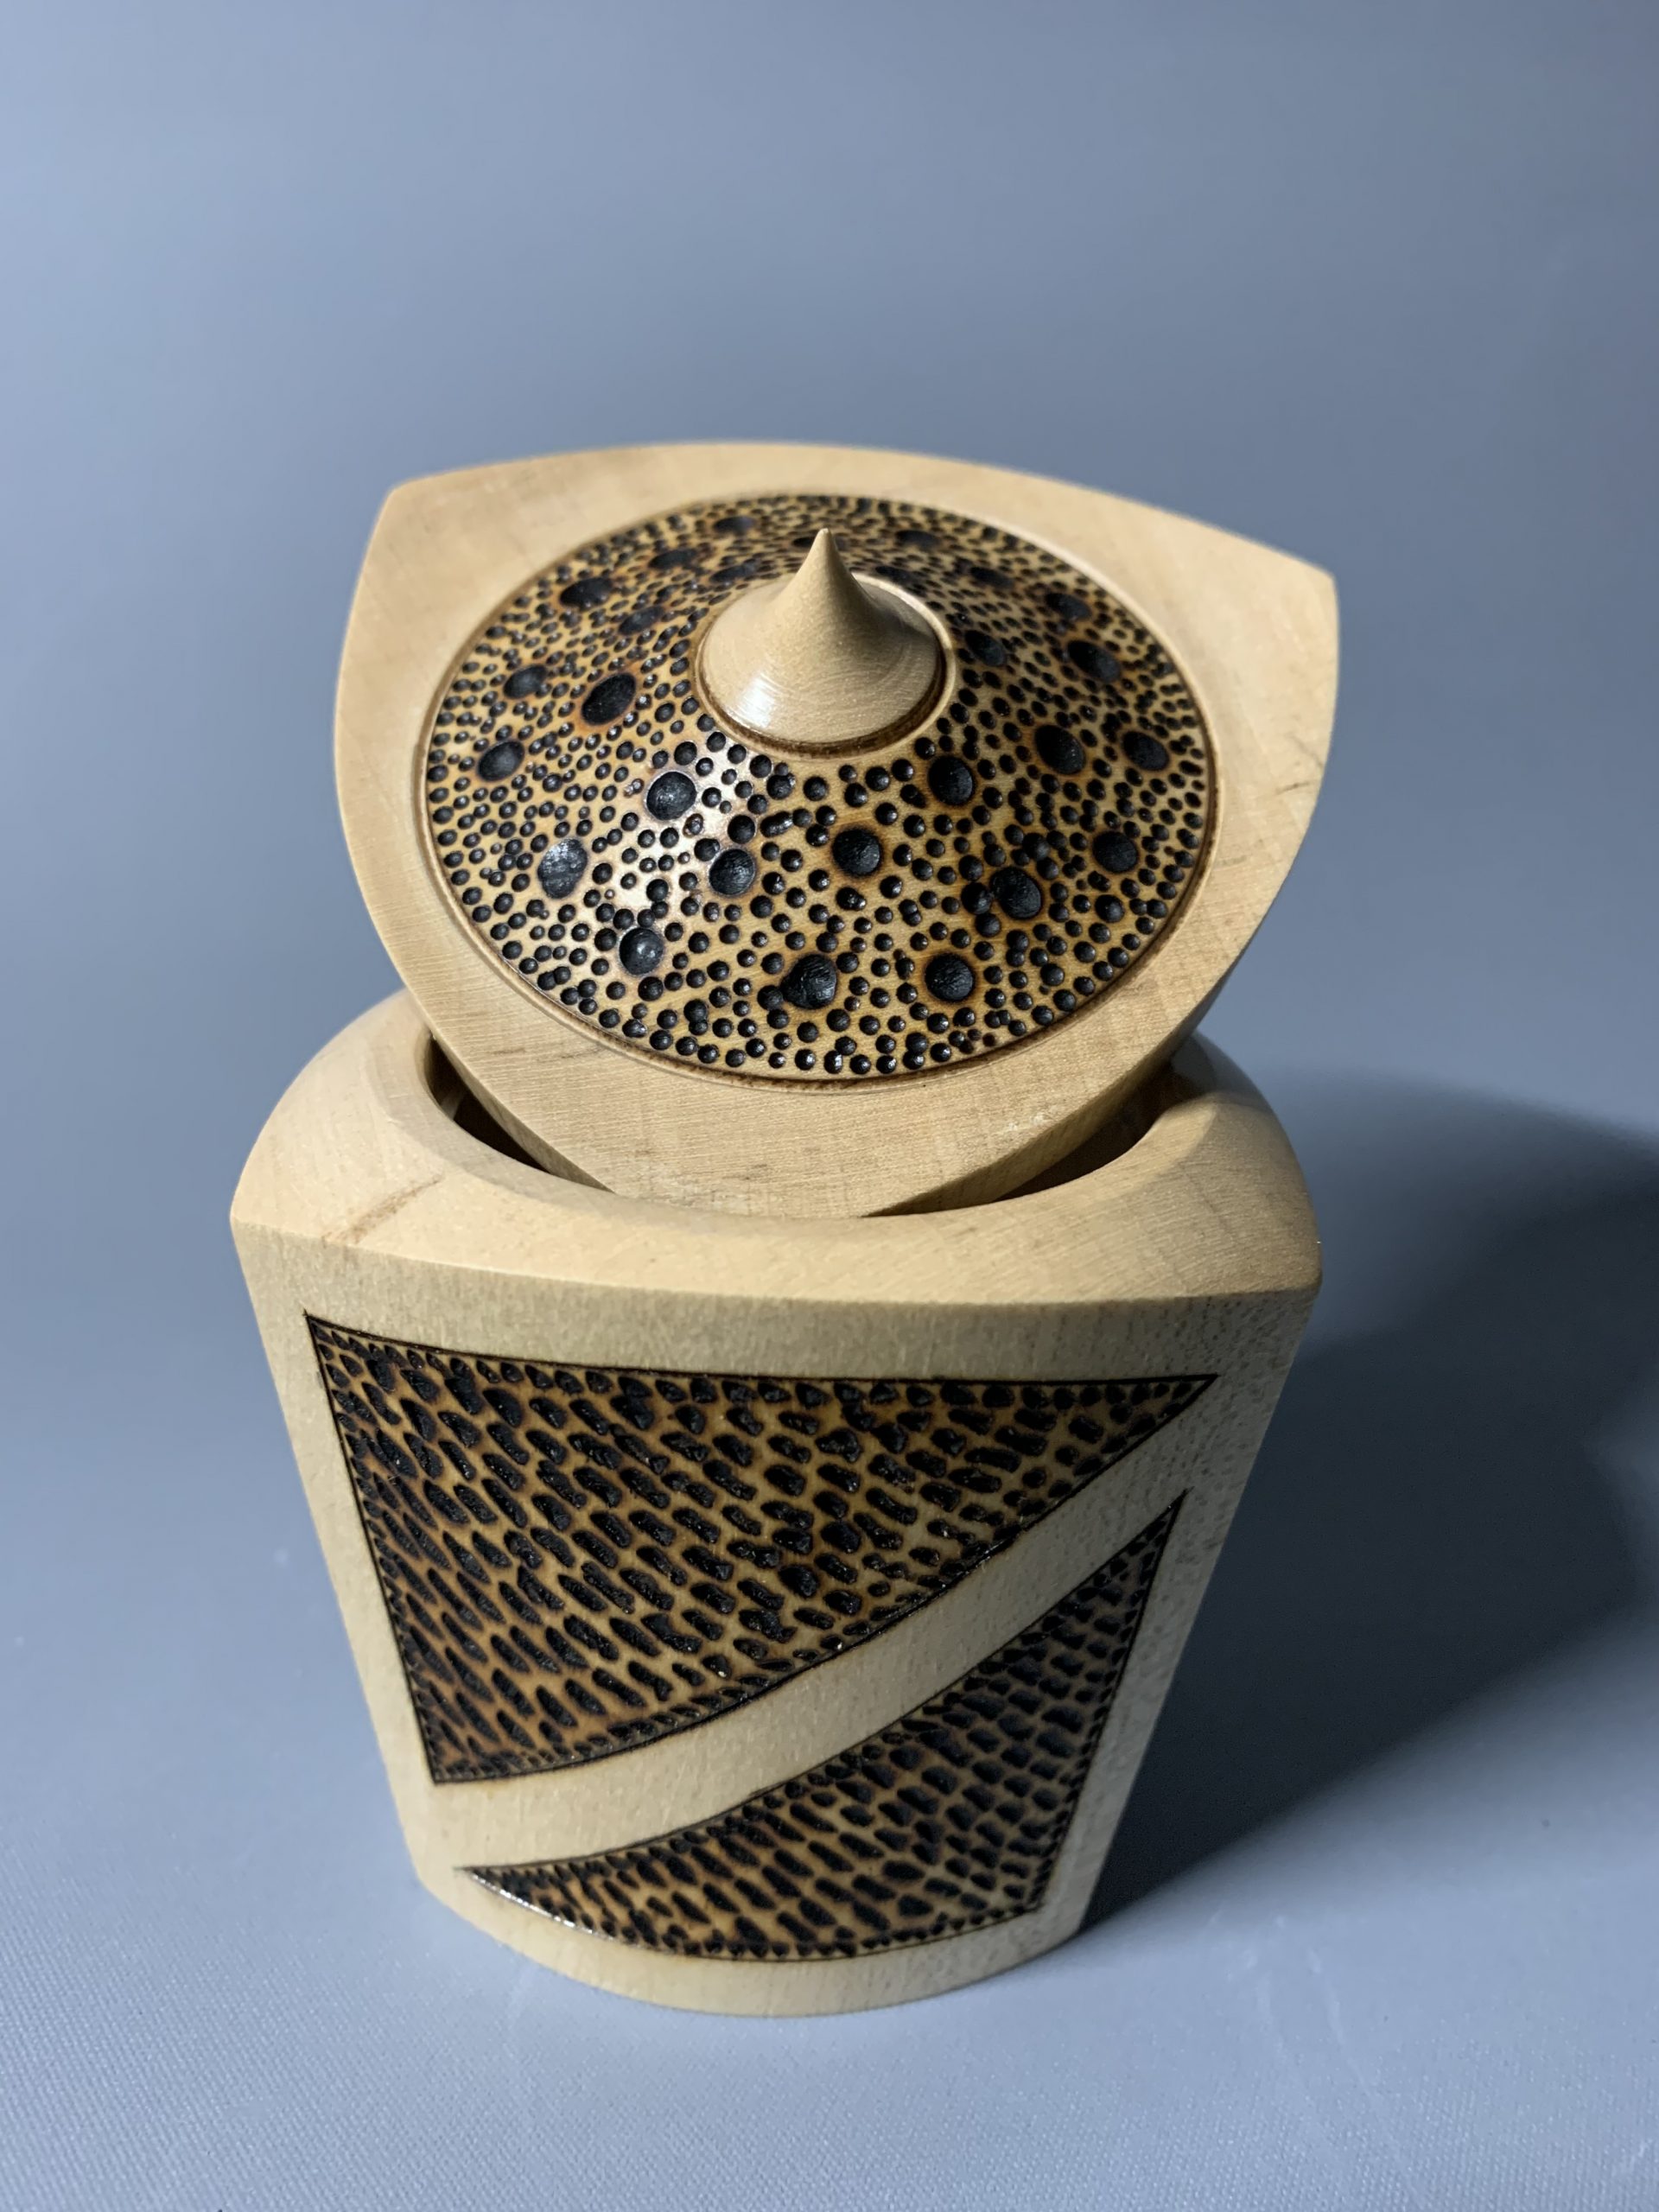
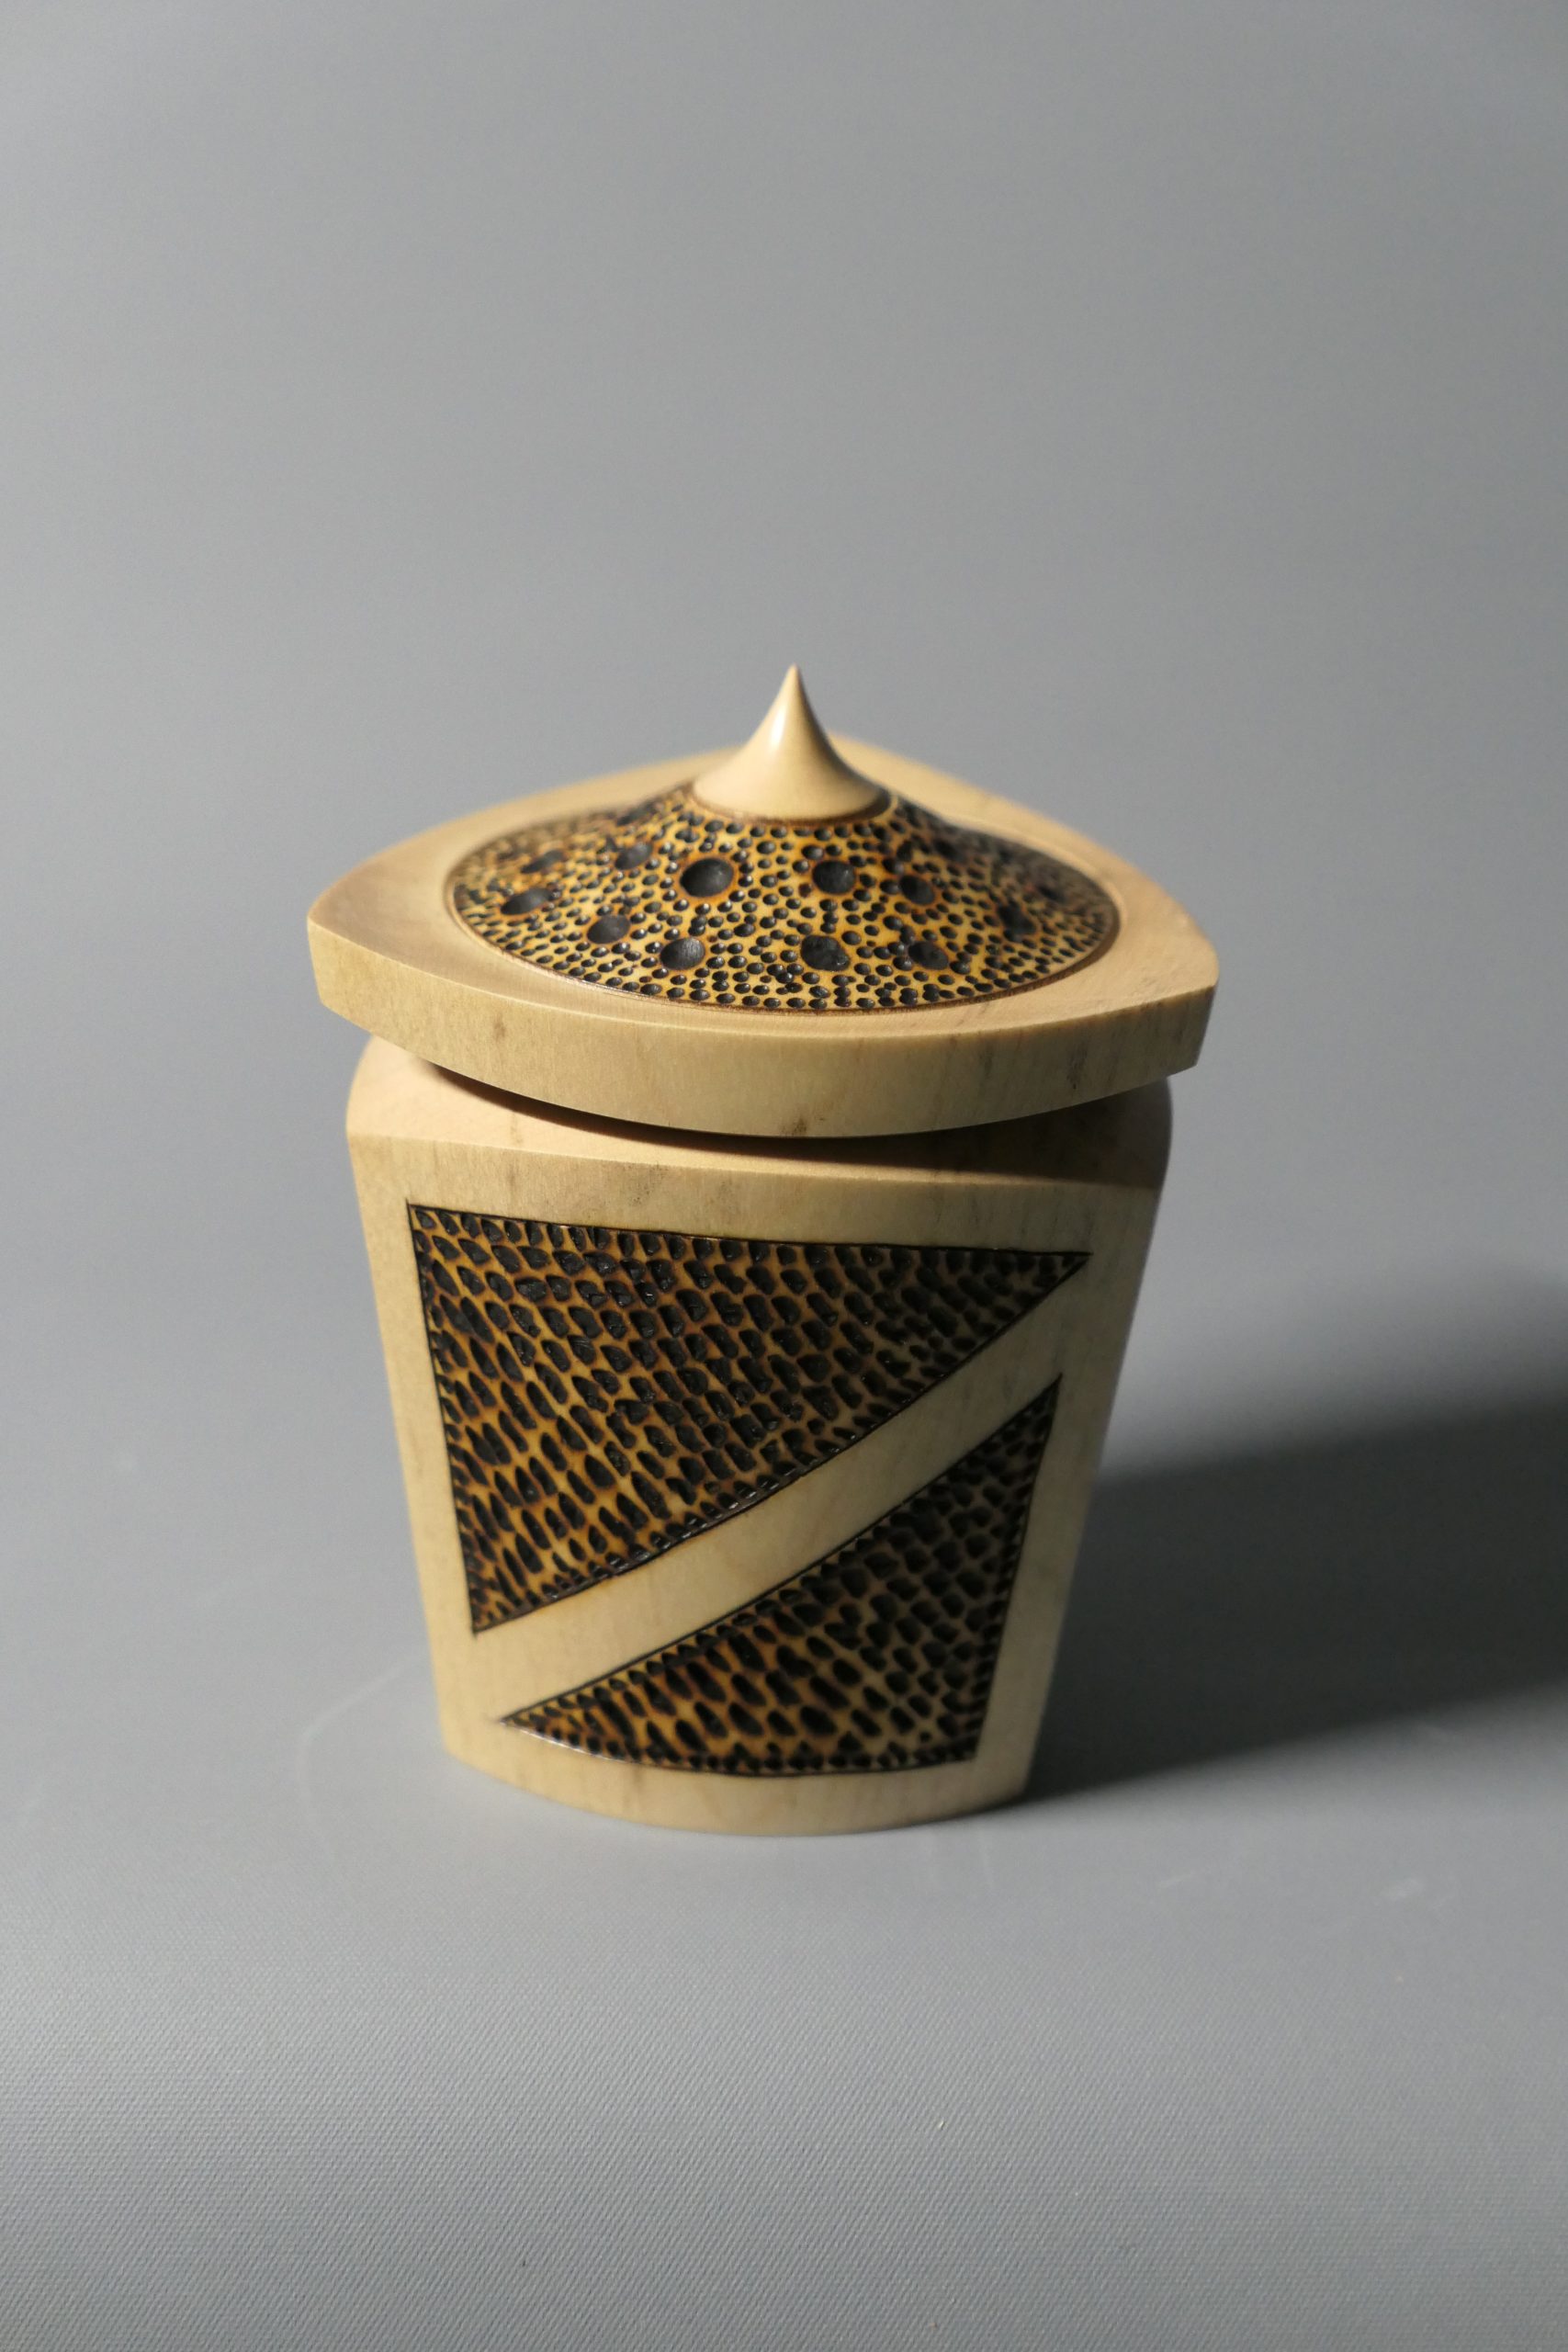
The piece is a three sided multi axis trinket box with an oriental influence inspired by a Cindy Drozda design. The overall size is about 80mm wide and 100mm high. I have previously textured / decorated one of my twisted multi axis boxes with pyrography and it seemed well received so thought I would give a similar treatment to a different shaped box for this month’s entry.
The box was turned from sycamore which is a ‘kind’ wood for pyrography and its light colour provides a good contrast to decoration / texture. Several textures /patterns were tried on scrap wood and then the perimeters of the pattern drawn in pencil prior to commencing the work using four different tips in my Peter Childs pyrography unit.
The finish applied to the piece was a coat of Chestnuts acrylic sanding sealer followed by three stage buffing, the final buff being with carnauba wax.
Roger Groom
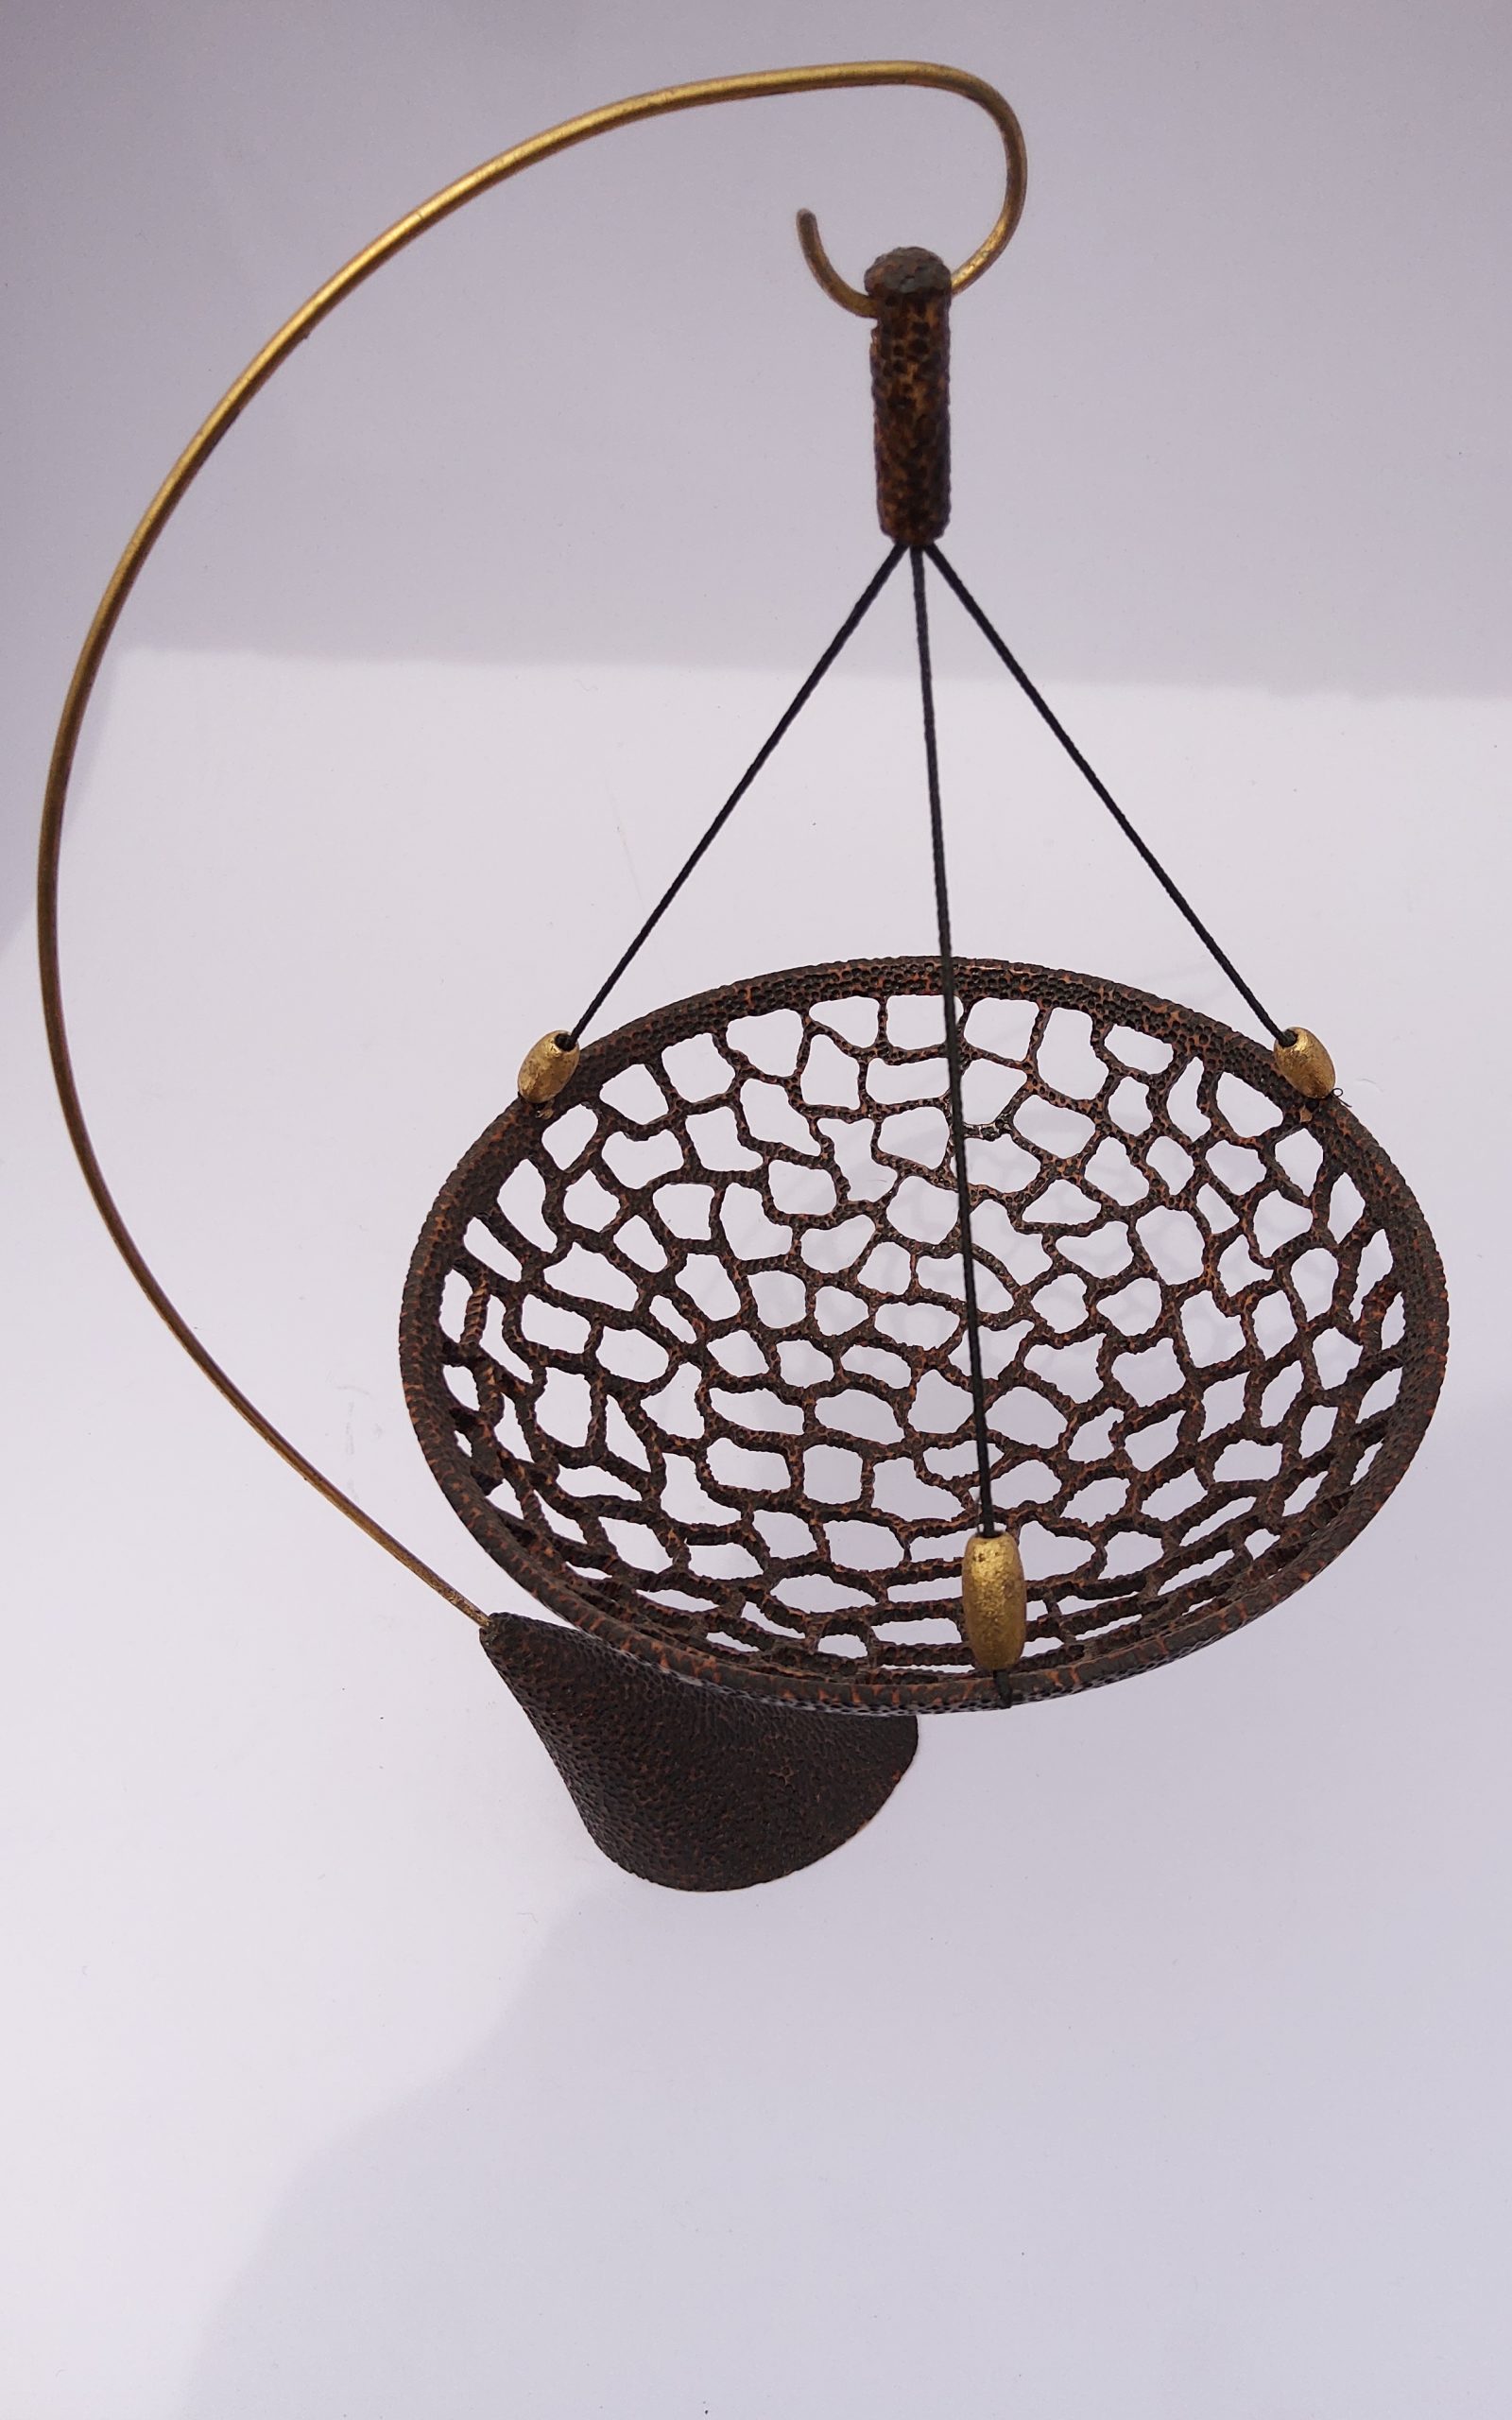
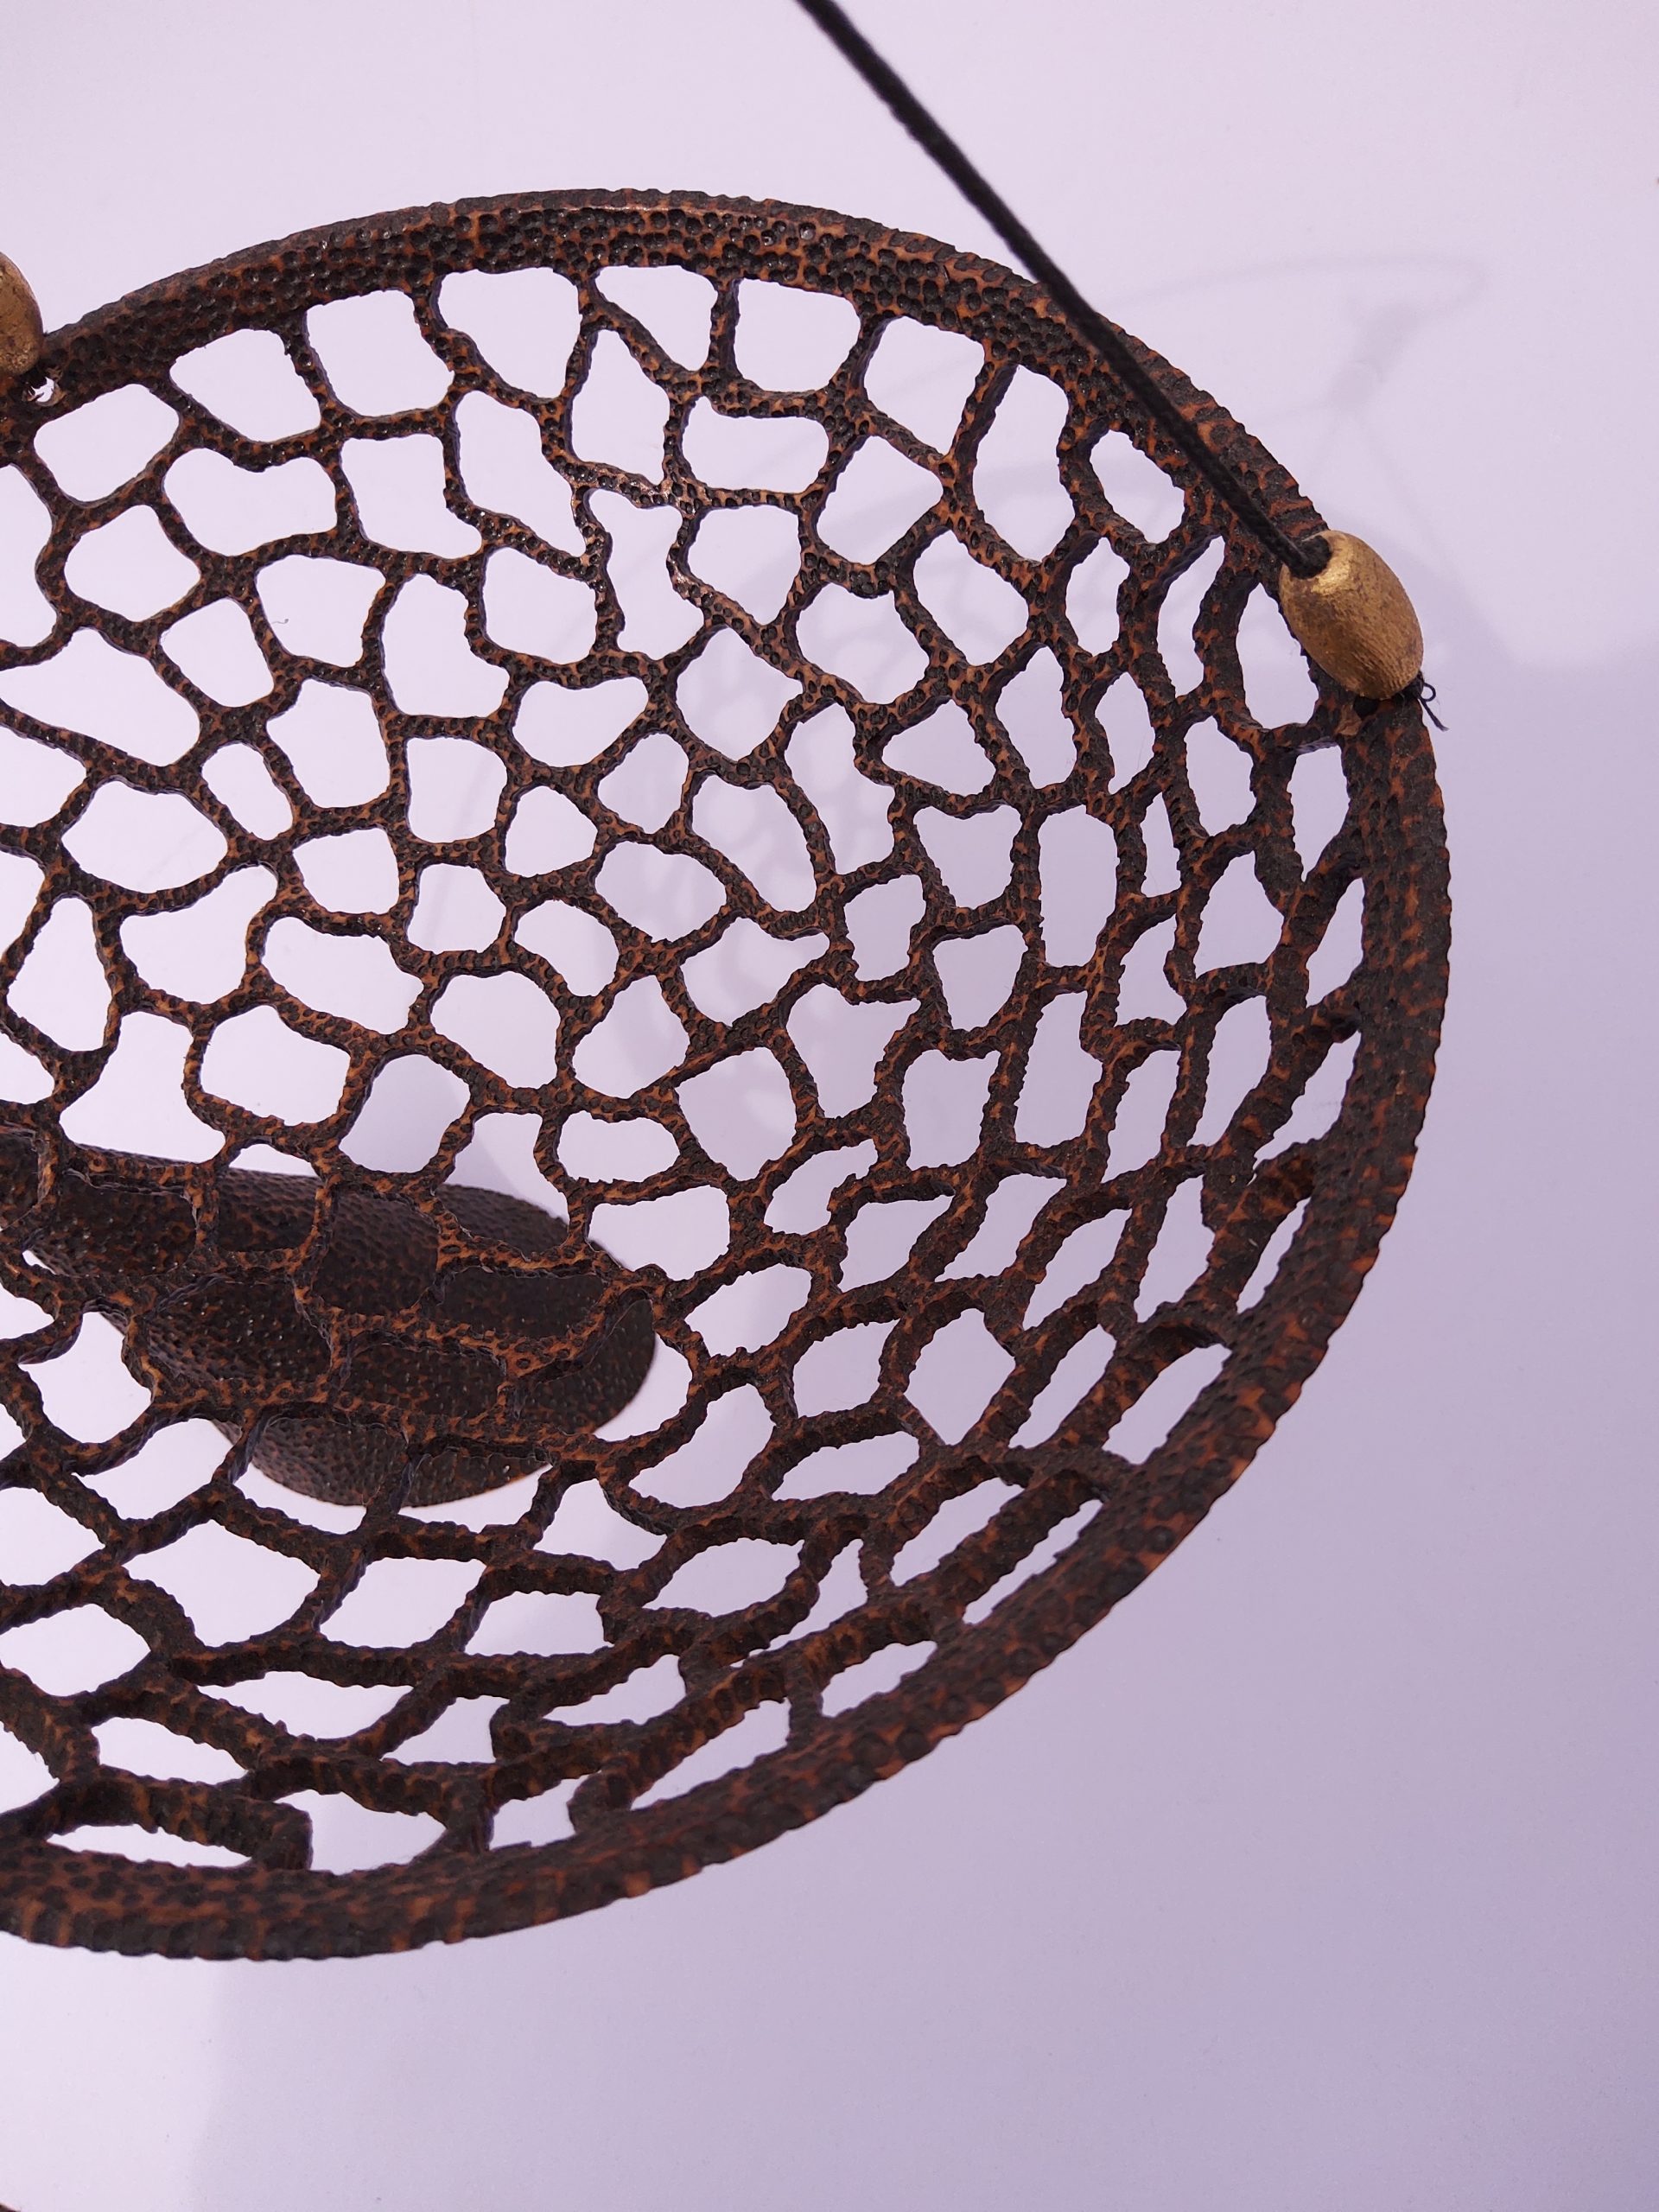
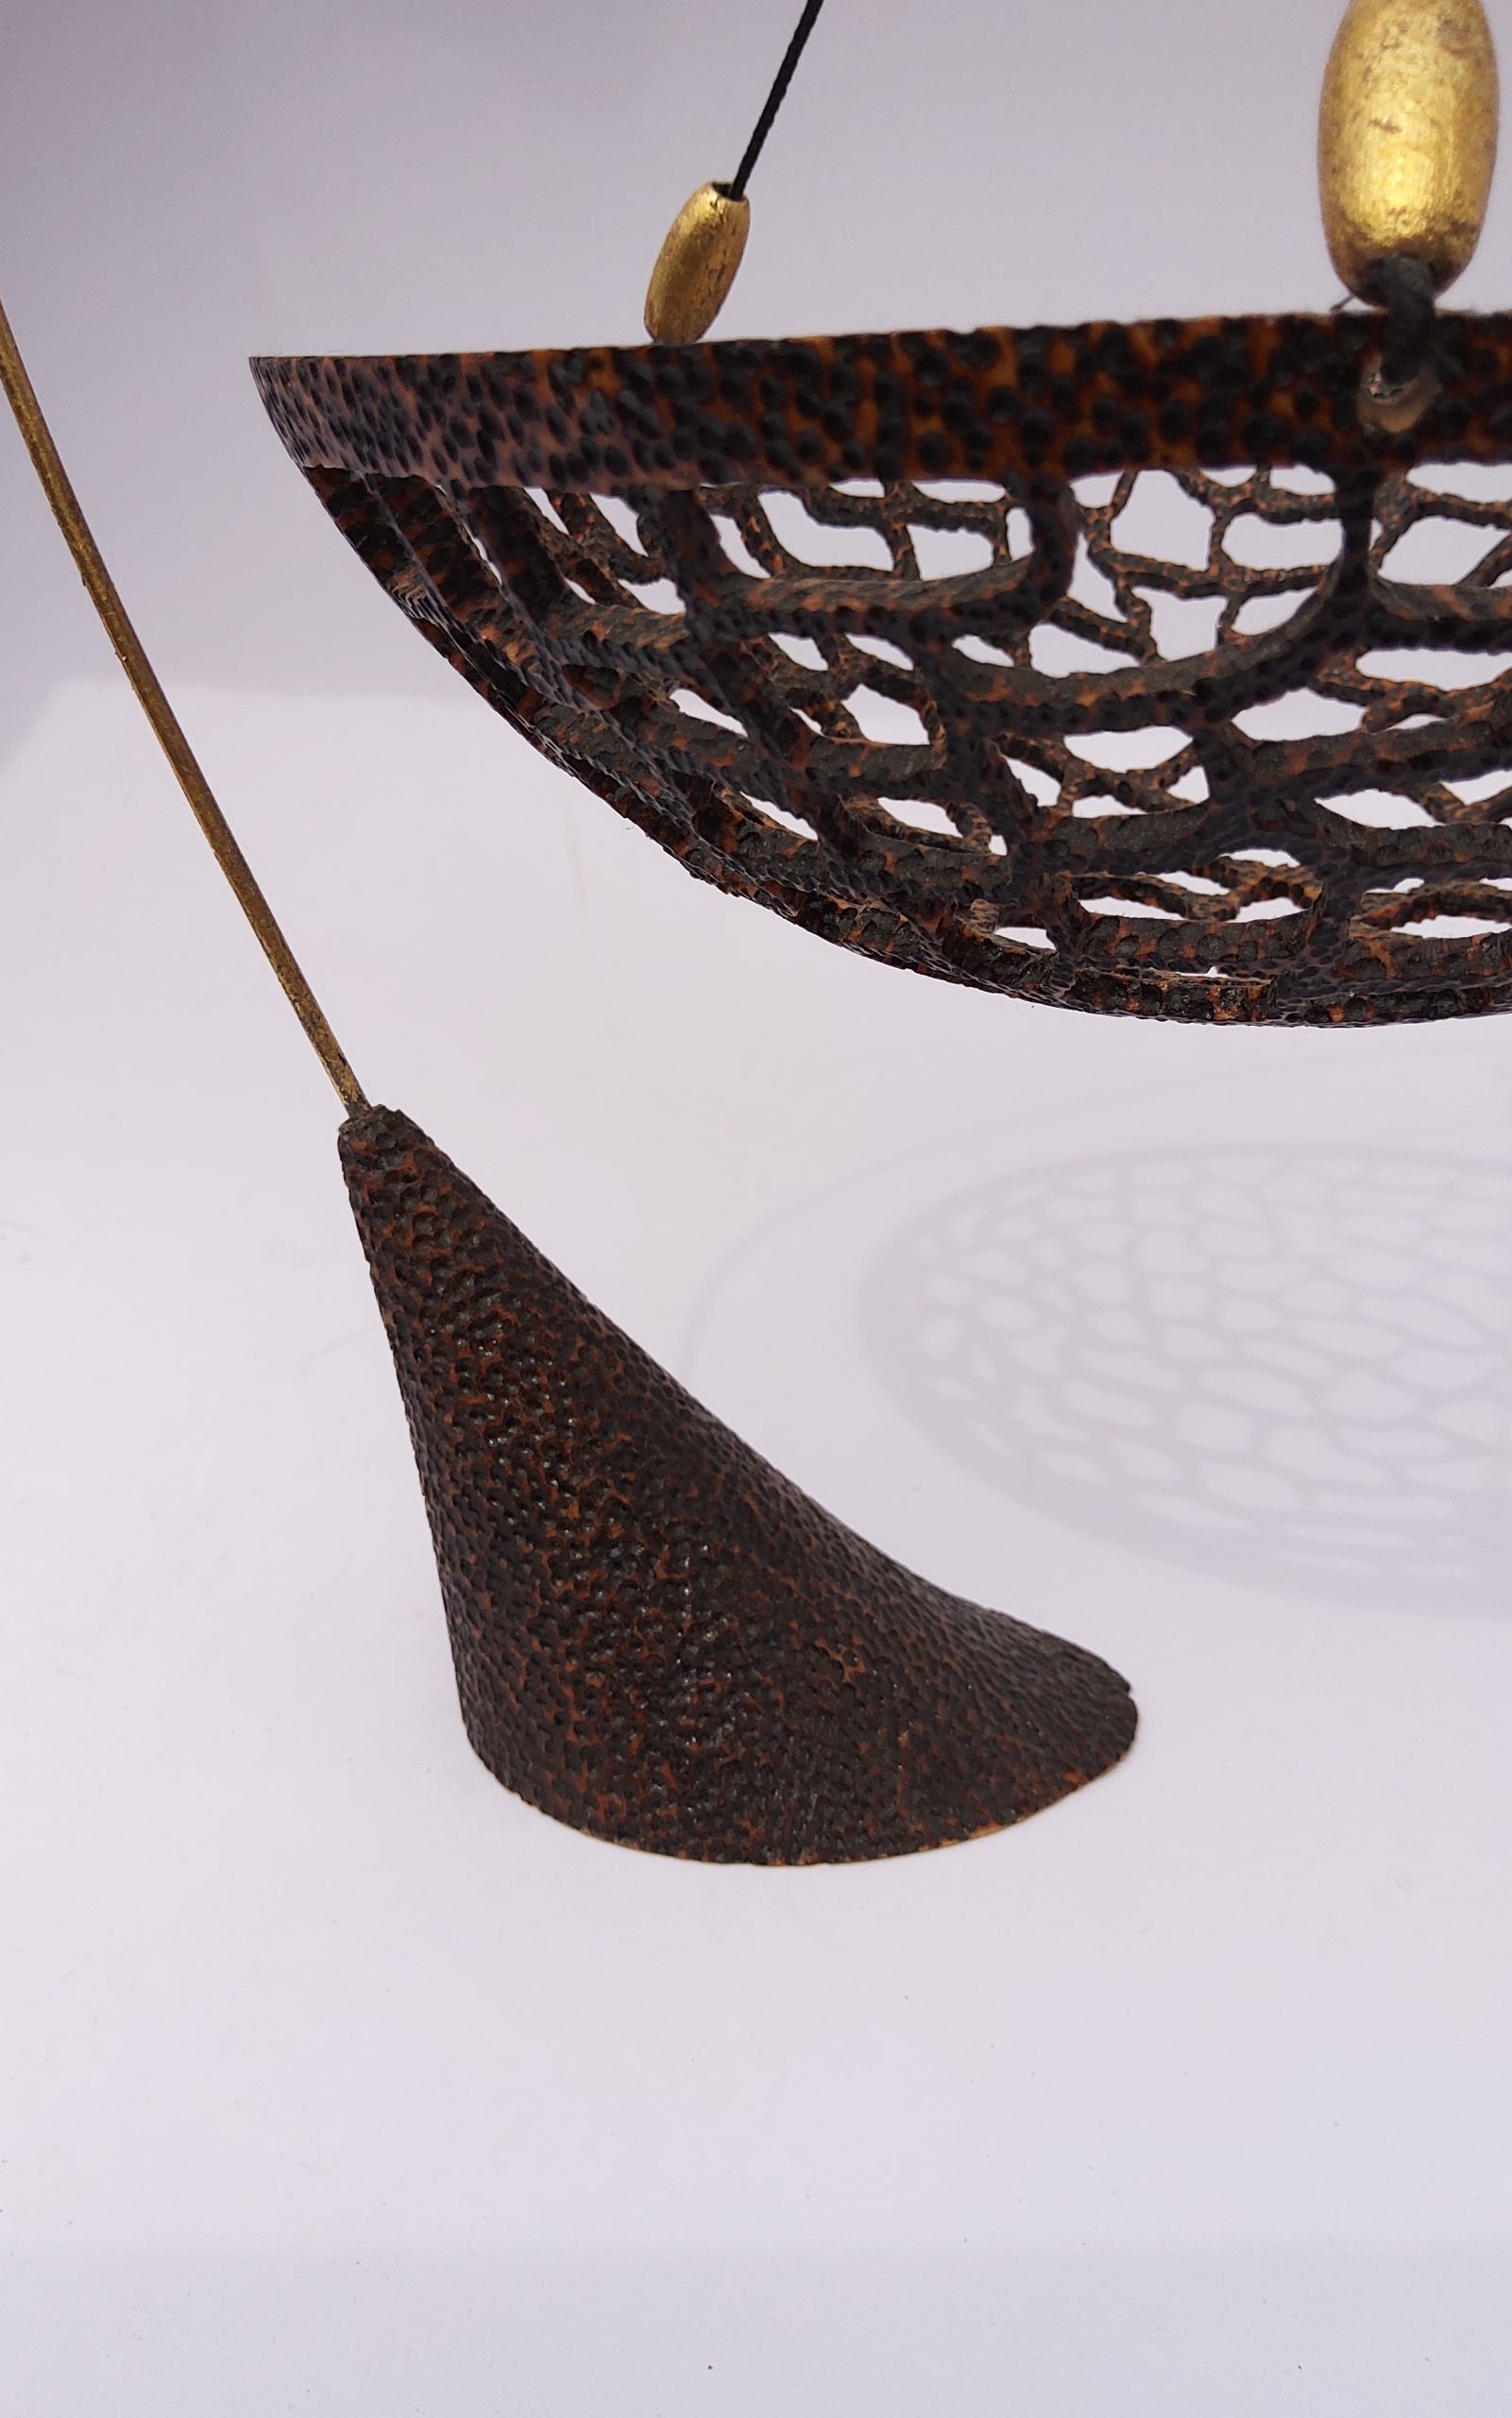
It is a pierced and pyroed hanging basket. The inspiration for this piece came from several well known turners, namely Andi Wolf, Micheal Gibson and Ashley Harwood. It is made of Beech and being quite a bland piece of wood needed a bit extra. I pierced it using a Dremel and then pyroed inside and out with a spoon bit using a Red Scorpion unit from Woodart.
The beads which support the bowl have been gold leafed as has the supporting wire. The stand I used was like the ones which Ashley uses for her hanging ornaments.
The bowl weighs less than 3/4 of an ounce and the finish was Chestnut acrylic sanding sealer followed by several coats of Chestnut acrylic satin lacquer.