Author Topic: WIP  (Read 8711 times)

Offline Mark Sanger

  • platinum
  • *****
  • Posts: 807
    • Mark Sanger Web Site
WIP
« on: August 25, 2015, 05:37:13 PM »
Hi all

Here is a WIP for an offset lidded form I am making, it is based on the one pictured bottom but with the texture being of the same blossom as in one of the pieces I previously posted. Often I hammer a piece by making quite a few variations containing a specific, in this case the blossom texture. The reason for this is that the first one is always the hardest and highlights many issues, in this case the fact I needed a much more powerful Pyrography unit so that I can brand/carve the wood much more efficiently. Now I have the new unit and have found less complex ways of achieving the design I am practicing these (as well as making some more pieces to sell, as I spent rather too much at the seminar)  :) Gotta speculate to accumulate or so they say, or it might just be that I like new toys.  :)

Any way I will up date this from time to time and hopefully it will be of interest.

Thanks for looking


« Last Edit: August 25, 2015, 08:20:26 PM by Mark Sanger »

Offline Les Symonds

  • platinum
  • *****
  • Posts: 3273
    • Pren
Re: WIP
« Reply #1 on: August 25, 2015, 05:57:10 PM »
Always interesting to see a WIP of this nature. What interests me is the way that the flowers look as though they were applied over the texture, which clearly isn't the case. It will be interesting to keep watching this thread.

Les
Education is important, but wood turning is importanter.

Offline Bryan Milham

  • Administrator
  • platinum
  • *****
  • Posts: 4500
  • I’ve had my patience tested; I’m negative
Re: WIP
« Reply #2 on: August 25, 2015, 10:14:17 PM »
Burning all those little dots, and not for the first time. Mark, you have the patience of a saint.
Oh Lord, Lead me not into temptation…

...Oh who am I kidding, follow me, I know a shortcut!

Tom Sherman

  • Guest
Re: WIP
« Reply #3 on: August 26, 2015, 12:34:52 AM »
I like it Mark, got to be more pleasant with the new pyrography pen. I like the offset finial also.

Offline The Bowler Hatted Turner

  • platinum
  • *****
  • Posts: 2260
Re: WIP
« Reply #4 on: August 26, 2015, 07:52:10 AM »
Thia has the making of another great piece. You need to tell us all the details about your new pyrography pen.

Offline Mark Sanger

  • platinum
  • *****
  • Posts: 807
    • Mark Sanger Web Site
Re: WIP
« Reply #5 on: August 26, 2015, 08:48:15 AM »
Hi all

Thank you for taking the time to comment.

This type of work is time consuming and requires the use of magnifying glasses otherwise your eyes get strained. A piece this size will take me around 4 hours to texture, but it is a place I can loose myself and is quite meditative and relaxing, especially as I put some relaxing music on while working.

Pyrography machines are designed for just that, pyrography, shading and burning but not to such a depth as here which is more branding and carving as result many of the machines loose heat as you press the tip into the wood to any depth as such you have to retract from the wood and wait for the tip to glow orange again before the next texture. This problem is amplified the thicker the wire gets. Most of the time I will use 14swg-20swg wire  which allows for heavy texturing this is just too thick for most machines to get any real speed up when working.

To get over this I made a machine from a 250w low voltage dimmable transformer and suitable dimmer switch, I am not going to show how I did it here as a qualified electrician checked it for me and while it is fine for my own use I obviously can not allow students or friends to use it.

I had seen This machine at Woodart-Products online but always like to try things out before I spend money, they were at the seminar so I asked to use one for a try out and it worked well with loads more power still available than what was needed for 20swg. It also has an air pump which keeps the handle cool and blows the smoke away from you as you work (correct extraction is still needed though as the smoke has to go somewhere).

Any way I was impressed so I purchased two, this one and the next one down for classes I am putting together to add to the other two pyro-machines, quite an investment but the speed by which I can now texture the pieces has probably halved as the power pick up is much quicker with much less lose of heat.

No I don't get commission, but have tried many units over the last couple of years and this one is as powerful as the home made unit but CE rated so conforms for students and is competitively priced compared to other powerful units I have tried.

There are details on-line of how to make a home made branding pyro machine but this is for people to research themselves at their own peril.

Offline fuzzyturns

  • platinum
  • *****
  • Posts: 978
    • Fuzzy Turns
Re: WIP
« Reply #6 on: August 26, 2015, 09:00:57 AM »
I look at your heavily pyrographed pieces and cannot but wonder whether you wouldn't be better off with a power carver? After all, it cuts the material instead of burning it, so no smoke and no burned edges. Should be a lot faster, and certainly better for your health.

And if you want the burnt edges, you could still do that later, but with much less effort. Am I missing something here?

Offline Mark Sanger

  • platinum
  • *****
  • Posts: 807
    • Mark Sanger Web Site
Re: WIP
« Reply #7 on: August 26, 2015, 09:28:08 AM »
I look at your heavily pyrographed pieces and cannot but wonder whether you wouldn't be better off with a power carver? After all, it cuts the material instead of burning it, so no smoke and no burned edges. Should be a lot faster, and certainly better for your health.

And if you want the burnt edges, you could still do that later, but with much less effort. Am I missing something here?

Hi Wolfgang

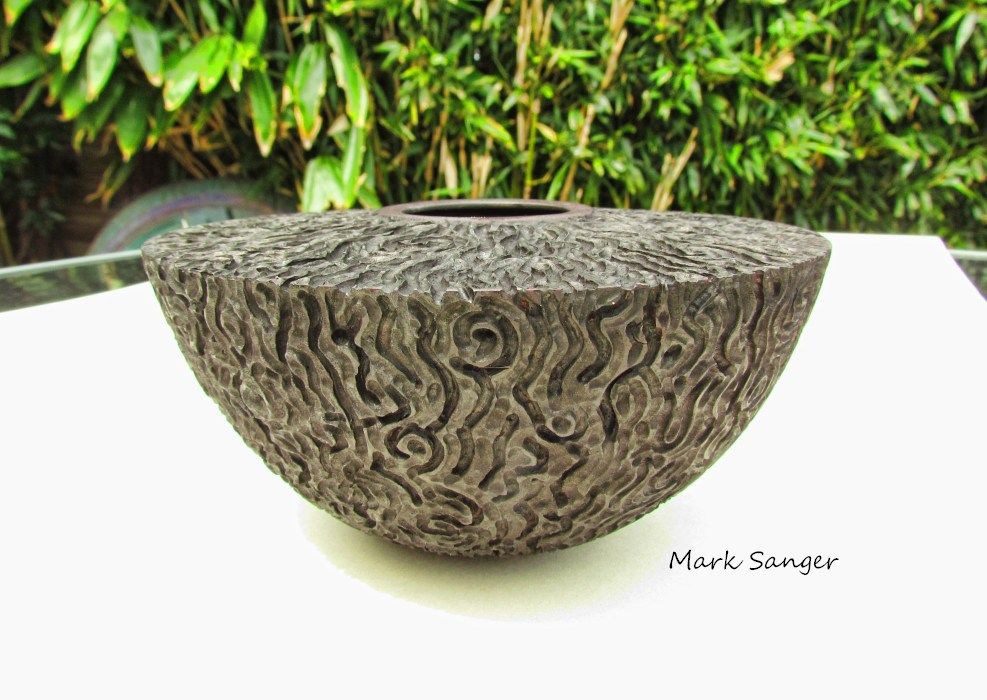
In much heavier carving/texturing you are right it is a better option, although while there is not the smoke there is very fine dust which is also a problem. I do indeed use both methods, however the problem with power carving is that on softer woods such as sycamore no matter how fast and sharp the cutter you can still get some fluffy edges unless you have a very very high speed carver. Finishing with diamond burrs and finishing cones is something I co but it is another process and on very fine detail is a real pain.

Branding not only gives me exceptional detail it also gives me exceptional control as well as sealing/burning the edge to finish without sanding.

With a powerful unit I can carve to a depth of 1-2 mm pretty much as quick as with a burr (If I had the NSK rotary tool then I would be able to carve much quicker, but these are around £600 just for the carver then you need a good compressor, so you are looking at a big expense, then you have the dentist drill noise, dust) the Micro motor I have goes to 45,000 rpm and is more than good enough for my needs. But yes if you have the money to invest in a 300,000-400,000 carver there are other options but they are very expensive.

Also for very fine and intricate work the fine pyro blades allow you to obtain very fine detail that I can not with a micro burr, lines parts of a mm are difficult to cut with a burr as the point is so fine that the center speed is so low it can be problematic with the burr veering due to the grain.

During my travels I have been privileged to work with masters in texturing and all of them for fine detail use pyrography for these very reasons, so having learnt from these people I work as shown.

You can achieve so much more with a powerful pyro unit, but yes when more material removal is required then I use a micro motor but for these pieces you are only texturing 1-2 mm deep max and the positives of a powerful pyro for me unit outweigh the use of a rotary tool by far on this wood and detail. But yes as shown on the piece at the bottom, indeed it was a better option to first carve and then finish with a pryo ball end wire.

Currently I am having 'another' workshop move around, seems like déjà vu as I only had my last move around and to take care of the smoke as soon I will not be able to sit outside I am installing a cooker hood with inline fan to extract straight out of the workshop, a cheap cooker hood can be picked up for £50 or you can make something similar out of 2 ply to catch the smoke, inline fan £30 some piping and you have excellent extraction straight out of the workshop.

hope this clarifies when and why I use a pyro unit.


« Last Edit: August 26, 2015, 10:06:05 AM by Mark Sanger »

Offline Mark Sanger

  • platinum
  • *****
  • Posts: 807
    • Mark Sanger Web Site
Re: WIP
« Reply #8 on: August 26, 2015, 09:33:39 AM »
oh forgot, also with shaped pyro wire you can duplicate exactly the same repetitive shapes with ease, something you can not do with a burr.


Offline The Bowler Hatted Turner

  • platinum
  • *****
  • Posts: 2260
Re: WIP
« Reply #9 on: August 26, 2015, 12:13:43 PM »
Mark thanks for posting this, very informative. When you come to think about your extraction something you may consider (in order to initially save some money is using the cardborad tubing from the centre of carpet rolls from Carpet Right or places like that. It actual fits the extractor system and is certainly much cheaper.

Offline Mark Sanger

  • platinum
  • *****
  • Posts: 807
    • Mark Sanger Web Site
Re: WIP
« Reply #10 on: August 26, 2015, 03:30:49 PM »
Mark thanks for posting this, very informative. When you come to think about your extraction something you may consider (in order to initially save some money is using the cardborad tubing from the centre of carpet rolls from Carpet Right or places like that. It actual fits the extractor system and is certainly much cheaper.

Now that's an idea, my good lady works for a family interiors company, so I will get it from there. She would divorce me if I even stepped foot into a carpet wrong.

Offline georg

  • TONY & DI
  • platinum
  • *****
  • Posts: 1475
    • Anthony George
Re: WIP
« Reply #11 on: August 26, 2015, 07:24:52 PM »

   Looking good so far Mark....... The pyro machine looks a good bit of kit, will stick to the one we have for now though.
   Looking forward to seeing the finished piece.
   Regards Tony & Di
"If you always do what you always done, you always get what you always got" 

http://www.anthonygeorge.net/

Offline Mark Sanger

  • platinum
  • *****
  • Posts: 807
    • Mark Sanger Web Site
Re: WIP
« Reply #12 on: August 26, 2015, 08:27:13 PM »

   Looking good so far Mark....... The pyro machine looks a good bit of kit, will stick to the one we have for now though.
   Looking forward to seeing the finished piece.
   Regards Tony & Di

It should be finished soon so will hopefully it will be at Yandles.

Offline Mark Sanger

  • platinum
  • *****
  • Posts: 807
    • Mark Sanger Web Site
Re: WIP
« Reply #13 on: August 27, 2015, 04:41:02 PM »
Hi all

Here is an update.

The texturing of the main form is now complete. I wasn't happy with the size of the recess on the front so rework this and reduced it in size. Next will be the colouring, lid and finial.


Back view


This one I started this afternoon and to date is titled 'Haven't gotta clue' as well I haven't as yet and don't know where it is going, the only thing I started with was the texture of cracked stone.


That's about it for today, young-lings home and I have the orders to cook Fajitas this evening so off out shopping.  :)
« Last Edit: August 27, 2015, 04:43:00 PM by Mark Sanger »

Offline The Bowler Hatted Turner

  • platinum
  • *****
  • Posts: 2260
Re: WIP
« Reply #14 on: August 27, 2015, 08:39:15 PM »
Mark I hate to drop a spanner in the works but where you made the recess smaller the texturing follows the edge on the right hand side.